Creating Process Instance Metrics and KPIs
There are two ways to create a metric or a KPI of a process instance (Fig. 1):
-
click Instance KPI in the toolbar,
-
in the context menu of the metrics and KPIs list select the Add Process Instance KPI option.
|
|
|
Fig. 1. Buttons used to create a process instance metric/KPI.
|
The creation wizard window will open.
You can navigate between the steps of the wizard with the Back and Next buttons. To cancel KPI creation at any step of the wizard click Cancel.
Step 1. KPI Name
|
|
|
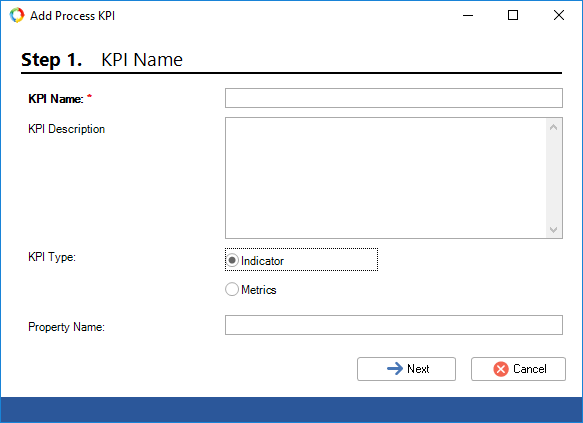
Fig. 2. KPI/metric wizard: Step 1. KPI Name.
|
KPI Description - detailed information about the metric/KPI and its use. The description is written by the process designer when they model the process.
KPI Type - indicator or metric. For an indicator you will need to configure a scale which will be used to evaluate the indicator.
Property Name - name of the property written with English characters. For convenience, the Property Name automatically copies the KPI Name only without spaces. You can change it if you like, but it must only contain English characters and numbers.
Step 2. KPI type
|
|
|
Fig. 3. KPI/metric wizard: Step 2. KPI type (Technical).
|
KPI type:
-
-
Time - KPI defined by the Calculation Rule, which you will specify at the next step. It can store the Time Interval data type. At this step, specify whether the system must use the business calendar when calculating the KPI or not.
|
|
|
Fig. 4. KPI/metric wizard: Step 2. KPI type (Time).
|
Step 2. Calculation Rule.
For the Time indicator type you have to specify the time interval that this KPI will measure in the process, and the calculation rule for the KPI.
The process instance KPI can store the following time intervals:
-
Business process execution time (Fig. 5),
-
-
Business process execution time
The KPI will record the time from the moment the instance is launched until the moment it is completed.
|
|
|
Fig. 5. KPI/metric wizard: Step 2. Calculation Rule. "Business process execution time".
|
Stage execution time
Process stages are marked in the graphic model with the Metric calculation intermediate even. There may be any number of intermediate events of the Metric calculation type in a graphic model. For different indicators you can use different duration of such events.
|
|
|
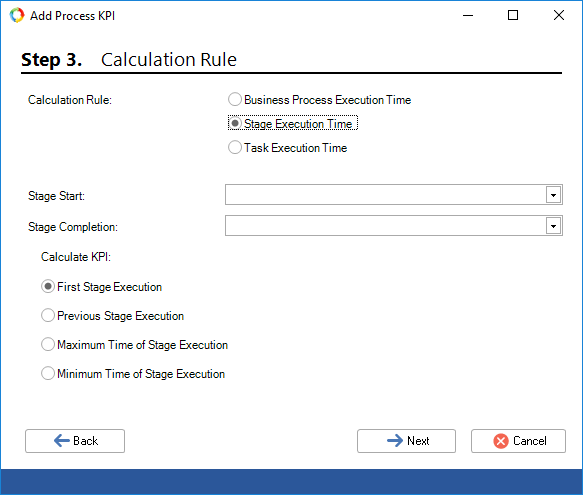
Fig. 6. KPI/metric wizard: Step 2. Calculation Rule. "Stage Execution Time".
|
In the Stage Start and Stage Completion fields enter the names of the intermediate events of the Metric calculation type, which will define the process stage.
A process can go through one stage several times. In the Calculate KPI field specify which time must be recorded in the indicator.
Each time the process goes through the start, the time is reset. When the process reaches stage completion, the time is recorded. Therefore, if the process goes through the start point several times, but goes through the completion point once, ELMA will record the last time. Below you can see an example of such a process:
|
|
|
Fig. 7. Example of a process where the flow can go through the stage start several times, but only once through stage completion.
|
Task Execution Time
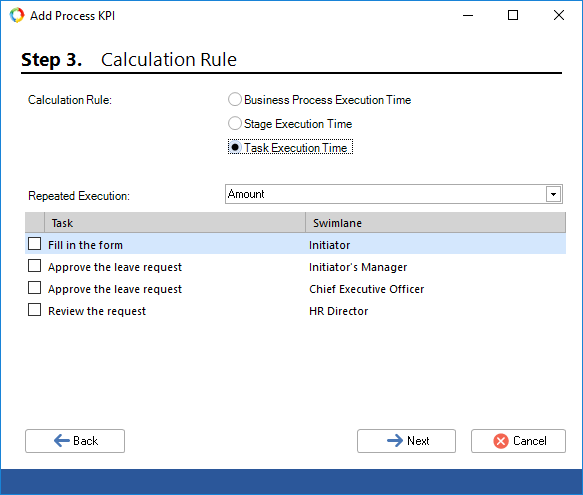
KPIs can record the exact time when the task is executed. The list shows the names of the tasks and the swimlanes, to which they belong on the process map. Select only one task from the list. The KPI will record its execution time.
|
|
|
Fig. 8. KPI/metric wizard: Step 2. Calculation Rule. Task Execution Time.
|
Since one task can be executed several times in a process, specify in the Repeated Execution field the time that you want to record:
-
Total - when a task is executed repeatedly, the time is summed up;
-
Average - the average execution time is calculated;
-
Minimum - the shortest execution time is recorded;
-
Maximum - the longest execution time is recorded;
-
First - KPI records the execution time when the task is executed in the process instance for the first time;
-
Last - KPI records the execution time when the task is executed in the process instance for the last time.
Step 4. Show.
This step is available for process instances but isn't available for metrics. Here you specify the limits of the scale that will be used to evaluate the KPIs.
In Web Application next to the KPI value and the process name you will see red, yellow or green KPI indicator. For evaluation, the actual value obtained during the instance is compared to the value specified in the scale. The KPI's status is set according to the result.
|
|
|
Fig. 9. МPI/metric wizard: Step 4. Show.
|
Plan Value - indicator's value which is considered necessary to fulfil the target plan. This value can be an integer for the Integer type, or a fraction for the Fraction type, or a number of minutes for the Time Interval type.
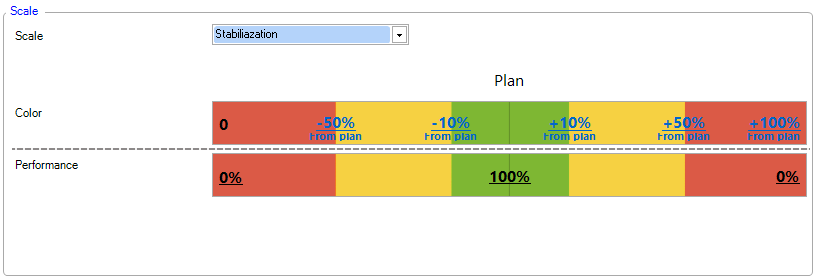
Scale - in the drop-down list select the type of the scale that you want to use.
There are three different status colors in ELMA:
-
Green - KPI values meet plan values
-
Yellow - KPI values are in the acceptable range
-
KPI values are in the unacceptable range
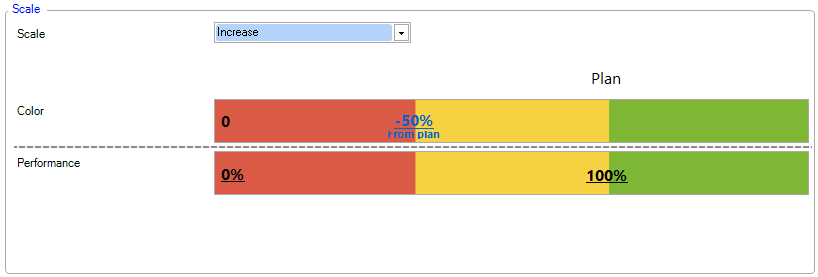
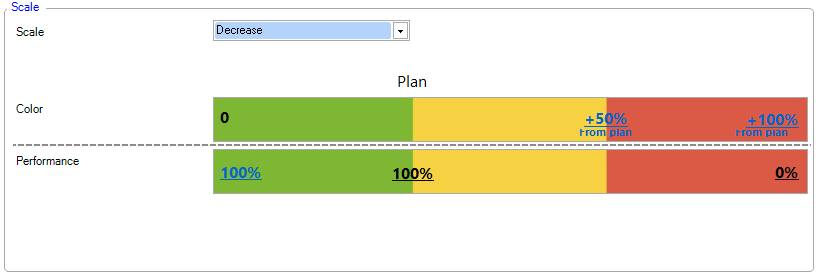
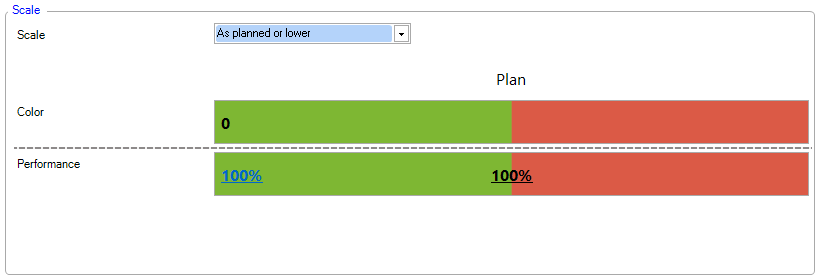
There are five types of scales:
|
Stabilization
|
this type is used to evaluate those indicators that should stay within the limits of their range.
|
|
Increase
|
this type is used to evaluate those indicators that should not be lower than expected.
|
|
Decrease
|
this type is used to evaluate those indicators that should not be higher than expected.
|
|
As planned or higher
|
this scale is a stricter version of the Increase type, which doesn't specify the acceptable deviation from the plan.
|
|
As planned or lower
|
this scale is a stricter version of the Decrease type, which doesn't specify the acceptable deviation from the plan.
|
If the scale reaches its minimum value or exceeds the maximum value, the KPI is not measured. In this case, the KPI works as a metric.
Copyright © 2006–2019 ELMA


