"Linked Objects List" Element
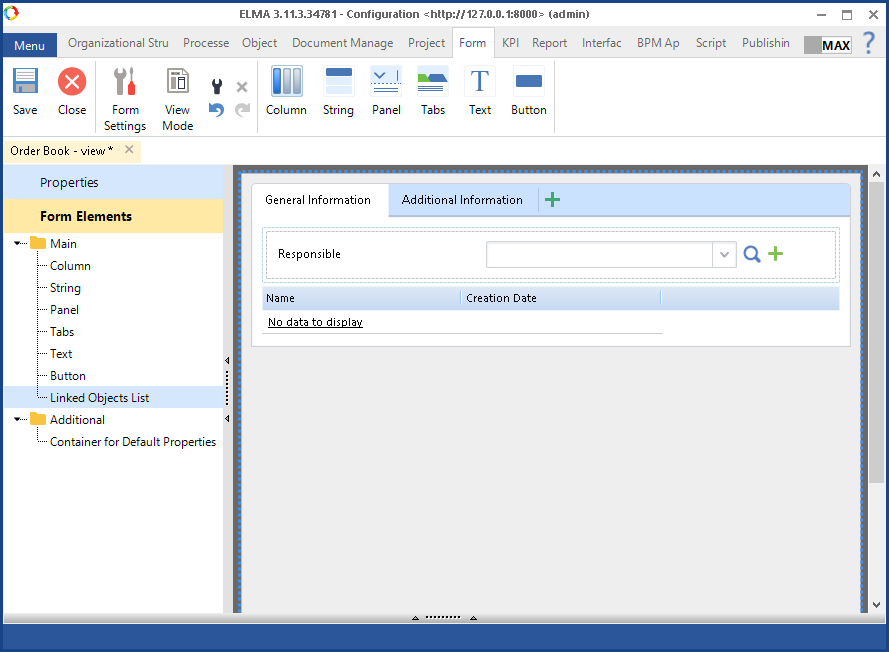
The Linked Objects List element allows displaying the data from a linked object. We recommend adding this element to the view form only.
|
|
|
Fig. 1. "Forms" tab. "Linked Objects List" element
|
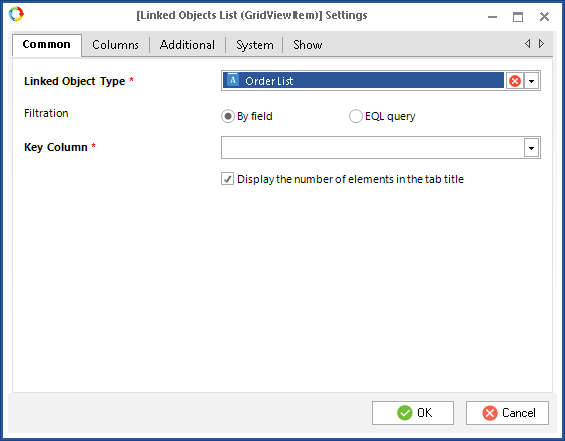
You can configure each of the linked objects lists. The dialog box for configuring the Linked Objects List element includes the following tabs: Common, Columns, Additional, System and Show (fig. 2).
|
|
|
Fig. 2. Dialog box for configuring the "Linked Objects List" element. "Common" tab
|
"Common" tab
An example of this tab is in fig. 2.
Linked Object Type * – type of the object, linked with the current object. A linked object is an object, which has links to the current object instances. The data from the selected object will be displayed in Web Application. This field is required.
Filtration:
|
|
By field – filter the data by field, selected from the Key Column * drop down list (fig. 2).
-
Key Column * – select the key column, which will be used for filtering the data of the linked object. The key column is the column, which has the "Object" property. This field is required.
|
|
|
EQL query – filter data using an EQL query. You can enter the query text in the EQL filter* field (fig. 3).
-
EQL filter* – enter a query in the EQL language (fig. 3).
|
|
|
Fig. 3. Dialog box for configuring the "Linked Objects List" element. "Common" tab
| |
Display the number of elements in the tab title – show the number of filtered objects in Web Application (fig. 4).
|
|
|
Fig. 4. Web application. Display the number of filtered items
|
"Columns" tab
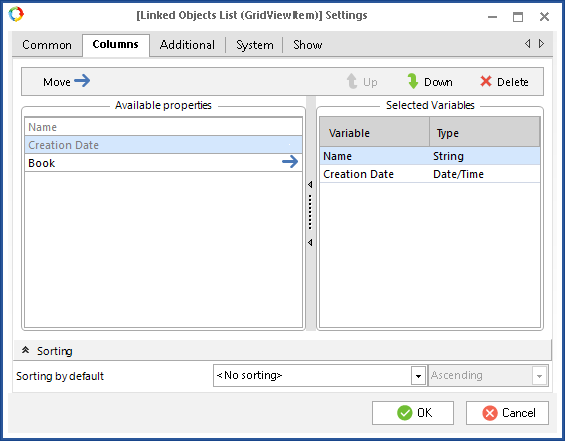
On this tab (fig. 5), you can configure the list of properties, displayed in Web Application.
|
|
|
Fig. 5. Dialog box for configuring the "Linked Objects List" element. "Columns" tab
|
On this tab, you can see the Sorting panel. This panel allows you to configure how data will be sorted in the table in Web Application. The Sorting by default field contains all the variables, listed in the Selected Variables unit, as well as the <No sorting> option. When you select the latter, the data will not be sorted automatically in Web Application. When you select one of the variables, sorting in ascending/descending order becomes available.
"Additional" tab
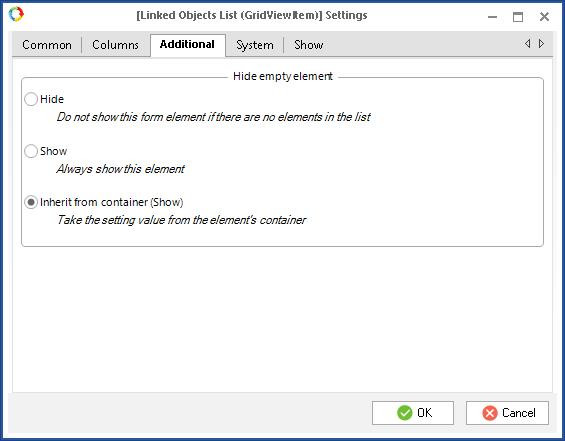
By default, this tab (fig. 6) provides several options that define how content will be loaded in Web Application. Each of the options has a description.
Fig. 6. Dialog box for configuring the Linked Object List element. Additional tab
"System" tab
This tab is similar to the System tab in the dialog box for configuring an object property.
For example, there are Order Book and Orders List objects in ELMA Designer. You need Web Application to display data of the Orders List instances with links to particular Order Book instances, in each Order Book instance.
In this case, you have to create an "Object" property on the Orders List page and select Order Book as the object. Next select the Orders List object as the linked object on the Order Book object view form.
Later, when you create an Orders List object instance, you have to select a linked Order Book instance in the Book field (fig. 7)
|
|
|
Fig. 7. Creating an "Orders List" instance in the web application
|
As the result, Web Application will display the Orders List data on the page of the Order Book instance, selected in the Book field, when creating the Orders List instance.
Fig. 4 and 8 illustrate examples of the Linked Objects List element on the view form in Web Application.
|
|
|
Fig. 8. Object view form in the web application. "Linked Objects List" element
|
"Show" tab
This tab is displayed in the settings dialog box of all the elements and is similar to the tab, described in the general object property
settings.
Copyright © 2006–2019 ELMA


