In the Tasks section you can:
-
view different task groups:
-
incoming – tasks, assigned to the user;
-
outgoing – tasks, assigned by the user;
-
-
department tasks – all the active and overdue tasks, assigned to the department employees;
-
tasks from department – all the active, overdue and completed tasks, assigned by the department employees;
-
archive – completed and checked department tasks;
-
-
-
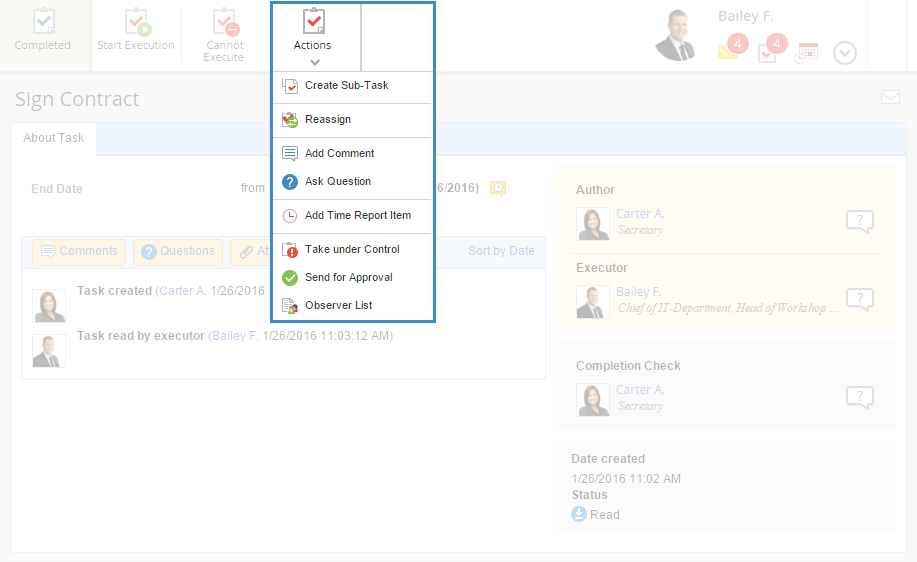
When you click Actions or  on the task page (fig. 1), a dropdown menu opens, which allows selecting task actions, depending on the task type, user role and access permissions. The menu items may change.
|
|
|
Fig. 1. Task page. "Actions" button
|
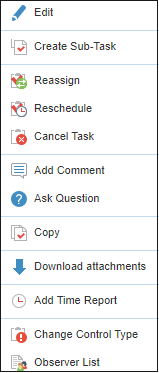
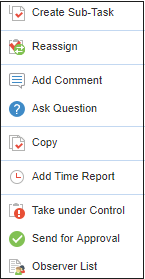
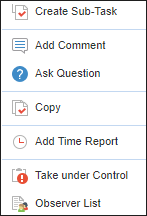
The menu items of the Actions button for different roles are in fig. 2-7.
|
|
|
|
|
Fig. 2. "Actions" button for the task author
|
Fig. 3. "Actions" button for the task executor
|
Fig. 4. "Actions" button for the task co-executor
|
|
|
|
|
|
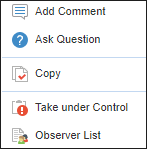
Fig. 5. "Actions" button for the task observer
|
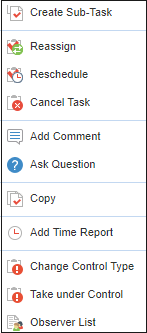
Fig. 6. "Actions" button for the task approver
|
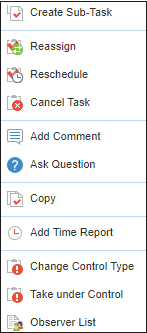
Fig. 7. "Actions" button for the task controller
|
Edit Task
To edit a task, click Actions – Edit on the task page. The task editing page will open, where you can make changes and click Save. The task participants will be notified on the changes. These changes will be shown in the task history panel.
Reassign Task
After the task has been created the executor can be changed. The author, executor and controller can do that.
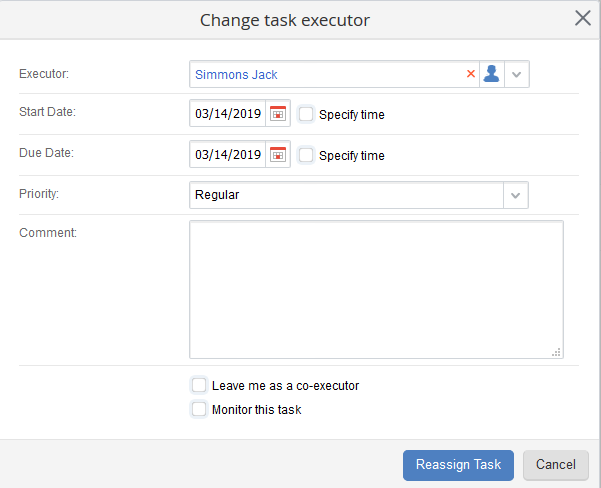
To reassign a task, click Actions – Reassign on the task page. In the opened dialog box, by default, the fields display the information inserted by the author of the task when it was created. If necessary, change the values of the fields and click Reassign Task.
|
|
|
Fig. 8. Change task executor
|
S
tart Date, Due Date – date and time when a task starts and finishes. You cannot change these dates to an already past date. Only users with the
appropriate access permissions can do this. These permissions are configured by the system administrator in
Administration – Users – Access Settings – Global Access Settings – Tasks – Create/Edit tasks for a past date. Priority – shows how important this task is.
Comment – comment on the reassigned task.
When reassigning a task, a user can check the
Leave me as a co-executor box. In that case, the user who is reassigning the task, will remain a
co-executor. This checkbox is available only when an executor reassigns a task.
Apart from that, when reassigning a task, the user can start
monitoring it. To do this, check the
Monitor this task box.
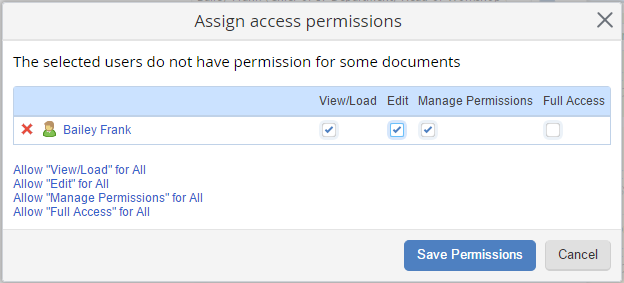
If a document is attached to the task, and the selected executor does not have
access to it, a dialog box (fig. 9) will open, where you have to assign the
permissions and click
Save Permissions.
|
|
|
Fig. 9. Assign permissions dialog box
|
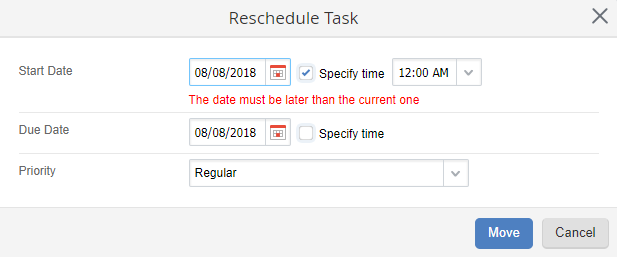
Reschedule Task
To change the task due date, click Actions – Reschedule in the toolbar on the task page. Select the new start or due date in the opened dialog box (fig. 10). Note, that you cannot reschedule for a past date. The Reschedule Task window shows a respective notification.
This dialog box also allows changing the task priority. To save changes, click Move.
By default, a task cannot be rescheduled to a past date. This option is available only to the users with the permissions, assigned in Administration – Users – Access Settings – Global Access Settings – Tasks – Create/Edit tasks for a past date .
Cancel Task
You cannot delete a task in ELMA, but you can cancel it. The task status will change to "Cancelled by the author". This option is available for active tasks, and can be used by the author or supervisor of the task.
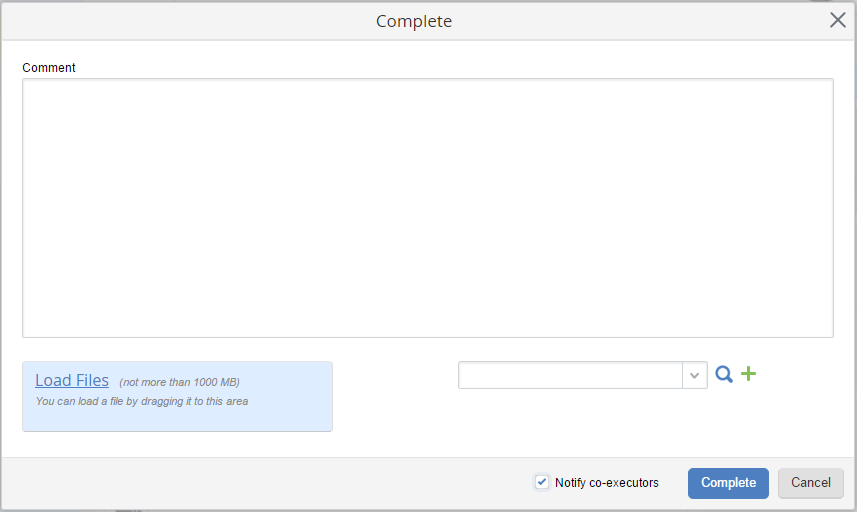
To cancel a task, click Actions – Cancel Task on the task page. You can enter a comment to task cancelling in the opened dialog box (fig. 11).
|
|
|
Fig. 11. "Complete" dialog box
|
In this dialog box you can also upload files and documents. To save changes, click Complete.
The cancelled task will not be displayed in the Tasks section and users will only be able to view it with the task search.
Add Comment to Task
Add Question to Task
Copy Task
After creating a task, you can copy it. This feature is useful for copying tasks with very complex content. All task participants except for approvers can copy the task. It is not allowed to copy completed tasks and document decision based tasks.
To copy a task, click Actions – Copy in the toolbar of the task page. A window that opens is similar to that for creating a task. All the data from the original task is automatically copied to the new tasks. The copied data can be modified. After making all the changes, click Save in the toolbar.
Download attachments
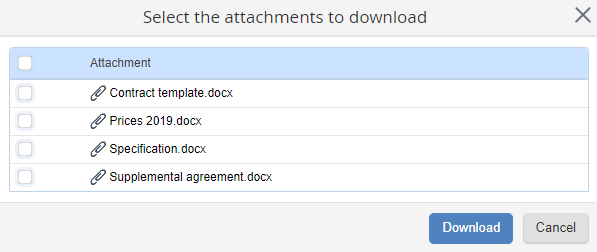
If the task contains attachments added to the task when it was created or later in a comment, you can download them as a .zip archive. Downloading the archive is available to all user roles.
To download the archive, go to the tasks page and click Actions - Download attachments in the top menu. In the provided dialogue box (fig. 12) check the attachments that you want to download.
|
|
|
Fig. 12. Selecting attachments
|
To quickly select or deselect all the attachments, check the checkbox in the top left corner of the table.
Then click Download. The attachments will be downloaded as a single archive regardless of their number.
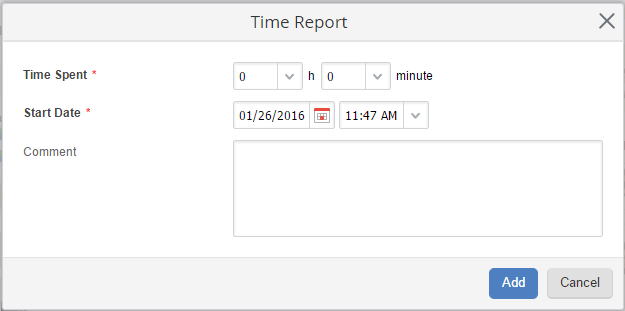
Add Task Time Report
In ELMA, you can add a time report to a task. All the user roles can do it, except for the task observer.
To add a time report, click Actions – Add Time Report Item on the task page. Select the number of spent days and hours, task execution date and time in the opened dialog box (fig. 13). These fields are required.
|
|
|
Fig. 13. "Time Report" dialog box
|
You can add a comment in this dialog box. To save the changes, click Add. After you have saved the changes, the task is not executed. All the added time report items are displayed on the task page, Time Report Log tab.
Send for Approval
After you have created a task, you can send it for approval. Only the task author can do that. The task author can add the approver only when creating the task.
To send a task for approval, click Actions – Send for Approval on the task page. Select the required user, approval start and due date in the opened dialog box (fig. 14). You can also add a comment.
|
|
|
Fig. 14. "Send for Approval" dialog box
|
Copyright © 2006–2019 ELMA