Create a process using the Process Wizard in ELMA Designer. There are two methods of starting the Process Wizard:
-
On the Process List tab, click Add in the toolbar;
-
On the Process List tab, right-click to open the context menu and select Create Process.
|
|
|
Fig. 1. The Add button on the toolbar and Create Process item in the context menu.
|
A process is created in two steps.
Step 1: Common properties.
The first step is to set the required parameters of the process.
-
Name - Must be short and meaningful; it must describe the scope of the process; allow users to identify the process easily and prevent them from starting a wrong process. The name is displayed in the process list in the Designer and Web Application.
-
Process Group - Shows the location of the new process in the existing structure. The new process will belong to the group specified in this field.
 - Click to open the list of process groups.
 - Click to add a new group.
In addition, at this step, you can change certain system variables. These variables are grouped into three blocks: Data Structure, Process Metrics Structure, Process Instance Metrics Structure. Click on a block header to view or hide its contents. Each block contains two fields: Class Name and Table Name in Database; usually their contents are similar. A description placed under each field helps you to understand how this variable will be used in the system.
By default, the fields are filled in automatically; the system removes all non-alphabetic characters (spaces, punctuation marks, special characters) from the Process Name. The system uses specific prefixes and postfixes to generate unique names for each block. For example, the P_ prefix and the _PM postfix are used in the Process Metrics Structure block.
The length of the names in these fields is limited to 26 characters. If the length of the Process Name with a prefix and postfix exceeds 26 characters, the system automatically reduces the Process Name.
If a class name or a table name in the database already exists, the system highlights the fields with conflicting values and displays the following message: The process with this class name already exists (or existed). In this case, it is necessary to change the values of the selected fields to make them unique for this configuration.
|
|
|
Fig. 2. Conflicting values of the class and table names.
|
Click Next to go to the next step.
|
|
|
Fig. 3. The first step of the process wizard.
|
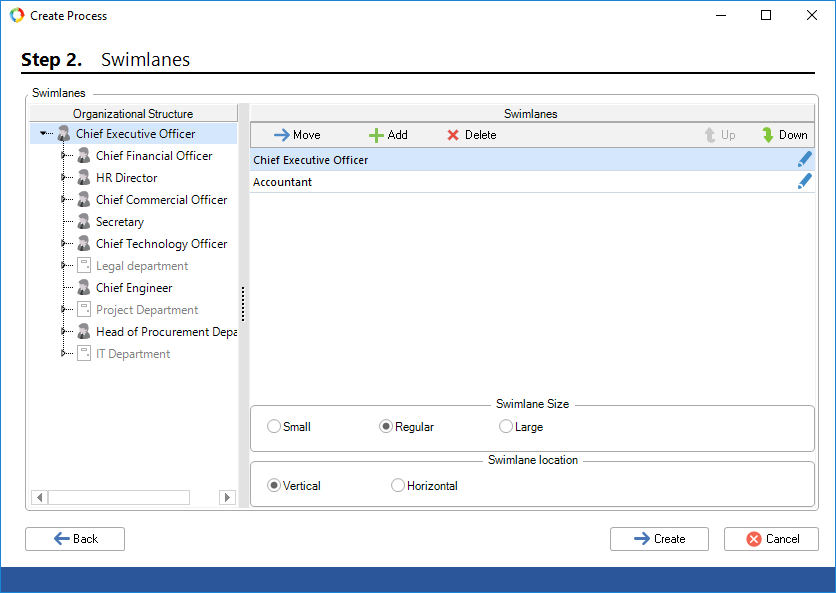
Step 2: Swimlanes.
At the second step, select the process swimlanes. Swimlanes separate and organize activities by participants at all process stages.
If the process swimlanes are not determined and you do not know the process participants, you can skip this step by clicking Next. You can add, change or delete the swimlanes later, while modeling the process.
Add a swimlane using one of the following methods:
-
select an element on the Organizational Structure panel and drag it to the Swimlane field;
-
select an element on the Organizational Structure panel and click  ;
;
-
click  and add a swimlane in the opened window.
If in the Organizational Structure field does not contain elements, then the organizational structure has not been published yet.
 - Delete the selected element from the Swimlanes panel.
 - Move the selected element on the Swimlanes panel. The order of the elements in this field determines the order of the swimlanes in the graphical model.
|
|
|
Fig. 4. Selecting the process swimlanes.
|
At this step, you can also change the swimlane size in the graphical model:
-
Small – Select this option if the swimlane contains less than 4-5 graphic elements;
-
Regular –You can place up to 10 elements in the swimlane of this size;
-
Large – Suitable for the swimlanes with numerous graphic elements.
The swimlane orientation options determine how the swimlanes will be arranged in the graphical model:
-
Vertical – the swimlanes will be arranged from left to right;
-
Horizontal – the swimlanes will be arranged from top to bottom.
When you click Next, the system creates the process. You will be automatically redirected to the process page in the Designer, where you can start modeling the business process.
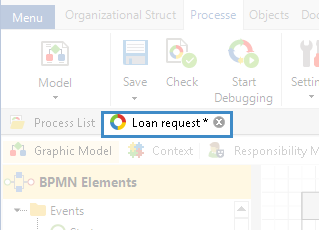
When editing a business process model, a * symbol appears next to the tab name (fig. 5), which indicates that there are unsaved changes in the business process.
Fig. 5. Unsaved business process tab
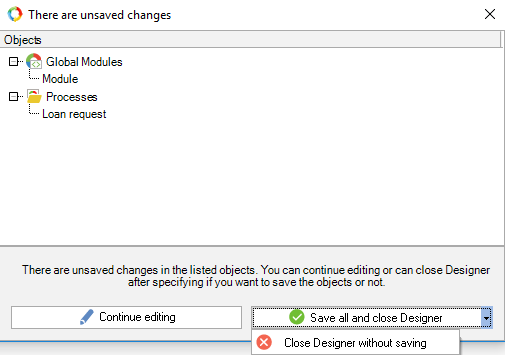
If you try to close ELMA Designer without saving the changes in a business process, a dialog box with the list of all processes with unsaved changes will be displayed (fig. 6).
Fig. 6. Unsaved changes dialog box
Select one of the options in the dialog box (fig. 6):
-
Continue editing – close the dialog box and return to editing the business process;
-
Save all and close Designer – save the changes and close ELMA Designer;
-
Close Designer without saving – close ELMA Designer without saving the changes in the specified business processes.
Copyright © 2006–2019 ELMA


