Custom Form for Creating Object Instances
Starting from version 3.11.8, the possibility to create a custom form for adding object instances in Web Application was implemented.
This article describes the settings that need to be configured in ELMA Designer and shows an example of a form.
Let's create a Property Owner object. Information about the different property will be added to it: vehicle, real estate. Creation and display form for each property type will be different.
First, create the objects in ELMA Designer:
- Property (parent object for all the property types);
- Real estate (child object. Base type - Property);
- Vehicle (child object. Base type - Property);
- Property owner.
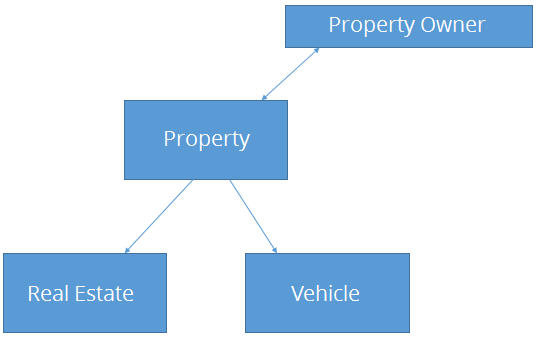
Fig. 1. Scheme of base and parent objects
Create the Property object (in the Common Module group). On the Additional tab, check the Allow to create heirs box.
.png)
Fig. 2. "Property" object page. Additional tab"
Open the Forms tab and create any form (do not add anything on it) and click Form Settings in the toolbar. In the opened dialog box, open the System tab.
.png)
Fig. 3. "Property" object form settings
Copy the UID of this form, you will need it later.
Save and publish the object.
Create the Real Estate object. It will be a child object. Open its Additional tab and select the Property object as its base class.
.png)
Fig. 4. "Real estate" object page. Additional tab
Create the Vehicle object. It is also a child object, base class - Property.
.png)
Fig. 5. "Vehicle" object page. Additional tab
Save and publish both objects.
Create the Property Owner object. Leave all the settings unchanged. Add the "Property" attribute. Type - "Property", Link type – Many-to-many.
.png)
Fig. 6. "Property" attribute settings
Open the Forms tab and create a form for this object. Add the "Property" attribute to this form. Double click on this field to open its settings. Open the System tab.
.png)
Fig. 7. Property settings. System tab
Next to the Razor Form field click on the editing button. The Razor markup editing form will open. In Select form for editing select Standard Interface: Editing. Click Edit. Replace the standard code with this:
@model IEnumerable<Property>
@using EleWise.ELMA.ConfigurationModel
@using EleWise.ELMA.Model.Views
@using EleWise.ELMA.Web.Mvc.Html
@using EleWise.ELMA.BPM.Web.Common.Mvc.html

@Html.EntityCollection(new Guid("26b2e20c-1a59-4df8-a4b8-4dd97c9e8030"))
Insert the UID you copied earlier as the value in Guid.
The window will look like this:
.png)
Fig. 8. Razor markup editing window
Save and close this form.
Set the created form as the default form on the Forms tab.
Save and publish the created objects. Restart the ELMA server.
Add the required properties for the Real estate and Vehicle objects.
For example, add the "Real estate type" and "Address" properties to the Real estate object, and the "Name" and "Type" properties to the Vehicle object.
Save and publish the objects. Restart the ELMA server.
Configure forms for the Real estate and Vehicle objects. On the Forms tab, double-click on the existing form (it is inherited from the base object Property).
.png)
Fig. 9. Forms tab
Add the required properties to the form. For example, the form of the Vehicle object may look like this.

Fig. 10. Vehicle object form
Save and close the form.
After configuring the forms, save and publish the objects.
In Web Application, go to the Property Owner object and add an instance. The form for adding an instance will look like this.
.png)
Fig. 11. Form for adding an instance
Enter the owner name. To add information about the owner's property, click Create. In the opened window, select a property type - Real estate or Vehicle.
.png)
Fig. 12. Selecting property type
For each selected object, a form will open, which was configured in the Designer.
For example, the form for the Real estate object will look like this.
.png)
Fig. 13. Form for adding a Real estate instance
After clicking Save the entered data will be displayed on the form for adding a Property owner instance. After that, you can add information about another property owner in the same way.
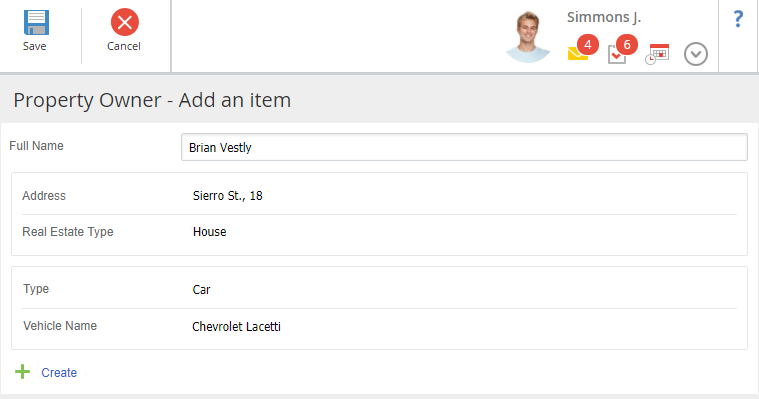
Fig. 14. Form for creating a Property owner instance
If you mouse over an instance, the![]() buttons will appear. Using these buttons you can edit or delete the information on the selected form.
buttons will appear. Using these buttons you can edit or delete the information on the selected form.