Example of creating a complex report
This article describes the entire process of creating a complex report: creating a query to the database (DB), configuring the report parameters, developing the report layout. As an example, we will use the report on contractors, created in the article "Example of creating a simple report". In the new report, we will display a sub-report - Scheduled relationships with a contractor.
Designer
In the Reports section of the Designer, create a report that will show information on contractors, industry and the responsible user. Add a field for the sub-report link. Name it "Scheduled Activities". On this link display all the scheduled relationships of a contractor. Use the Contractor, User, and Industry objects. You can find these objects on the Report Data Sources tab, in the Objects unit. In the Objects unit, you can find the required object by the Displayed name field and then check the database table name in the Name field.
.png)
Editing a data source
1.1. In the toolbar click Edit and select Internal (SQL).
1.2. On the parameters tab, add the Responsible parameter (Type: User; Link: Single).
.png)
1.3. Use the query created in the article "Example of creating a simple report". Make some changes to it.
Write a query that will display the contractor name, industry and responsible user. All the specified fields are stored in one table, Contractors, but some of the fields store only the IDs of other tables, therefore link all the required tables in the query.
Query text:
select distinct
Contractor.Name as Contractor
, Contractor.Id
, ContractorIndustry.Industry as Industry
, [User].FullName as Responsible
, Contractor.CreationDate
, ’More’ as LINK
from Contractor
left join [User] on Contractor.Responsible=[User].Id
left join ContractorIndustry on Contractor.Industry=ContractorIndustry.Id
{if {$Responsible} <> Null }
where
[User].Id = {$Responsible.Id}
{end if}
Query description:
select distinct // exclude duplicate rows
Contractor.Name as Contractor // new name Contractor for the Name field
, Contractor.Id// Id of the contractor, used for linking to the sub-report
, ContractorIndustry.Industry as Industry // Industry name for the Industry field
, [User].FullName as Responsible// Responsible name for the user responsible for the contractor
, Contractor.CreationDate
, ’More’ as LINK// add a LINK column for the links to the sub-report.
fromContractor // specify the table to take data from.
leftjoin [User] onContractor.Responsible=[User].Id // join the User table with the Contractor table via the Responsible field from the Contractor table with the Id field from the User table. This is necessary for the report to display the full name of an employee in the Responsible field instead of its ID.
left join ContractorIndustry on Contractor.Industry=ContractorIndustry.Id // join the ContractorIndustry table with the Contractor table via the Industry field of the Contractor table with the Id field from the ContractorIndustry table. This is necessary for the report to display the industry name in the Industry field instead of its ID.
{if {$Responsible} <> Null }
where
[User].Id = {$Responsible.Id}
{endif}// the condition, according to which all the entries are shown if the Responsible field is empty, and only the filtered entries if the parameter is specified.
Report layout
Go to the Display Settings tab and select .NET Razor in the Report Layout unit.
.png)
Go to the Report Layout tab to create a report in .NET Razor. You can write code for displaying data in HTML or use the Template Wizard.
.png)
Move the available fields to the Selected Fields column and click OK. The fields will be displayed in the report.
.png)
As the result, code will be generated in Designer.
.png)
To check the report you can start debugging using the respective button in the toolbar.
.png)
If you do not specify the responsible user, the following result will be displayed:
.png)
The column names are displayed as specified in the query. You can rename the columns in the code:
.png)
<th scope="col">@items.Columns["LINK"]</th>Target value:
<th scope="col">Scheduled Activities</th>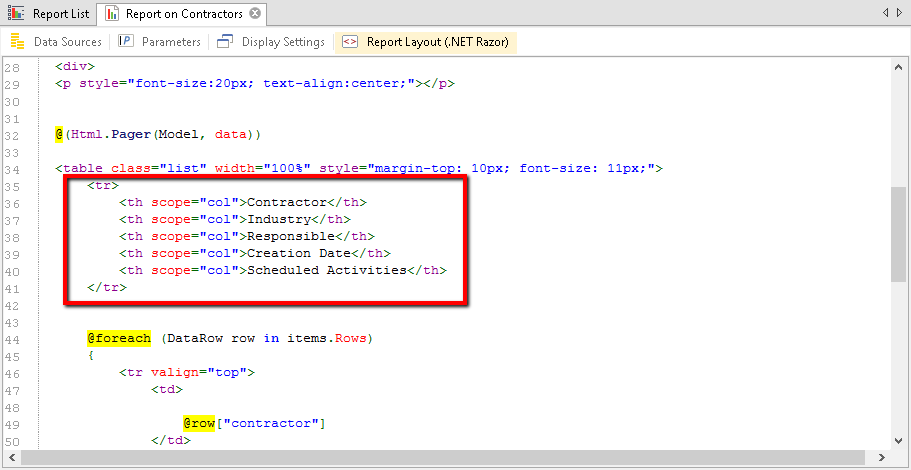
Result:
.png)
Let's add a link to the sub-report Scheduled Activities instead of the word More.
Working with a sub-report in .NET Razor.
In the Report List find the Report on contractors, right click on it and select Create Sub-Report:.png)
In the dialog box for creating a sub-report, the group is already selected. Specify the report name – Scheduled Activities. Next, create a query for the sub-report.
Query text:select tbl.*
from (
select c1.Name as Name, rs1.Theme as Theme, rs1.Description as Description, ’Call’ as DescriptionF, rs1.StartDate as StartDate
from RelationshipCall rsc1
left join Relationship rs1 on rsc1.id = rs1.id
left join Contractor c1 on rs1.Contractor = c1.Id
where c1.id=@CID and rs1.DoneDate is null
union
select c2.Name as Name, rs2.Theme as Theme, rs2.Description as Description, ’Mail’ as DescriptionF, rs2.StartDate as StartDate
from RelationshipMail rsc2
left join Relationship rs2 on rsc2.id = rs2.id
left join Contractor c2 on rs2.Contractor = c2.Id
where c2.id=@CID and rs2.DoneDate is null
union
select c3.Name as Name, rs3.Theme as Theme, rs3.Description as Description, ’Meeting’ as DescriptionF, rs3.StartDate as StartDate
from RelationshipMeeting rsc3
left join Relationship rs3 on rsc3.id = rs3.id
left join Contractor c3 on rs3.Contractor = c3.Id
where c3.id=@CID and rs3.DoneDate is null
) tblThis structure is used to create one table for the selected relationships. As you can see, similar queries are joined using vertical UNION are used for creating the table; these queries will display the same fields of different contractors: Call, Mail, Meeting.
To link a parent report and a sub-report, add a parameter of the Integer type to the Scheduled Activities sub-report in order to pass the Contractor ID to it. In this example, the parameter is called CID..png)
Configure the display of the report in .NET Razor, as described above.
Create a report layout using the Template Wizard as described above..png)
Set the value in the code
@{String temp = "other";}to check the relationship type ‘Call’, ‘Mail’, ‘Meeting’. Check the condition in the cycle:
<text>@if (row["DESCRIPTIONF"].ToString() != temp)

{

<tr style=’background: lightgreen’>

<td>@row["DESCRIPTIONF"]</td>

<td></td>

<td></td>

<td></td>

<td></td>

</tr>

}</text>
//a header will be rendered if <span >String </span> is not ‘Call’, ‘Mail’, ‘Meeting’..png)
Next, the remaining rows and columns are rendered. At the end set the current value to the columns
<text>@{temp = row["DESCRIPTIONF"].ToString();}</text>.png)
Add a link to the sub-report. Add a link for displaying the sub-report using the Create Link button. The link is added to the column, which should contain the link to the sub-report in the code. In this example, it is LINK.
.png)
In the Link Type field select Report, in the Report Name field specify the report name - Scheduled Activities.
Next, specify the value for the sub-report parameter CID – ID, i.e. Contractor ID is passed to the CID parameter of the sub-report, in order to display the scheduled activities on the specific contractor:
In Link Name Field, specify the field, to which the link will be bound in the parent report – LINK. For convenience, check the Open in New Window box:
.png)
As the result, you get the following link:
.png)
To check the report, start debugging:
.png)
When you click More, the Scheduled Activities sub-report will open in a new tab:
.png)
To hide the CID parameter from users, configure the parameter display on the Display Settings tab in the Parameter Input Form unit, select The form is defined by the user (.NET Razor):
.png)
Open the Parameter Form Layout tab, click Template Wizard; it will automatically generate the code for displaying parameters. Make the parameter not visible by wrapping it in div:
@using EleWise.ELMA.BPM.Web.Reports.Extensions
@using System.Data
@model EleWise.ELMA.BPM.Web.Reports.Models.ReportParametersInfo
<style>
.list th {
    background: none repeat scroll 0 0 #666666;
    color: #FFFFFF;
    padding: 5px;
    text-align: left;
}
.list td {
    border-bottom: 1px solid #CCCCCC;
    padding: 3px 5px;
    vertical-align: middle;
}
</style>
 <div style="display:none">
<table style="width:100%" class="listTaskExec">
    @Html.EditorFor(m => m.Parameters)
</table> </div>.png)
Thus, you can create a more complex report using one parameter and .NET Razor layout.