Translating ELMA Interface
In all editions of ELMA (Community, Express, Standard, Enterprise) it is possible to translate the system interface into almost any foreign language (from the list of .NET platform languages).
To make the translation function available to a user, go to Administration – Users – Access Settings – Global Access Settings – Administration – Translate ELMA and assign this permission to the required user group (fig. 1).
![]()
Fig. 1. Assigning access permissions to the Translate ELMA feature
After assigning permissions, the selected user groups will be able to use the Translation Mode button in the user menu (fig. 2).
![]()
Fig. 2. Translation Mode button in the user menu
ELMA offers two translation options:
- via the web interface – in this mode, a user can translate only web page elements;
- via PoEditor – in this mode, all lexical units used in ELMA are translated.
Translating ELMA interface
When you click on the Translation Mode button in the user menu, all the elements of the page that are available for translation will be highlighted in green and will be translated into English by default, and at the top of the page you will see the language selection panel on which you need to select the language required for translation (fig. 3).
![]()
Fig. 3. ELMA main page in the translation mode
To add a new translation language, in the top translation bar > click the ![]() button > a dialog box will open. Select a new language from the dropdown list (fig. 4).
button > a dialog box will open. Select a new language from the dropdown list (fig. 4).
![]()
Fig. 4. Adding a new target language
Once a new language is selected, translate all the page elements. To do this, move the mouse cursor over an element and click on the Translate button (fig. 5) or the Translate tooltip.
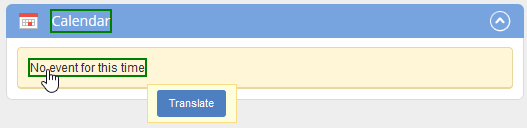
Fig. 5. The Translate button for the web page element in the Translation Mode
In the dialog box that opens, in the Translated string field, enter a translation for the selected element. To save the translation, click the Save button (fig. 6).
![]()
Fig. 6. A translation window of the selected page element
After saving, the entered translation will be displayed for the selected page element (fig. 7).
![]()
Fig. 7. A translated element of the web page
If the Translation String is empty, after clicking the Save button the selected element will be highlighted with a red frame and displayed in the source language (fig. 8).
![]()
Fig. 8. Web page element without a specified translation in the Translation Mode
Translating via the PoEditor section
Along with the above translation option, there is a possibility to translate all lexical units of ELMA. Translation, as well as viewing/filtering lexical units, are carried out in the PoEditor section (fig. 9).
![]()
Fig. 9. Translating ELMA in the PoEditor
![]()
Fig. 10. Translating in PoEditor
In this form, in the Target field, enter its translation. When you hover your mouse over the term, a pop-up window is displayed (fig. 11) with a list of similar phrases from your translation memory.
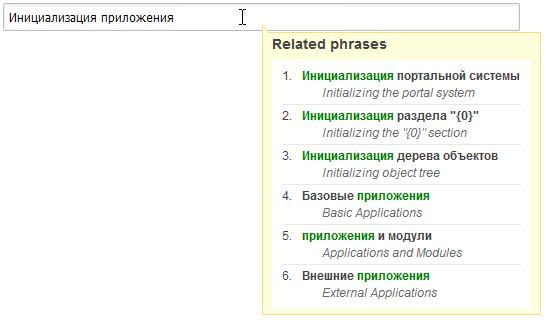
Fig. 11. A pop-up window with the list of similar phrases
Toolbar buttons:
 — Use this button to download archive with language settings. Select the required language from the dropdown list (fig. 12), and click the Download button.
![]()
Fig. 12. Download language dialog box
The archive with the selected language settings will be downloaded to the PC.
 — Use this button to upload the file (project) with language settings. This feature is designed to export/import translation templates from one configuration to another (for example, from the test configuration to the production one). Select the required language from the dropdown list (fig. 13), and attach the archive with the language settings, then click on the Upload button.
![]()
Fig. 13. Upload language dialog box
The archive with the selected language settings will be uploaded to the server.
 — Use this button to publish a new language project. In the dialog box that opens (fig.14) select the required language and click Publish.
![]()
Fig. 14. Publish language dialog box
Once the language is published, all ELMA users will be able to select this language as the interface language.
 — Shows statistics on translated language files. Clicking on this button opens a dialog box (fig. 15) with general statistics and statistics on files.
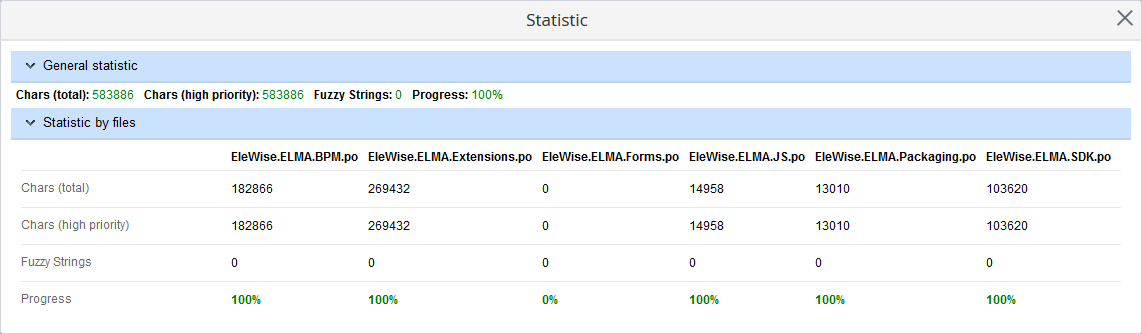
Fig. 15. Statistics Dialog Box