Creating web modules in ELMA
Before creating a module, please read the article Creating module in ELMA.
Displaying data in web application
We need a web module to show information to users in the web application. ELMA module system is based on Orchard CMS 1.0.
Suppose, we need to create a CRM module (please, read Create a server module before continuing).
Preparing the module’s structure
We already have a web module project in our CRM module. Information about the module for Orchard CMS will be stored in Module.txt file:
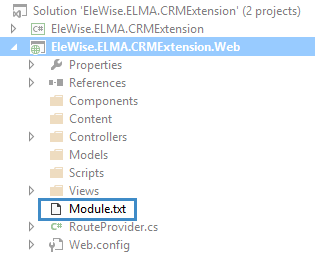
Learn more about the Orchard modules in this article. For your module, you will also need to specify the dependencies of base system modules (learn more in Structure of web modules).
MVC routes for our module are already defined in the RouteProvider.cs file:
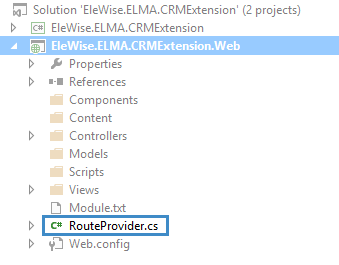
Menu items
We need a menu button to allow users to go to our module. To do that, we can use EleWise.ELMA.Web.Content.Menu.IMenuItemsProvider extension point:
/// <summary>
    /// Menu elements provider
    /// </summary>
    [ExtensionPoint(ServiceScope.Shell)]
    public interface IMenuItemsProvider
    {
        /// <summary>
        /// Create menu elements
        /// </summary>
        /// <param name="factory">Elements fabric</param>
        void Items(MenuItemFactory factory);

        /// <summary>
        /// Localized item names
        /// </summary>
        List<string> LocalizedItemsNames { get; }

        /// <summary>
        /// Localized item descriptions
        /// </summary>
        List<string> LocalizedItemsDescriptions { get; }

    }
We will create a two-tier menu with CRM at the first tier and with Contacts item at the second tier. First tier items from ELMA left menu have 24x24 icons, second tier items – 16x16.
To create the 2-tier menu, we need to create two new items and connect them with each other. For an example, we can see how it was done in the Projects+ module:
Component]
    public class ProjectMenuItems : IMenuItemsProvider
    {
        public const string Projects = "ProjectsModule";
        public const string ProjectsList = "ProjectsList";
        public const string Milestones = "ProjectMilestones";

        public const string PROJECT_ADMIN_MENU = "project-admin-menu";

        public void Items(MenuItemFactory factory)
        {

#region left

            factory.Section("Projects", Projects)
                .Image32(RouteProvider.ImagesFolder + "x32/Project.png")
                .Order(100)
                .Container("left")
                .OnTop(true)
                .Stretch(true);

            factory.Action(new ActionRoute("Index", "ProjectList", new { area = RouteProvider.AreaName }), ObjectIconFormat.x16)
                .Name("Project list")
                .Code(ProjectsList)
                .Parent(Projects)
                .Order(10)
                .Container("left");

            factory.Action(new ActionRoute("Index", "Milestone", new { area = RouteProvider.AreaName }), ObjectIconFormat.x16)
                .Name("Milestones")
                .Code(Milestones)
                .Parent(Projects)
                .Order(20)
                .Container("left");

#endregion

            factory.Action(new ActionRoute("Index", "Admin", new { area = RouteProvider.AreaName }), ObjectIconFormat.x16)
               .Code(PROJECT_ADMIN_MENU)
               .Order(105)
               .Parent("admin")
               .Container("left").Copy(b => b.Container("top"));
        }


        public List<string> LocalizedItemsNames
        {
            get {
                return new List<string> {
                    SR.T("Projects"),
                    SR.T("Milestones"),
                    SR.T("Project list")
                };
            }
        }

        public List<string> LocalizedItemsDescriptions
        {
            get { return null; }
        }
    }
Based on this example, let’s add our items to the menu. To do that create a new class CRMExtensionMenuItems in the Components folder of the web module:
[Component]
    public class CRMExtensionMenuItems : IMenuItemsProvider
    {
        public void Items (MenuItemFactory factory)
        {
            factory.With(f => f.Container("left"));

            factory.Section("CRMExtension", "crmext")
                .Order(100)
                .Image24("#x24/crm.gif");

            factory.With(f => f.Container("left").Parent("crmext"));

            factory.Action(new ActionRoute("Index", "MyCompany", new
            {
                area = RouteProvider.AreaName
            }));
        }

        public List<string> LocalizedItemsNames
        {
            get
            {
                return new List<string>
                {
                    SR.T("CRMExtension"),
                    SR.T("My Companies")
                };
            }
        }

        public List<string> LocalizedItemsDescriptions
        {
            get
            {
                return null;
            }
        }
    }
- When users click on the menu item, the method Index of CompanyController will be invoked (we will create this controller later on in the article). To do that, we create a new instance of ActionRoute To make sure, that this works, we will also need to mark the controller method with EleWise.ELMA.Web.Content.ContentItemAttribute attribute (we will show that below);
- All images must be located in ../<ELMA>/Web/Content/Images.
Creating a new entity
Before we create entities, we need to create the controller. To do that, right-click the Controllers folder – Add – New item… – Class (call it CompanyController.cs):
[ActionLinkArea(RouteProvider.AreaName)]
    public class CompanyController : FilterTreeBaseController<IMyCompany, long>
    {
    }
Add a new action:
public ActionResult Create ()
        {
            var company = InterfaceActivator.Create<IMyCompany>();
            return View(company);
        }
As you can see, in this action we create a new instance of the MyCompany entity and pass it to the view.
Following the MVC pattern, try to remove any complicated logic from your controllers – you have Models for that.
Now we need to create a view. To do that, go to the Views\Company folder and create Create.cshtml view (Add – New item… – MVC 4 View Page (Razor)):
@using ViewType = EleWise.ELMA.Model.Views.ViewType
@model EleWise.ELMA.CRMExtension.Models.ICompany

@{
    Html.Header(SR.T("Create a Company"));
}

@{
    @(Html.Toolbar().Group()
        .ToolbarSubmit(EleWise.ELMA.SR.Save, "#x32/Save.png")
        .ToolbarLink(EleWise.ELMA.SR.Cancel, "#x32/Cancel.png", "javascript:history.back(-1);"))
}

@using (Html.ElmaForm())
{
    @Html.ValidationSummary(false)
    @Html.BuildFormForModel(Model, ViewType.Create,
        q =>
        {
            q.HideForm();
            q.HideAllProperties();
            q.PropertyRow(m => m.Name);
            q.PropertyRow(m => m.ITN);
            q.PropertyRow(m => m.ICE);
        })
}
As a result, we will see the following:
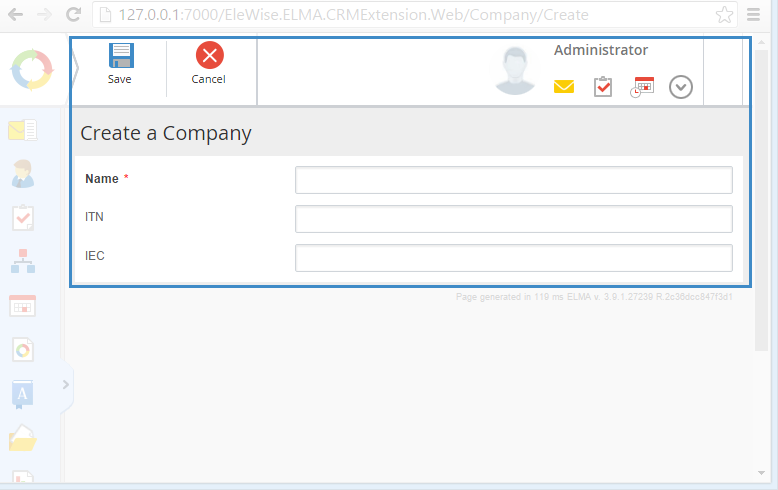
Important things to note are:
- To set a page header, use Header();
- To create a standard ELMA form, use ElmaForm();
- To display entity properties, use BuildFormForModel() and call PropertyRow to display each property. If you make it this way, your objects will be displayed in the same way as standard ELMA objects;
- Use Toolbar() to create a top toolbar.
To save new MyCompany entity, we must create a new action in the controller:
[HttpPost]
        public ActionResult Create(IMyCompany company)
        {
            try
            {
                if (ModelState.IsValid)
                {
                    Manager.Save(company);

                    Notifier.Information(SR.T("\"{0}\" company created"));

                    return RedirectToAction("Index");
                }

                return View(company);

            }
            catch (Exception ex)
            {
                Notifier.Error(ex.Message);
                return View(company);
            }
        }
Here we use Manager and Notifier properties from the base class. As you see, this method is also simple and does not contain any complicated logic aside from exceptions’ handling. In fact, we do not even need to handle the exceptions here, because the base class already have these handlers – if an exception is thrown, it will be processed in the same way.
When we call Manager.Save (company) method, the entity will be saved to the database.
View entity’s information
Now we must add a function to view entities’ information/list of entities.
To view information about the entity, we need to add a new action to the controller:
public ActionResult Details (long id)
        {
            var company = Manager.Load(id);
            return View(company);
        }
Now we need to create a view Views\Company\Details.cshtml for this action:
@model EleWise.ELMA.CRMExtension.Models.IMyCompany
@using EleWise.ELMA.CRMExtension.Web.Controllers
@using ViewType = EleWise.ELMA.Model.Views.ViewType

@{
    Html.Header(SR.T("Company - {0}", Model.Name));
}

@(Html.Toolbar().Group("edit-button").ToolbarButton(
new ActionToolbarItem("toolbar-button-Edit")
{
    Text = SR.Edit,
    ToolTip = "Edit the information about company",
    IconUrl = "#x32/edit.png",
    Url = Url.Action<CompanyController>(c => c.Edit(Model.Id))
}
))

@Html.BuildFormForModel(Model, ViewType.Display,
    q =>
    {
        q.HideForm();
        q.HideAllProperties();
        q.PropertyRow(m => m.Name);
        q.PropertyRow(m => m.CreationAuthor);
        q.PropertyRow(m => m.CreationDate);
        q.PropertyRow(m => m.ChangeAuthor);
        q.PropertyRow(m => m.ChangeDate);
        q.PropertyRow(m => m.ITN);
        q.PropertyRow(m => m.ICE);
    })
As a result, we will see the following:
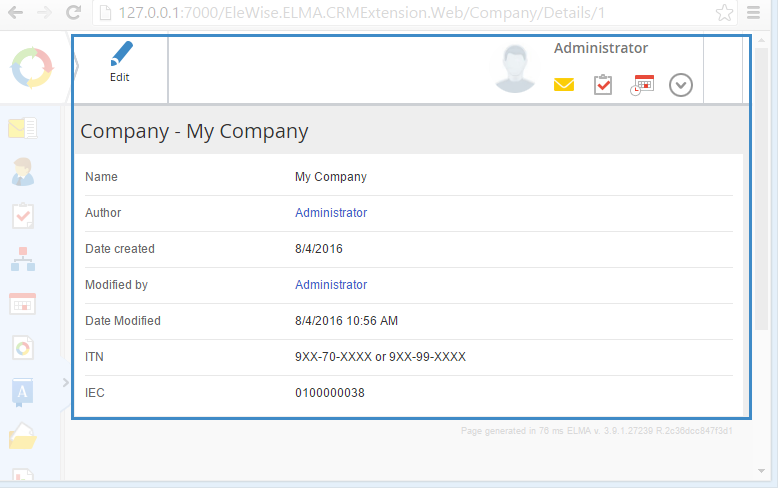
There we used Html.Toolbar() method to add an option to edit entity’s properties to the entity’s view form.
Edit entity
Now we need to implement editing for entity’s properties. To do that, add a new action to the controller:
public ActionResult Edit (long id)
        {
            var example = Manager.Load(id);

            return View(example);
        }
Add a new view Views\Company\Edit.cshtml for this action:
@using ViewType = EleWise.ELMA.Model.Views.ViewType
@model EleWise.ELMA.CRMExtension.Models.IMyCompany


@{
    Html.Header(SR.T("Edit Company - {0}", Model.Name));
}

@{
    @(Html.Toolbar().Group()
        .ToolbarSubmit(EleWise.ELMA.SR.Save, "#x32/Save.png")
        .ToolbarLink(EleWise.ELMA.SR.Cancel, "#x32/Cancel.png", "javascript:history.back(-1);"))
}

@using (Html.ElmaForm())
{
    @Html.ValidationSummary(false)
    @Html.BuildFormForModel(Model, ViewType.Edit,
        q =>
        {
            q.HideForm();
            q.HideAllProperties();
            q.PropertyRow(m => m.Name);
            q.PropertyRow(m => m.ITN);
            q.PropertyRow(m => m.ICE);
        })
}
As a result, we will see the following:
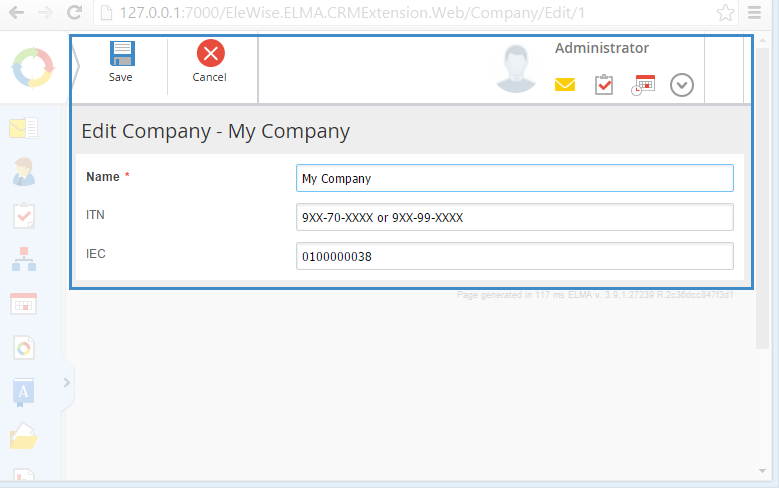
To save the edited entity, we need to add a new action to the controller:
[HttpPost]
        public ActionResult Edit (IMyCompany company)
        {
            company.Save();

            Notifier.Information(SR.T("Company {0} saved successfully", company.Name));

            return RedirectToAction("Details", new
            {
                id = company.Id
            });
        }
After saving, you will be redirected to the entity’s view form.
Actions with an entity (business logic)
View list of entities, search for entities
To show a list of entities and search through it, we need to add a new action to the controller:
[ContentItem(Name = "Customers", Image16 = "#x16/crm_clients.gif", Order = 0)]
        public ActionResult Index ()
        {

            var filterModel = CreateFilter();

            filterModel.Filter = new InstanceOf<IMyCompanyFilter>()
            {
                New =
                {
                    PermissionId = CRMExtensionPermissionProvider.ViewCompanyPermission.Id
                }
            }.New;

            var list = CreateGridData(new GridCommand(), filterModel);

            return View(list);
        }
CreateFilter() function creates new the FilterModel object that is used to display the filter in the Grid.cshtml. We will provide more details on it below.
The InstanceOf class we use to implement interfaces to create object instances.
To show the list of entities we need to add Views\Company\Index.cshtml view:
@using EleWise.ELMA.CRMExtension.Web.Controllers
@model IGridData<elewise.elma.crmextension.models.imycompany>

    @{
        Html.Header(SR.T("Company"));
    }

    @{
        @(Html.Toolbar().Group()
                .ToolbarLink(SR.Add, "#x32/Add.png", Url.Action<CompanyController>(c => c.Create())))
    }

    @Html.Partial("Grid")
As you can see, at the end we call another view Views\Company\Grid.cshtml:
@using EleWise.ELMA.BPM.Web.Common.Extensions
@model EleWise.ELMA.BPM.Web.Common.Models.GridDataFilter<elewise.elma.crmextension.models.imycompany>

    @Html.Partial("Filter/FilterModel", Model.DataFilter.Builder()
    .SubmitText(SR.T("Find"))
    .GridAction(Url.Action("Grid"))
        .ApplayFilterScript(string.Format("applyFilterGrid(’{0}’, ’filteringGridForm’)", Model.GridId))
    .FilterUrl(Url.Action("Index") + "?FilterId=")
    .Model,
    new ViewDataDictionary
    {
        TemplateInfo = new TemplateInfo
        {
            HtmlFieldPrefix = "DataFilter"
        }
    })

    @(Html.FilterDynamicGrid(Model)
        .Columns(c =>
        {
            c.For(m => m.Name).Link(m => Url.Action("Details", "Company", new
            {
                id = m.Id
            }));
            c.For(m => m.CreationAuthor);
            c.For(m => m.CreationDate);
            c.For(m => m.ChangeAuthor);
            c.For(m => m.ChangeDate);
            c.For(m => m.INN);
            c.For(m => m.KPP);
        })
        .Action("Grid"))
DataFilter here has the FilterModel type. Using the Builder function, we fill in the required fields to create the FilterModel instance to pass it to the FilterModel.cshtml.
As a result, we will see the following:

Here we also use Action(“Grid”) to call the Grid() action of the controller. Let’s add it to the controller:
[CustomGridAction]
        public override ActionResult Grid (GridCommand command, [Bind(Prefix = "DataFilter")]FilterModel filter, long? FilterId = null, string searchTasksType = null)
        {
            if (filter == null)
            {
                filter = CreateFilter(filterToMerge: InterfaceActivator.Create<IMyCompanyFilter>());
            }
            else
            {
                filter.Filter.PermissionId = CRMExtensionPermissionProvider.ViewCompanyPermission.Id;
            }

            var data = CreateGridData(command, filter);

            return PartialView(data);
        }
This action will be called during sorting, moving between web pages and some other actions. The attribute of the filter parameter defines the prefix that will be added to the element on the web page. Please note that override modifier is necessary here, as well as optional parameters FilterId and searchTasksType. We must add them because the Grid method is already defined in the controller’s base class.
