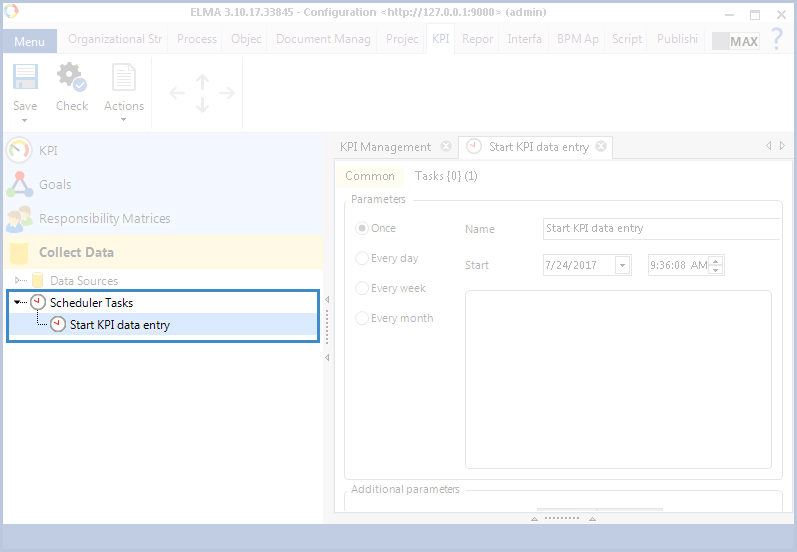
The Scheduler Tasks are used for automatic data collection from different data sources. You can configure scheduler tasks in the ELMA Designer > KPI tab > Collect Data section > Scheduler Tasks (fig. 1)
|
|
|
Fig. 1. ELMA Designer > KPI tab > Collect Data section > Scheduler Tasks
|
In the Web application, all the created scheduler tasks and the data sources involved are displayed in the Administration - System - Scheduler - KPI management.
Creating a scheduler task
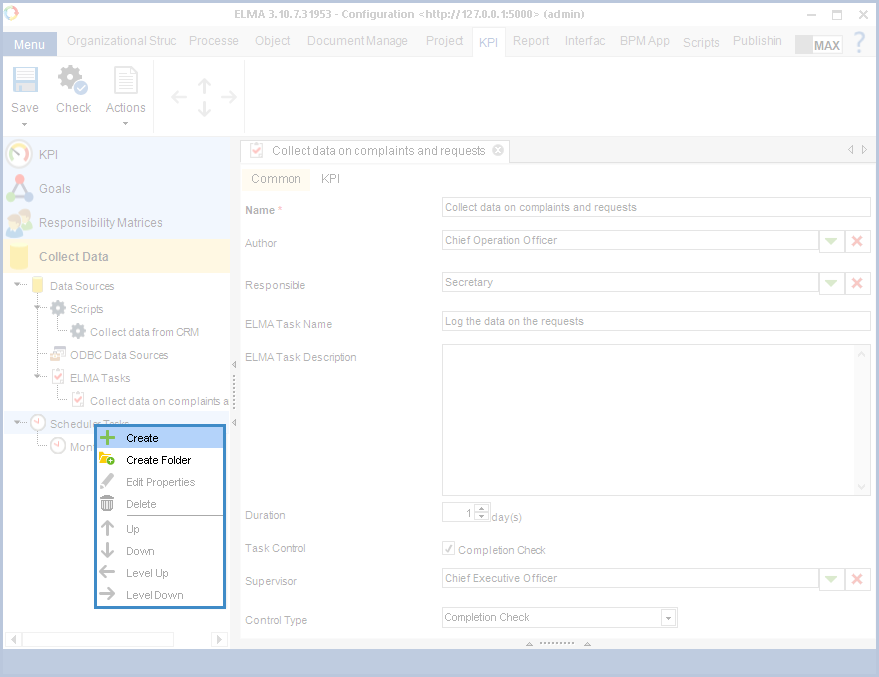
To create a new scheduler task, in the ELMA Designer > in the KPI tab > Collect data section > right click on Scheduler Tasks and select Create in the context menu (fig 2).
Fig. 2. Scheduler tasks context menu.
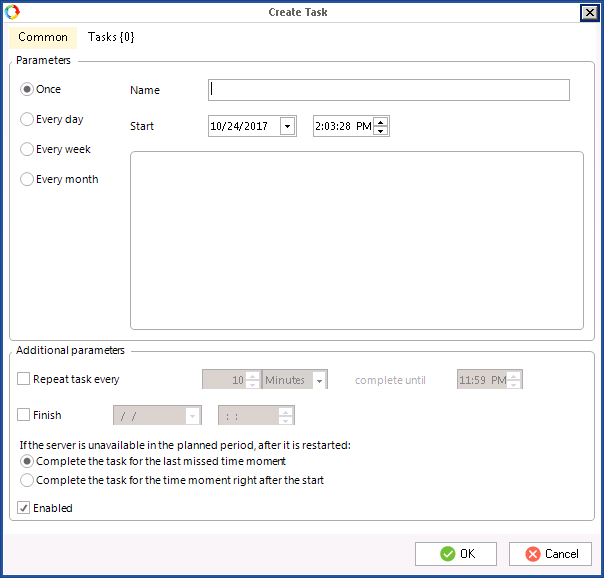
A window for creating a scheduler task will open (fig. 3). Please fill in all the required fields and click OK.
|
|
|
Fig. 3. Scheduler tasks dialog box. The Common tab.
|
This dialog box contains two tabs:
Common (fig. 3) and
Tasks (fig. 7).
On this tab (fig. 3) you configure the task schedule.
The Parameters section
Name – specify the scheduler task name.
Start – specify the date and the time when the scheduler starts checking for the nearest date and time, suitable for executing the first task in accordance with the settings specified below.
It should be noted that if you want a task to be executed only once, the date and time set in this field will be the start date and time for the scheduler task.
Once – execute the task once.
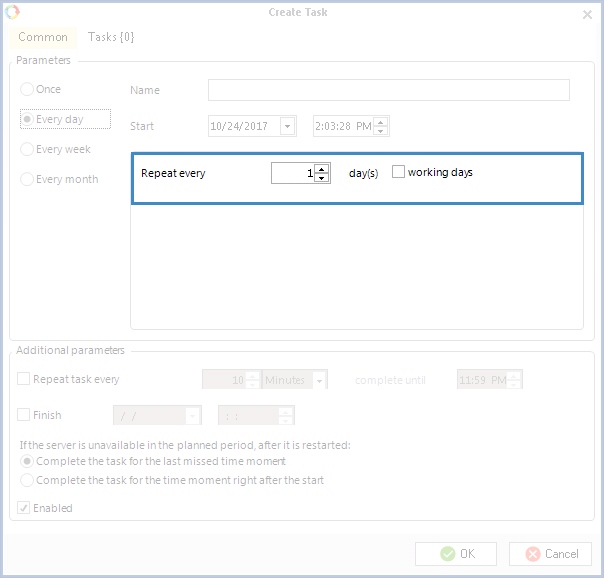
Every day – execute the task every day in accordance with the configured settings (fig. 4).
-
Repeat every – specify how often the task must be executed (in days). 1 – the task will be started every day, 2 – the task will be started every two days and so on.
-
Working days – check this box to execute the task only on working days. The working schedule is determined in the ELMA
business calendar.
|
|
|
Fig. 4. Scheduler tasks. Setting up daily tasks
|
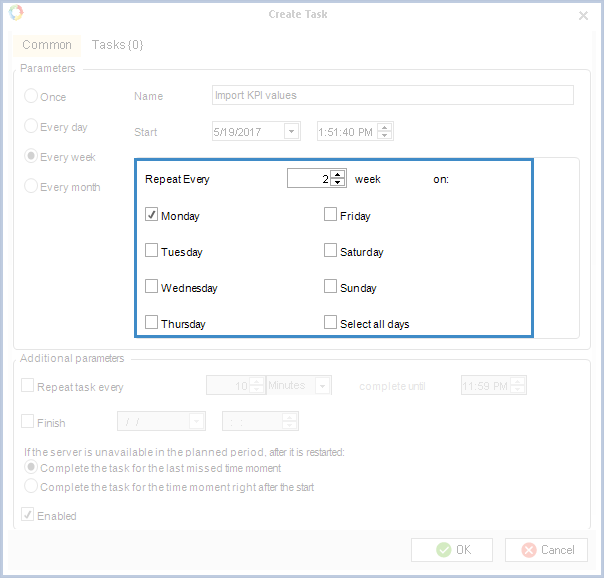
Every week – execute the task every week in accordance with the configured settings (fig. 5).
-
Repeat every {n} week on – specify the task frequency in weeks. For example, if you set "1", the task will be run every week, if you set "2" - every second week. Also it is necessary to select the days of the week in which the task will be executed. To select all days, tick the Select all days check box.
|
|
|
Fig. 5. Weekly task execution.
|
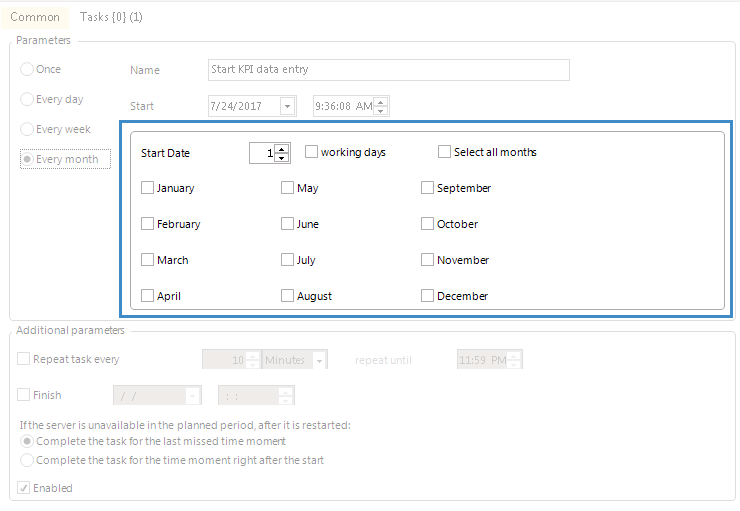
Every month – execute the task every month in accordance with the configured settings (fig. 6).
-
Start date – specify on which day of the month the task will be started.
-
Working days – if you select this checkbox, the task will be executed only on working days. The working schedule is determined in the ELMA
business calendar.
You also need to select months when the task will be executed. To select all months, tick the Select all months checkbox.
|
|
|
Fig. 6. Monthly task execution.
|
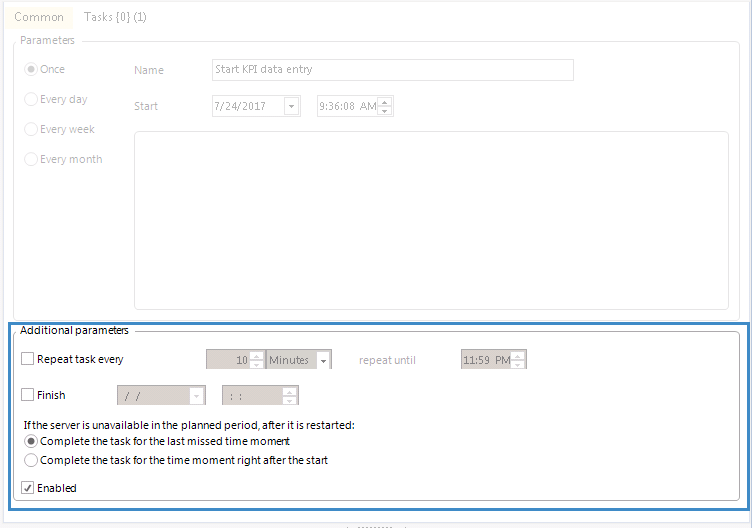
Additional parameters
Repeat task every – specify how often the task must be executed during the set period (fig.7).
-
repeat until – specify the time, until which the task will be repeated.
Finish – specify the date and time when the task execution will be finished. If you do not set up this parameter, the task will repeat with the specified periodicity until it its execution is canceled manually.
If the server is unavailable in the planned period, after it is restarted: select the required option.
Enabled – enable or disable the scheduler. If you tick this checkbox, the task will be executed in accordance with the set up parameters. If you deselect this checkbox, the task will not be executed. use this option if you need to suspend task execution, but you do not want to delete the task.
|
|
|
Fig. 7. Additional parameters
|
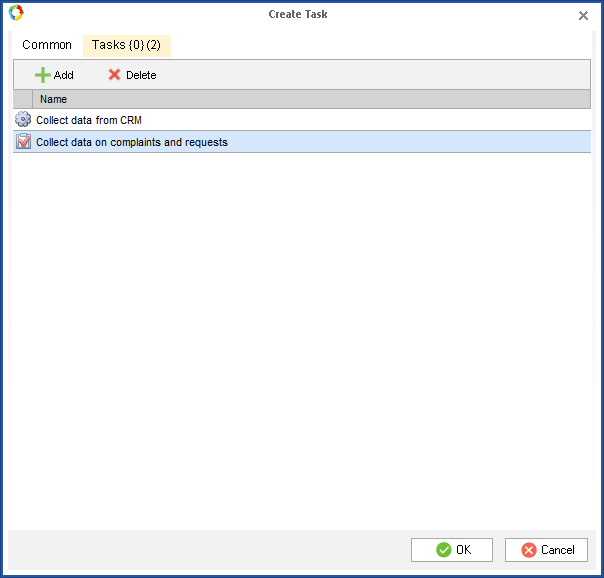
Use this tab (fig. 8) to add
data sources. The number between parenthesis, next to the tab name shows how many data sources were added.
Fig. 8. Tasks tab.
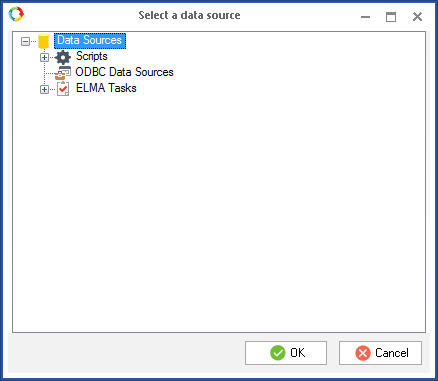
To add a
data source, click Add and select the required data sources in the opened window, then click OK.
Fig. 9 Select a data source for the scheduler task.
Editing a scheduler task
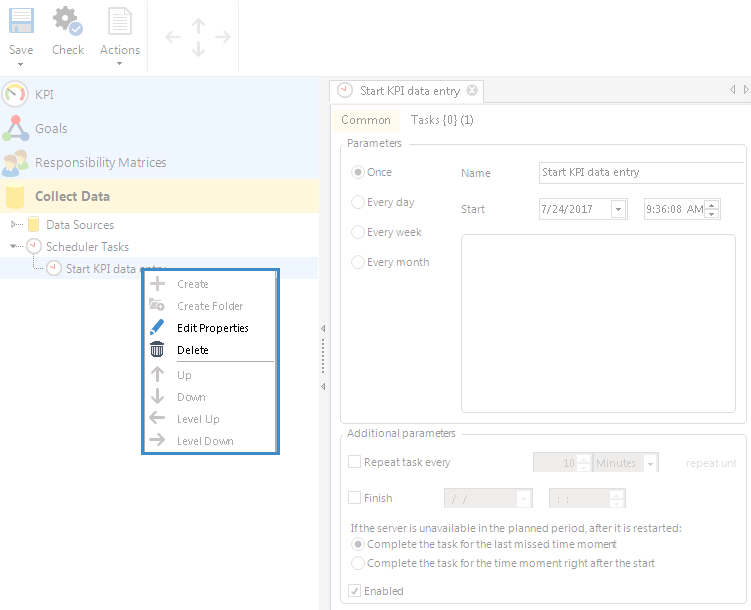
To edit a scheduler task, right click on its name and select Edit Properties in the context menu.
|
|
|
Fig. 10 Editing scheduler task
|
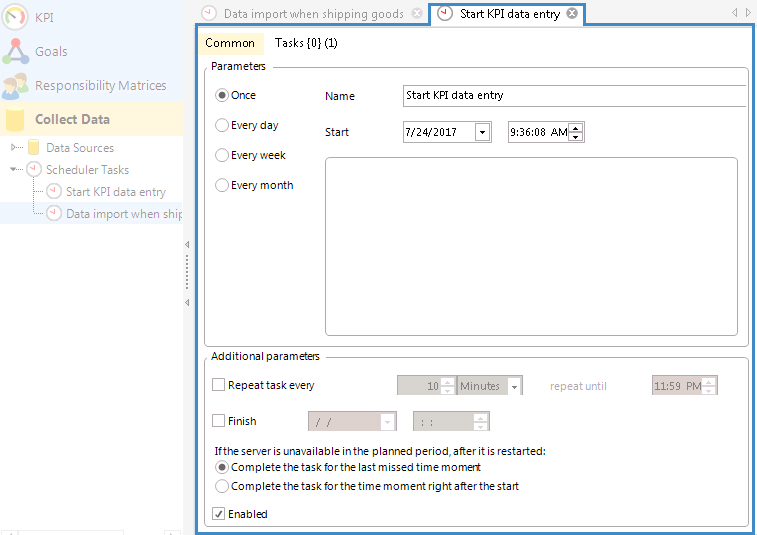
The scheduler task will open in a new tab (fig. 11)
You can read more about the parameters of this tab
here. Make all necessary changes and click Save in the upper menu of the ELMA Designer.
Deleting a scheduler task
To delete a scheduler task, right click on its name and select Delete (fig. 12) in the context menu.
|
|
|
Fig. 12 Deleting scheduler task
|
Examples of setting up a scheduler task
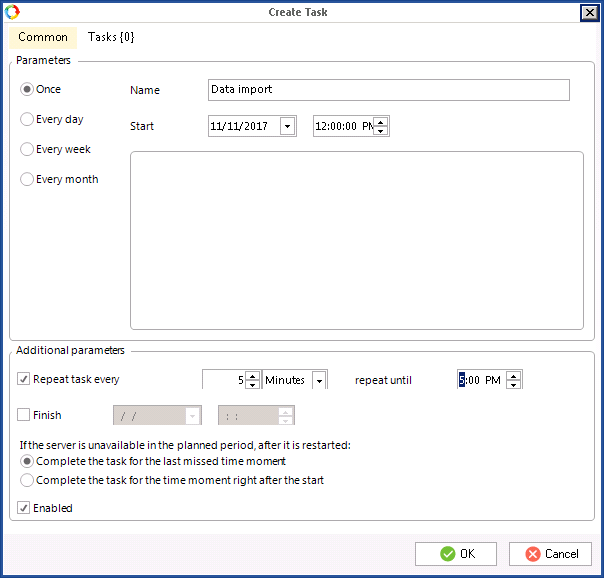
1. In Fig. 13 you can see an example of the following scheduler task: the data will be imported once, on November 11, 2018 at 12:00 p.m. The task will be repeated every 5 minutes until 5:00 p.m.
|
|
|
Fig. 13 Example of a scheduler task
|
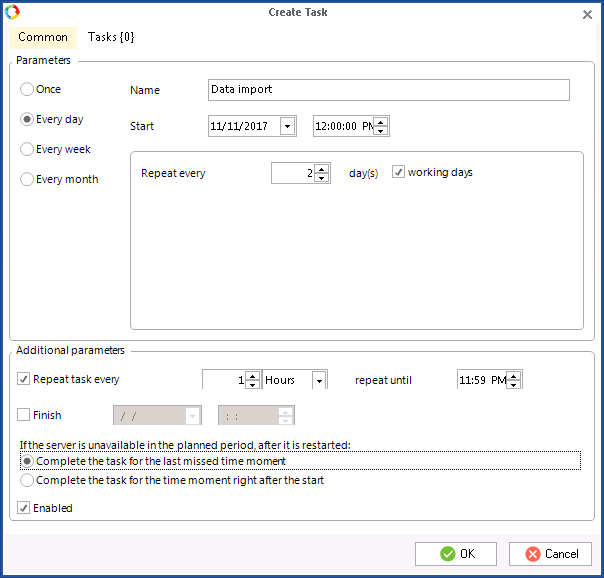
2. In the fig. 14 you can see an example of the following scheduler task: the data will be imported every two days on working days. The task will be executed for the first time on November 11, 2018 and will be repeated every hour until 11:59 p.m.
|
|
|
Fig. 14 Example of a scheduler task
|
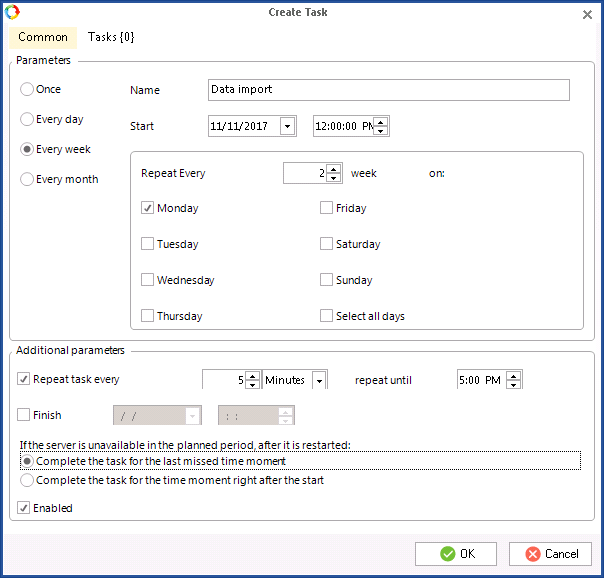
3.In the fig. 15 you can see an example of the following scheduler task: the data will be imported every two weeks on working Monday. The task will be executed for the first time on November 11, 2018 at 12 p.m. and will be repeated every 5 minutes until 5:00 p.m.
|
|
|
Fig. 15 Example of a scheduler task
|
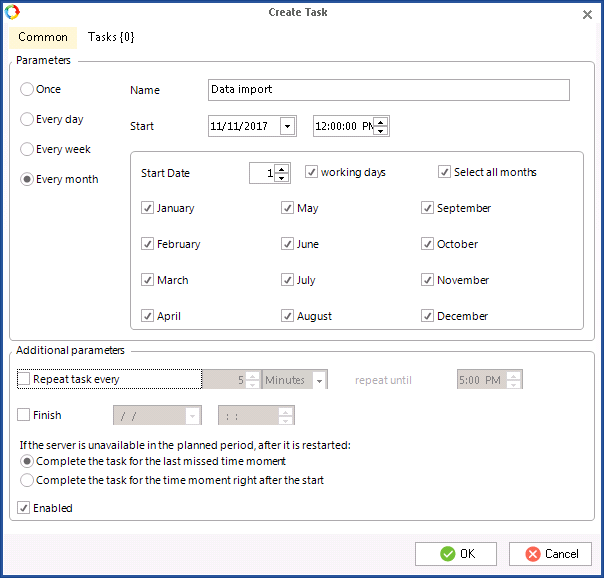
4. In the fig. 16 you can see an example of the following scheduler task: the data will be imported every first working day of the month.
|
|
|
Fig. 16 Example of a scheduler task
|
Copyright © 2006–2019 ELMA
