To collect plan and/or fact values in ELMA Web Application, you can use the ELMA Tasks
data source. Such tasks are created and configured in ELMA Designer in the
KPI tab – Collect Data – ELMA Tasks. The data is filled in in Web Application according to the KPIs. To automatically assign such a task to a
responsible user you have to use the
Scheduler tasks.
Creating an ELMA task
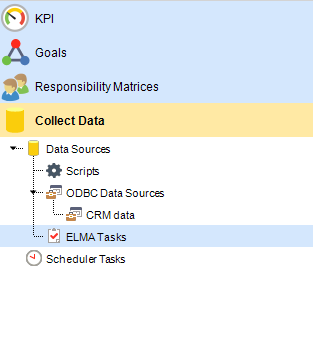
To create an ELMA Task, go to the KPI tab of ELMA Designer, open Collect Data – Data Sources – ELMA Tasks and click Create in the context menu (fig. 1).
Fig. 1. Creating an ELMA task.
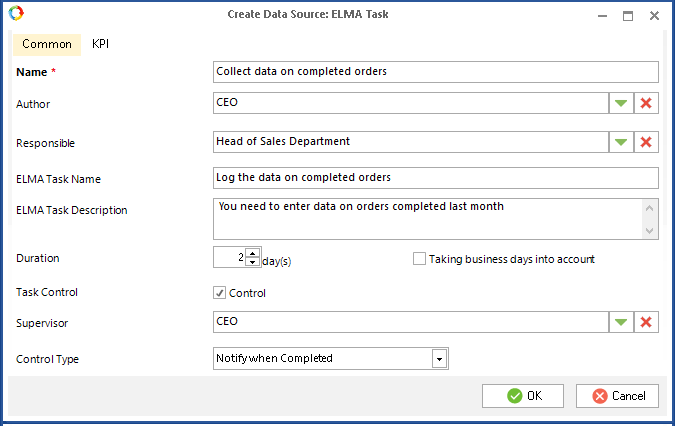
In the opened window, specify the information about the task:
Fig. 2. Creating an ELMA task.
Common tab
Fill in the following fields
Name * – name of the created ELMA Task. This name is shown in ELMA Designer. The field is required.
Responsible – user responsible for entering KPI data in Web Application.
ELMA Task Name – name of the task for entering KPI data in Web Application. This name is displayed in the
task list and the
Tasks portlet.
ELMA Task Description – description of the task for entering KPI data that will be displayed in Web Application.
Duration – duration of the task of entering KPI data (days).
Taking business days into account – if you check this box, the duration of the
Enter KPI Values task will be set taking only working days into account. Working days are determined in the
business calendar.
KPI tab
Fig. 3 shows an example of this tab.
Fig. 3. Creating an ELMA task.
Here you have to specify over what period the KPI values must be entered. Also you have to add the KPIs in order for the supervisor of the task to enter corresponding values.
Period – the period over which the KPI values must be entered. The KPIs are selected below. To specify the limits of the period, move the slider of the scale or specify the limits in the fields on the sides of the scale.
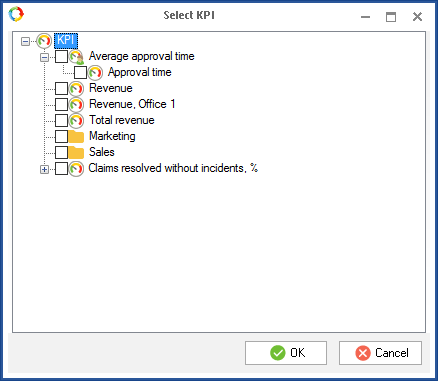
To add a
KPI, click
Add and select the required KPI in the provided window (fig. 4).
Fig. 4. Selecting a KPI
Note, that one task can contain several KPIs only if they have the same
periodicity. When you select the first KPI, its periodicity is identified automatically. You will not be able to select KPI with different periodicity.
The KPI will be added to the table as shown in fig. 3. Above the table, you can see the periodicity of the selected KPIs.
For each KPI, choose what values have to be entered in the web application:
Plan and/or
Fact (
Personal Plan and/or
Personal Fact for
personal KPIs).
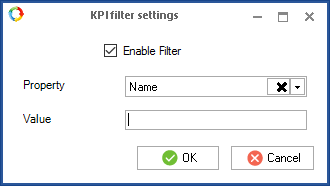
Besides, you can configure filtering row KPIs in ELMA tasks. To do so, double-click

to the right of the required row object KPI (fig. 3). KPI filter settings window will open (fig. 5). It contains fields similar to those that you can find on the common tab of a KPI page. The only difference is that there is no
Use EQL box.
Fig. 5. KPI filter settings dialog box
|
Note
When you enable filter for a KPI in ELMA task, take into account the filter configured on the KPI page: if filters will contradict each other, this KPI will not be displayed in the created Enter KPI Values task in the web application.
|
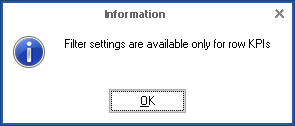
If you try to configure filter settings for non-row KPIs, the following notification will be displayed (fig. 6):
Fig. 6. Information box
To delete a KPI from the list, select it and click Delete.
After filling in all the information, click OK. The ELMA Task will be created.
Editing ELMA Task
There are two ways to open an ELMA task for editing:
-
Double-click on the task’s name in the task tree;
-
The task’s page will open. It is similar to the
task creation window (fig. 2, fig. 3).
Introduce the changes and click the
Save button in the
top menu.
Deleting an ELMA task
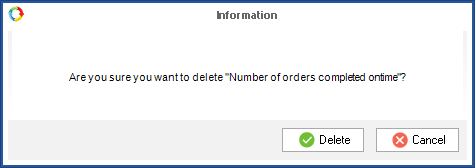
To delete an ELMA task, open the task’s
context menu and click Delete. In the provided window (fig. 7) click
Delete to confirm.
Fig. 7. Confirm deleting an ELMA task
See also:
Copyright © 2006–2019 ELMA