Resource optimizer is a tool for planning an optimizing workload of human and technical resources.
This tool allows you to monitor:
-
-
whether project tasks have or have not executors;
-
whether there are overdue project tasks;
-
There are two ways to open the resource optimizer:
-
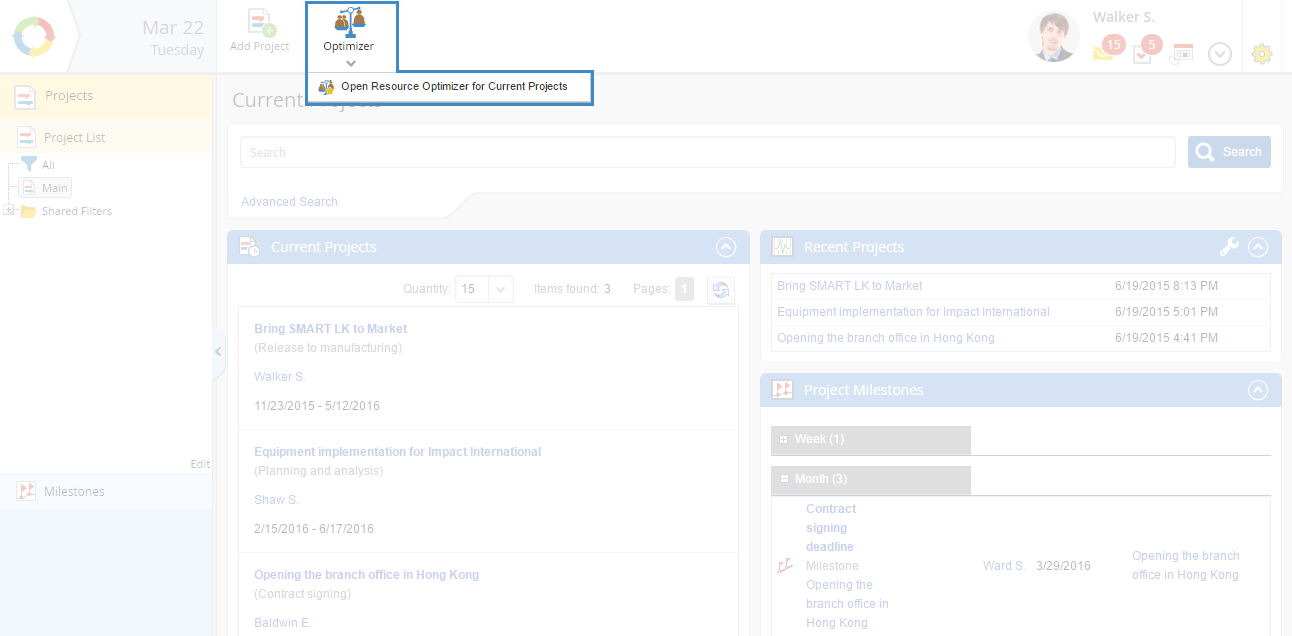
click Optimizer – Open Resource Optimizer for Current Projects in the Project List subsection of the Projects section (fig. 1). The page will display only the names of the current projects;
|
|
|
Fig. 1. Projects section. Optimizer – Open Resource Optimizer for Current Projects button
|
-
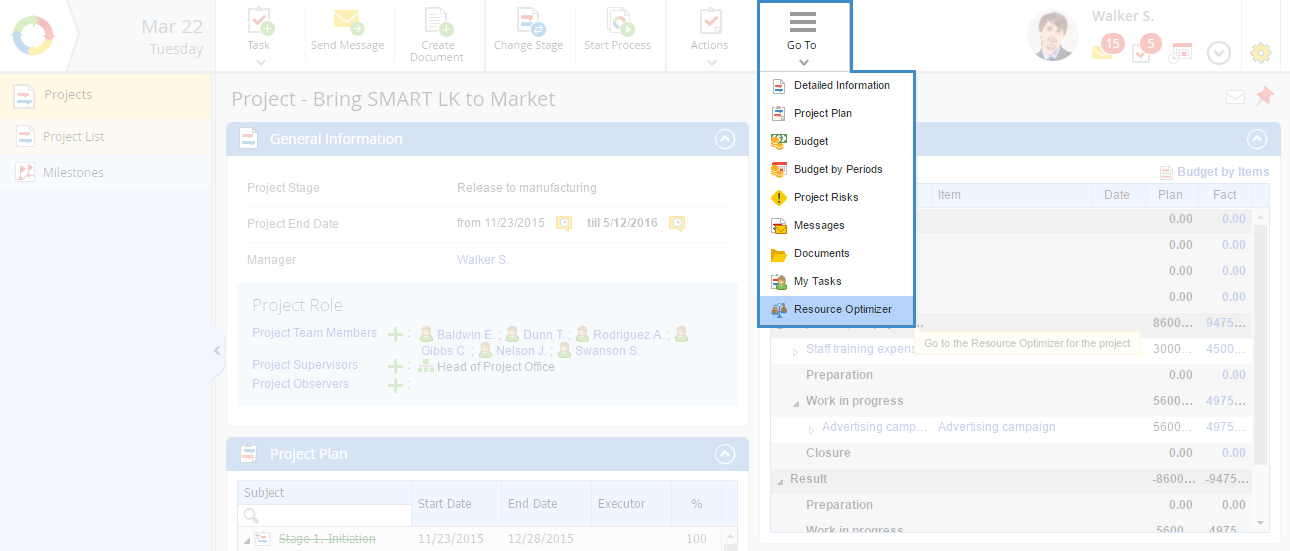
open the page of the required project and click Go To – Resource Optimizer (fig. 2);
|
|
|
Fig. 2. Project page. Go To – Resource Optimizer button
|
-
in the Project List subsection of the Projects section click Optimizer (fig 1). An empty resource optimizer page will open, where you will need to load the require project (fig. 3).
Fig. 3. Resource Optimizer
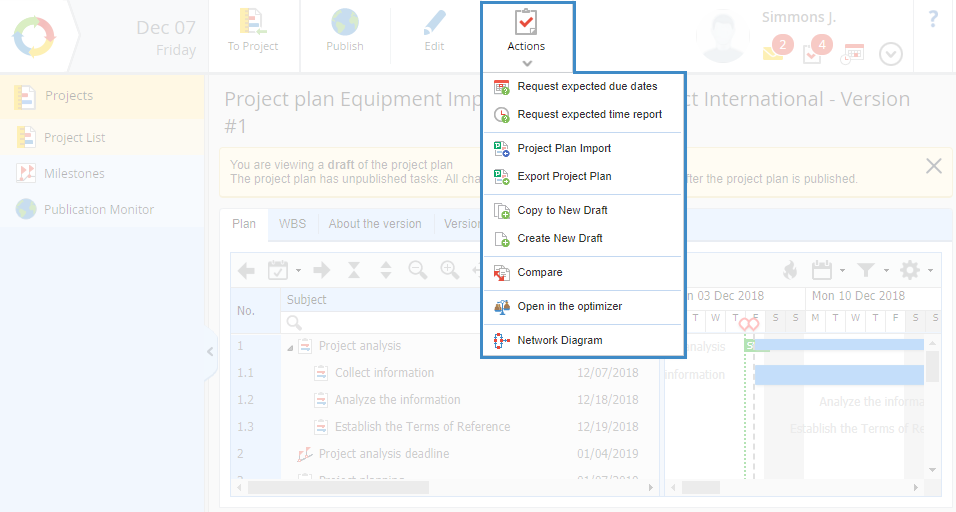
Fig. 4. Project plan page. Actions – Open in the optimizer
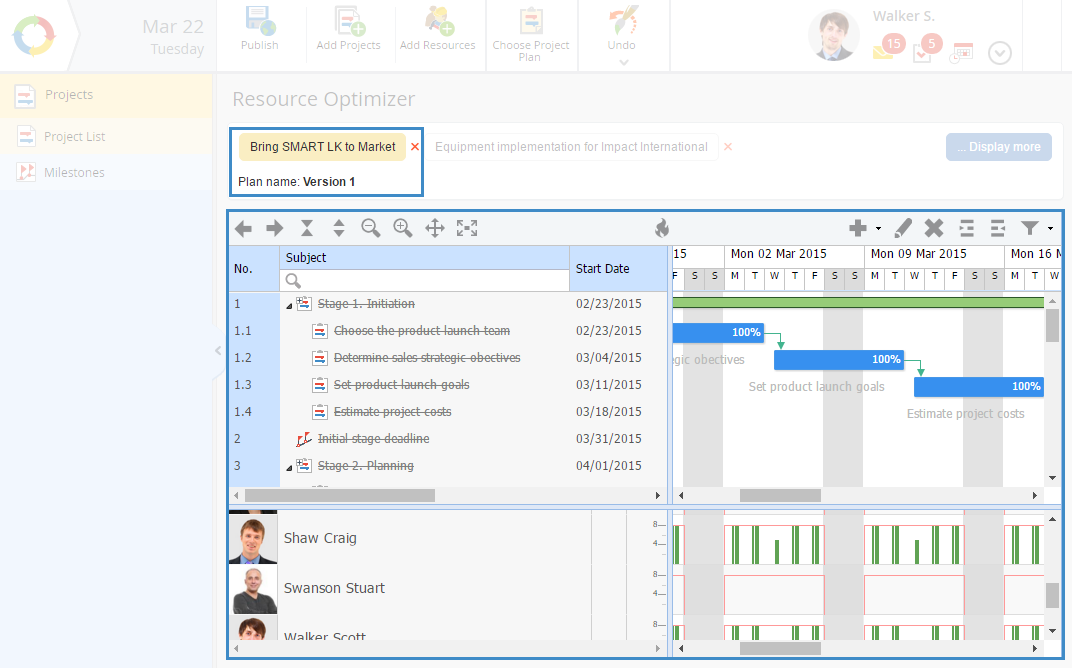
The resource optimizer page like this (fig. 5):
|
|
|
Fig. 5. Resource optimizer page
|
Below the page name, you can see a panel (fig. 6), with the list of projects, added to the resource optimizer. To the left of the project names you can see icons, indicating the project type: The base project type has the  icon, and the sub-project type has the
  icon.
icon.
To show information on one of the projects on this page (task list, Gantt chart, resource workload bar chart), click on its name. The name of the selected project will be dark-yellow, and the current version number of the project plan will be displayed below. After editing a project plan, you will see the  icon next to its name (fig. 6). To the right of the project name is the
  button. Click this button to delete the selected project from the list.
|
|
|
Fig. 6. Resource optimizer page with the selected project
|
Top menu buttons
|
|
|
|
|
Save the selected project plan version, edited in the resource optimizer.
Click  and Save all the changed plans to save all the project plans you have edited in the resource optimizer. and Save all the changed plans to save all the project plans you have edited in the resource optimizer.
If no plans are changed, you will see a respective notification.
|
|
|
|
|
|
|
|
|
|
|
|
When you click Undo a dialog box opens, where you have to confirm cancelling all the changed you made.
When you click  and Undo all, a dialog box opens, where you have to confirm cancelling all the changes you made to all the opened project plans. and Undo all, a dialog box opens, where you have to confirm cancelling all the changes you made to all the opened project plans.
|
Publishing changed project plan versions
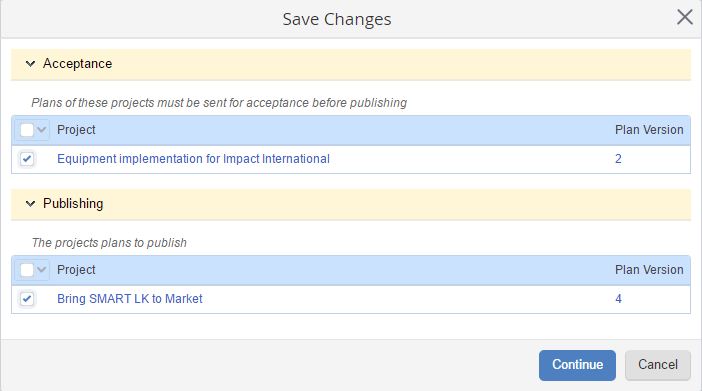
To publish all the changed project plan versions at the same time, click Publish in the top menu of the resource optimizer page. When you click this button, a dialog box opens (fig. 7), where you have to select projects, whose plans should be published. You can also add all the tasks executors to the project team members, if they are not. To continue, click Publish.
|
|
|
Fig. 7. Dialog box for publishing project plans
|
Adding projects to the resource optimizer
To start working with the resource optimizer, select an object, whose plan you want to optimize. Possible objects are base type projects, custom type projects, and sub-projects.
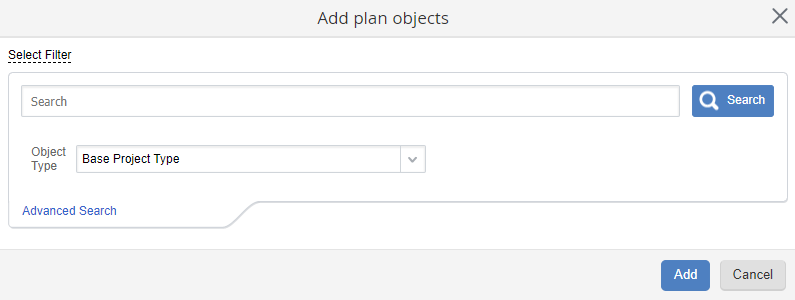
To add project plan objects to the resource optimizer page, click Add Objects in the top menu. When you click this button, a dialog box opens (fig. 8), where you have to select the projects to add to the resource optimizer. The drop down list contains only those projects, available to the current user and not added to the resource optimizer.
|
|
|
Fig. 8. Adding objects. Base project type
|
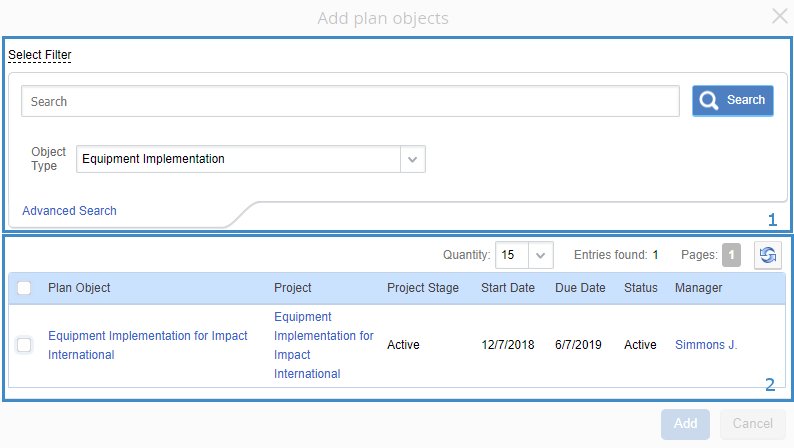
After searching, the dialog box will be expanded. It contains the object search form (fig. 9, 1) and the search results (fig. 9, 2).
Fig. 9. Adding objects. Search results
To find all the available objects, select an object type and click Find or press Enter.
Plan object search form
To search objects you want to add to the optimizer, use the search form (fig. 9, 1).
As the Object Type you can select:
-
Base project type – includes the default Project type, and all the custom types;
-
When selecting a Sub-project you can fill in additional fields:
Status – the status of the sub-project. The following statuses are available:
Project Type – the type of the parent project for this sub-project.
Hide tasks of outdated plans – hide the sub-projects, created in a project plan with the Outdated version status.
Search result table
The search result table (fig. 9, 2) shows the projects, available to the current user, and not added to the resource optimizer.
This table consists of the following columns:
Plan Object – name of the project or sub-project, whose plan will be opened in the resource optimizer.
Project – the name of the project or the parent project, if you select Sub-project.
Project stage – the stage of the project or the parent project, if you select Sub-project.
Start Date – the start date of the project or sub-project, whose plan will be opened in the optimizer.
Due Date – the due date of the project or sub-project, whose plan will be opened in the optimizer.
Status – depend on the selected object type:
-
for Base Project Type, it shows the status of the project, whose plan will be opened in the resource optimizer;
-
for Sub-Project, it shows the status of the Sub-project task.
To select plan objects, check the box next to them. You can select several plan objects at the same time. To select all the objects, check the  box in the table header.
To finish adding projects, click Add.
Adding resources to the resource optimizer
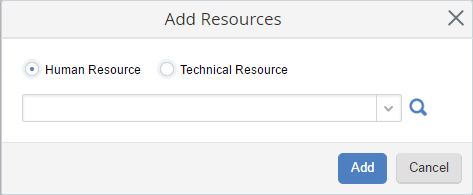
To add resources to the resource optimizer, click Add Resources in the top menu. When you click this button, a dialog box opens (fig. 10), where you have to select resources (human/technical) to add to the resource optimizer. If there is the  button, the current user can add new instances to the respective objects. This button is available only if the user has respective access permissions.
The list displays only those resources, created in the Human Resource/Technical Resource objects and not added to the resource optimizer.
|
|
|
Fig. 10. Dialog box for adding resources
|
To complete adding resources to the resource optimizer, click Add.
Selecting a project plan version
To select a project plan version to display on the resource optimizer page, click Choose Project Plan in the top menu. When you click this button, a dialog box opens (fig. 7), where you have to select the required project plan version, which will be added to the resource optimizer. This dialog box is similar to the dialog box for adding a project. The drop down list displays project plan versions with the Current and Draft statuses. To complete adding a project plan version to the resource optimizer page, click Add.
Using the resource optimizer
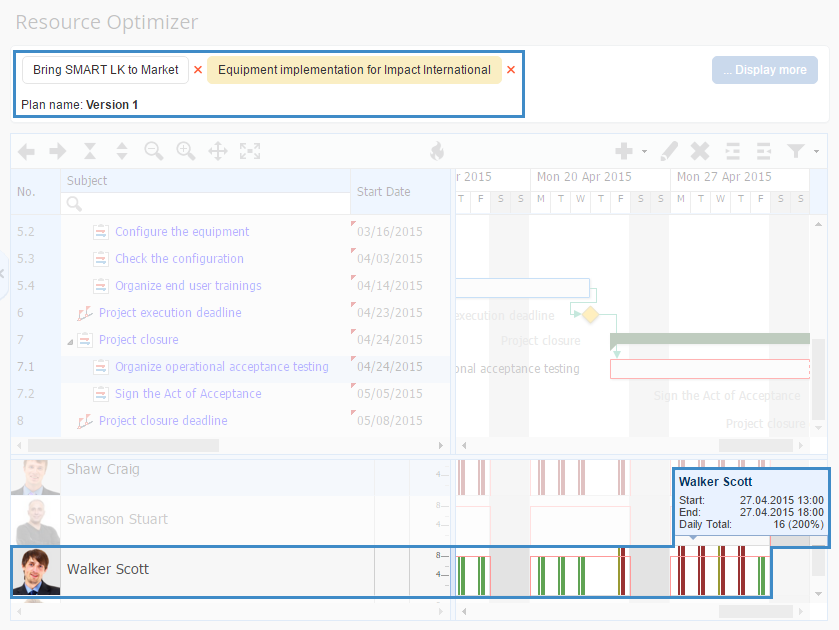
Consider a situation, in which a resource is involved in two projects at the same time. Its workload reaches 200% on some days. In this case, the executor will not be able to complete all the project tasks. To unload the resource, you have to distribute its tasks among other project team members or reschedule some tasks.
To do so, open the required projects in the resource optimizer and select the resource on the workload bar chart (fig. 11). When you mouse over the resource, a notification with its workload pops up (fig. 11).
|
|
|
Fig. 11. Resource optimizer page. Resource with high workload
|
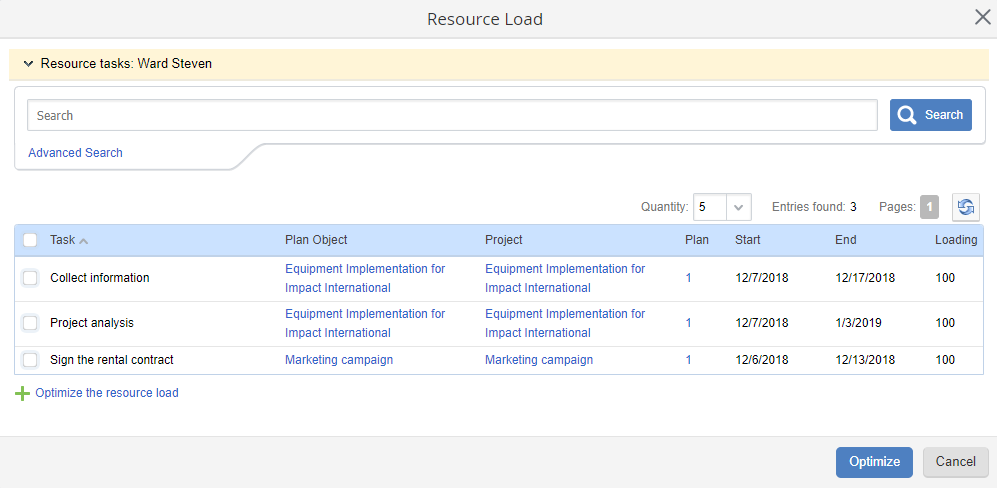
When you double click on this bar, a dialog box with information on the tasks, scheduled for this day, opens (fig. 12).
|
|
|
Fig. 12. Resource workload information
|
Select the task to reschedule or reassign to another executor. Edit the task and publish the changes made to the project plan.
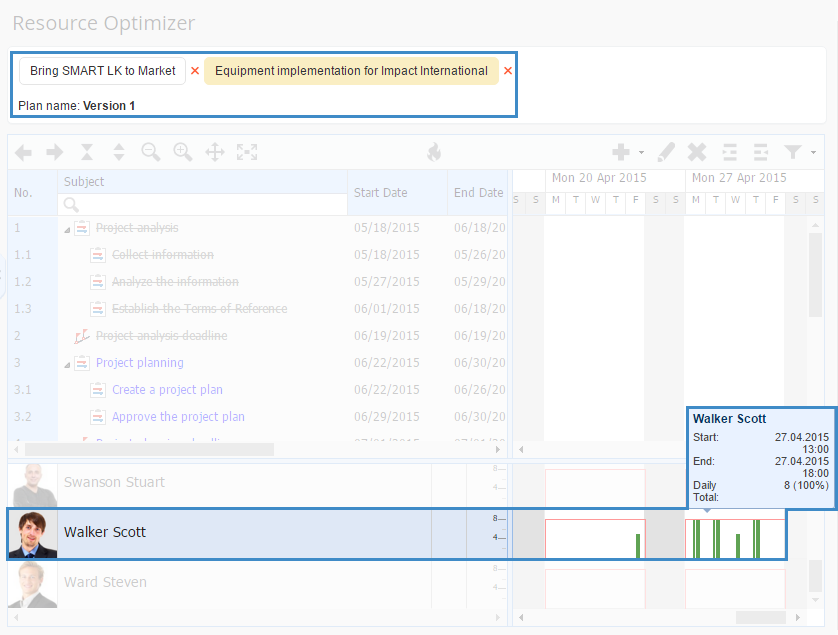
To workload bar will be highlighted green, meaning that the resource's use is optimal (fig. 13).
|
|
|
Fig. 13. Resource optimizer page. Optimized resource
|
Copyright © 2006–2019 ELMA
