Creating Links in Project Plan
Links in the project plan are tasks dependencies, defining the order of tasks in the plan.
To create a link in the project plan:
-
click Add - Successor Task / Predecessor Task in the context menu of the required task on the project plan editing page (fig. 1);
|
|
|
Fig. 1. Project plan editing page. Task context menu
|
-
on the project plan editing page in the Gantt Chart mouse over the required task until the  icon appears. Click and hold one of the icons and drag it to the task you need to link it with (fig. 2).
|
|
|
Fig. 2. Project plan editing page. Creating a link in the Gantt chart
|
After that, the created link will be displayed in the task list and in the Gantt chart (fig. 3).
|
|
|
Fig. 3. Project plan editing page. Link in the task list and the Gantt chart
|
If a project plan is imported from MS Project, the dependencies between tasks will be kept. If the imported project plan has manual and automatic dependencies, the links between tasks will be set according to the planning mode of the succeeding task. For example, if the preceding task is in the manual mode and the succeeding is in the automatic mode, then the preceding task will get the automatic mode when importing. If the task planning mode is not selected, links will be set to the automatic mode.
Adding predecessors
All previous tasks can be viewed on the
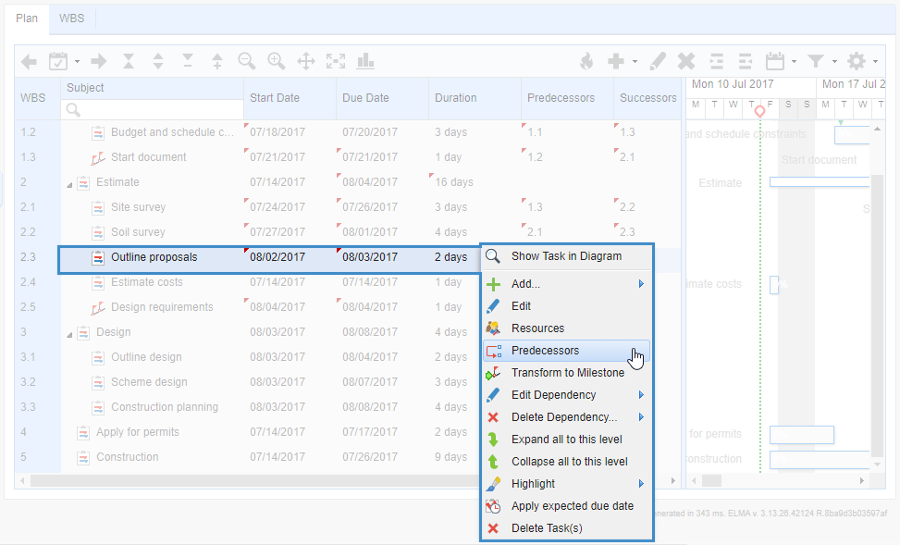
plan editing page. Click on a task and in the context menu select
Predecessors (Fig. 4);
Fig. 3. Project plan editing page. Task context menu. Predecessors
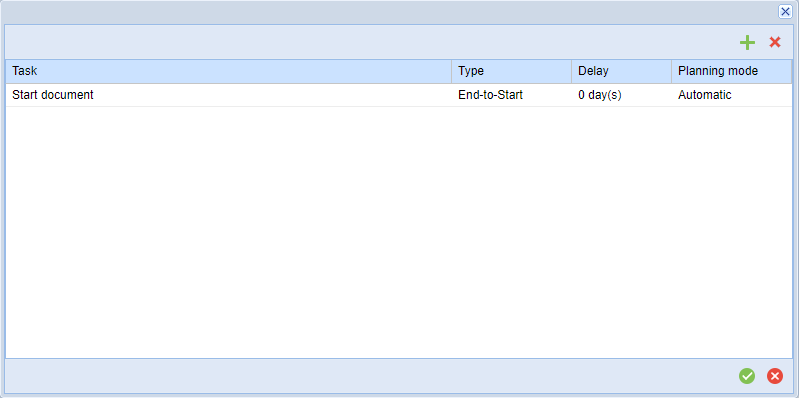
In the pop-up that opens, you will see all dependences and will be able to add, edit or delete links (fig. 5).
Fig. 4. Task predecessors dialog box
This pop-up consists of four columns:
1. Task – name of the predecessor task. You can replace it by clicking on its name and selecting one of the project plan tasks in the drop-down list. Next to the task name you will see its number.
2. Type – type of link between tasks. By default, this column displays the earlier selected type, but you can change it. Click on the value in this column, and select one of the types:
-
End-to-Start – the current task starts as soon as the predecessor task is complete;
-
Start-to-Start – the current task starts simultaneously with the predecessor task;
-
End-to-End – the current task ends simultaneously with the predecessor task;
-
Start-to-End – the current task ends when the predecessor task starts.
3.
Delay – in this column you can specify the number of days to delay the start of the linked task. To learn more, see the
corresponding Help section.
Click on the

button to add a new row and create a predecessor task.
To quickly find a task in the Task column, you can enter its serial number. In search results, click on the task to select it.
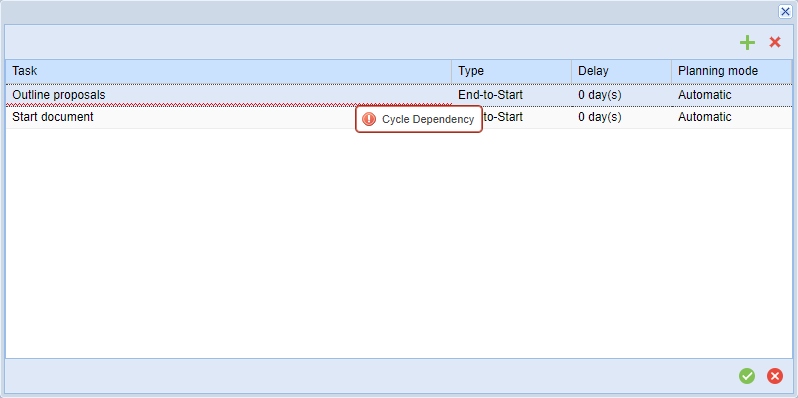
When you select predecessor tasks, conflicts may occur. In this case, the selected predecessor task will be underscored with red, and when you mouse over it, a conflict notification will appear (fig. 6).
Fig. 6. Conflict notification
There are several types of conflicts:
-
Please, select a task – this conflict occurs if the Task column is empty. To resolve this conflict, select a project plan task in this column.
-
A relationship between a parent task and a subtask is detected – this conflict occurs if the link is created between a parent task and a subtask of any level. To resolve this conflict, select another project plan task.
-
Repeated Dependency – this conflict occurs if the selected tasks are already linked. To resolve it, delete the duplicate task.
-
Transitive Dependency – this conflict occurs if tasks
A, B, C are linked like this:
A→B and
B→C. It means, that task
A transitively depends on task
C via task
B. To resolve it, select another project plan task.
-
Cycle Dependency – this conflict occurs if tasks
A, B, C are linked like this
A→B and
B→C. It means, that task
C cyclically depends on task
A. To resolve it, select another project plan task.
-
Wrong Dependency – this conflict may occur in cases, not described above. To resolve it, select another project plan task.
You should always resolve conflicts that occur when adding predecessors. Otherwise, when saving changes, the links will not be taken into account (will be deleted automatically).
After the predecessors are defined, click on the Save Changes button, to undo the actions click Cancel.
Once the links are added, task numbers will automatically appear in the Previous and Next columns, respectively.
If the contents of the cell have been changed, an icon  will be displayed in the upper left corner of this cell.
To delete the predecessor task, select the row and click  .
.
When editing a link between tasks, you can change the number of delay days before the task start.
To edit a link between tasks, click Edit Dependency in the context menu of the required task on the project plan editing page (fig. 4).
|
|
|
Fig. 7. Project plan editing page. Task context menu
|
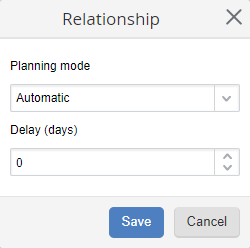
In the dialog box that opens (fig. 8) select one of the dependency modes:
-
Automatic – selected by default. With this planning mode (fig. 8) linked tasks will be shifted according to the delay, specified in the Delay (days) field.
If you select this mode, you need to specify the number of days, for which to postpone the execution of the linked task. You can enter a positive or a negative number. The default value is 0, i.e. the next task will be assigned as soon as the preceding task is completed. If you enter a positive number, the task B will be started in the specified number of days after the task A is completed.
If you enter a negative number, the task B must start in the specified number of days before the task A starts. This dependency mode is displayed as a full line on the Gantt chart.
Fig. 8. Dependency dialog box. Automatic planning mode
-
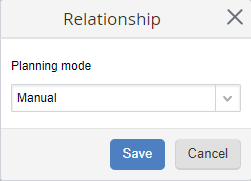
Manual – if you select this planning mode (fig. 6), the linked tasks will be shifted manually, taking weekend into account. For example, if there is a dependency between tasks A and B, then if the task A is rescheduled, the task B will not be rescheduled automatically.
This dependency mode is shown as a dashed line on the Gantt chart.
Fig. 9. Dependency dialog box. Manual planning mode
To delete a link between tasks, click Delete Dependency... in the context menu of the required task on the project plan editing page and select the link in the opened menu.
Copyright © 2006–2019 ELMA


