Customizing the sign-in window
You can modify the standard sign-in window, both graphically and functionally.
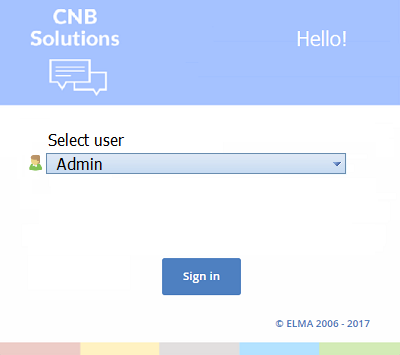
Here is an example of a modified sing-in window

1. The company's logo has been changed
2. The message in the top right corner has been changed to "Hello!" from "Business Process Management System"
3. The Remember Me option has been hidden for better security
4. The Password icon has been changed
To generate this window, all the images are loaded from
C:\ELMA3\Web\Content\Images\Logon
Logo.png is the main image, and logon_button.png is the sign-in button. You can edit these files: add your company's logo and change the colors.
To make other changes, edit the cshmtl LogOn file stored in ELMA3\Web\Modules\EleWise.ELMA.BPM.Web.Security\Views\Account
LogOn.cshtml determines the markup using Razor syntax. If you are not familiar with it or with HTML, pay attention to the <div>…</div> tags. For example, the code that defines the login starts with <div id="login_div"> and ends with </div>
<div id="login_div">
                <table width="100%">
                    <tr id="loginRow" style="display: none">
                        <td class="label_field"><span class="bluebold">@SR.Login</span> </td>
                        <td>@Html.TextBox("login", "", new { @class= "text_width" })</td>
                    </tr>
                    <tr id="passwordRow" style="display: none">
                        <td class="label_field"><span class="bluebold">@SR.Password </span> </td>
                        <td>@Html.Password("password", "", new { @class = "text_width" })</td>
                    </tr>
                    @Html.ExtensionZone("Security-LogOn-Token-select")
                    <tr>
                        <td colspan="2">
                            <div class="error">
                                @Html.ValidationSummary()
                            </div>
                        </td>
                    </tr>
                    <tr id="loginByCert" style="display: none">
                        <td colspan="2" style="text-align: center">
                            <a href="javascript:void(0)" onclick="redirect_to_cert()">@SR.T("Sign in with certificate")</a>
                        </td>
                    </tr>
                    <tr>
                        <td colspan="2" class="blue" >
                            @Html.CheckBox("rememberMe") @Html.Label("rememberMe", @SR.Remember)
                        </td>
                    </tr>
                    <tr>
                    <td colspan="2" class="td_login_button"><input type="submit" name="LogIn" value="@SR.Enter" class="login_button" /></td>
                    </tr>
                </table>
            </div>
To delete the Remember Me option, delete the following code:
<tr id="rememberMeRow" style="display: none">
   <td colspan="2" class="blue" style="padding-top:30px" >
       @Html.CheckBox("rememberMe") @Html.Label("rememberMe", @SR.Remember)
   </td>
</tr>
To edit the text in the top right corner, change the text here:
1
@MvcHtmlString.Create(SR.T("Business Process Management System"))
This code defines the text of the tooltip:
function show_tip() {
         var conf = {
             content: {
                 text: ’@MvcHtmlString.Create(SR.T("To start working with the system, sign in as admin with an empty password. Later, when working with the system, set up a new password."))’
             },
             position: {
                 my: ’top left’,
                 at: ’bottom left’,
                 viewport: true
             },
             show: ’focus’,
             hide: ’blur’
};.png)
You can make other changes too. For example, you can add a drop-down list of users registered in the system. In our example, we used a blank password field, but you can add a password field to the form if needed. This way, the users will not only select their username from the list but will also enter their password.
@{
    Layout = null;
}
@using EleWise.ELMA.BPM.Mvc.Application
@using Microsoft.Web.Mvc
<html xmlns="http://www.w3.org/1999/xhtml">
<head id="Head1" runat="server">
    <title>@SR.Authorization</title>
    <link rel="icon" href="@Url.Image("#favicon.ico")" type="image/ico" />
    <link rel="shortcut icon" href="@Url.Image("#favicon.ico")" type="image/ico" />
    @Html.Link("~/Content/Logon1.css", "stylesheet", "text/css")
    <link type="text/css" href="@Url.Content("~/Content/jquery-ui-1.8.15.custom.css")" rel="stylesheet"/>
       <link type="text/css" href="@Url.Content("~/Content/telerik.common.min.css")" rel="stylesheet"/>
    <link type="text/css" href="@Url.Content("~/Content/telerik.office2007.min.css")" rel="stylesheet"/>
    <script type="text/javascript" src="@Url.Content("~/Scripts/JQuery/jquery-1.6.4.min.js")"></script>
    <script type="text/javascript" src="@Url.Content("~/Scripts/JQuery/jquery-ui-1.8.15.custom.min.js")"></script>
    <script type="text/javascript" src="@Url.Content("~/Scripts/JQuery/jquery.qtip.min.js")"></script>
    @Html.ExtensionZone("Security-LogOn-Token-head")
</head>
<body class="logon">
    <table style="width: 100%; text-align: center;">
        <tr>
            <td class="td_center " align="center">
        <div id="center_div">
            <div id="logo_version"></div>
            <div id="logo_div"><div id="redaction_div">
        //текст в правом-верхнем углу
                @MvcHtmlString.Create(SR.T("Project Management"))
            </div></div>
            <div id="login_div">
                @using (Html.BeginForm())
                {
                <div class="otherUserDiv">
            //password and check-box are hidden
                    @Html.Hidden("password", "")
                    @Html.Hidden("rememberMe", "false")
                //text over the drop-down list
                    <span id="selectUser">@SR.T("Select User")</span>
                //creating a drop-down list of user names
                    @{
                        var users = UserManager.Instance.Find(u => u.Status == UserStatus.Active);
                        var userListItems = users
                            .Select(u => new SelectListItem { Text = u.GetShortNamePosition(), Value = u.UserName });
                        var dropDownList = Html.Telerik()
                            .DropDownList()
                            .Name("login")
                            .BindTo(userListItems)
                            .DropDownHtmlAttributes(new { style = "width:300px;" })
                            .HtmlAttributes(new { style = "width:300px;" });

                    }
                    <div id="userSelector" class="align_left">@(dropDownList)</div>

                    <div class="td_login_button align_center">@Html.SubmitButton("LogIn", SR.Enter, new { @class = "login_button" })</div>
                </div>
                }

            </div>
            <div class="bottom">
                <span class="blue align_left">
                    ELMA @(VersionInfo.GetVersion<SR>())
                </span>
                <a href="http://www.elma-bpm.ru" class="align_right copyright">© EleWise 2006 - @System.DateTime.Now.Year</a>
            </div>
        </div>
    </td>
    </tr>
    </table>
    @(Html.Telerik().ScriptRegistrar().jQuery(false).Scripts(script => script.Add("~/Scripts/telerik.combobox.js")))
</body>
As you see, the sign-in window can be changed in various ways. You do not need programming to change the graphics and the text, while with the Razor markup you can create the sign-in window from scratch.
We have attached the ready LogOn files in .txt format to the article.