Installing ELMA
Installation of the server and ELMA Designer
ELMA System is provided both in commercial (Express, Standard, Enterprise) and free (Community) editions. The system editions have different system features, supported DBMS and Windows features. Each system edition can be installed using a separate software installation media. It is provided after signing a licensing agreement. You can download Community Edition from ELMA website.
ELMA System requires .NET Framework 4 (or higher). It will be automatically installed during the system installation, if necessary.
Step 1. Run the installation file.
If the User Account Control dialog box appears, confirm that the action it displays is what you want. Click Yes to continue installation (fig. 1).

Fig. 1 User Account Control
Step 2. Select installer’s language.
The dialog box asks you to Select your language. Choose your preferred language in the drop-down menu (Fig. 2). Click OK to continue.

Fig. 2 Selecting language
Step 3. Welcome screen
The start screen of the setup wizard (fig. 3) contains introductory information and some installation tips. Click Next to continue.
.png)
Fig. 3 The start screen of the setup wizard
Step 4. License agreement.
Please read the license agreement (Fig. 4). If you accept the terms and conditions, click I accept the agreement and then click Next. If you check I do not accept the agreement, the Next button will be unavailable (you will not be able to continue installation of the system).
.png)
Fig. 4 License Agreement dialog box
Step 5. Select the installation folder.
At this step of the wizard, choose the ELMA installation directory. It is recommended to use the default directory. To change the default directory click Browse and specify the new path. Click the Next button to continue.
.png)
Fig. 5 Dialog box for selecting an installation folder
Step 6. Select configuration.
In the opened dialog box (Fig. 6), select the required configuration and click Next.
.png)
Fig. 6 Dialog box for selecting a configuration
|
|
New Configuration – this configuration allows you to look through ELMA capabilities. It includes a ready-made organizational structure, business processes, users and so on. The sample configuration is operational. |
|
|
Create Configuration – create a new system configuration, where you have to create an organizational structure, users and business processes yourself. Existing Configuration – select the file with your existing configuration. |
Step 7. Select components.
Use the drop-down list (fig. 7) to select the system components you want to install:
- Server and Designer – install both ELMA Server and ELMA Designer;
- Only Server – install only ELMA Server;
- Only Designer – install only ELMA Designer.
Click Next to continue.
.png)
Fig. 7 Dialog box for selecting components
Step 8. Configuration Settings.
Specify the location of the ELMA configuration files (Fig. 8). Click Browse and specify the path to the configuration folder that will contain ELMA configuration files. We recommend that you use the default UserConfig folder.
.png)
Fig. 8 Dialog box for selecting a configuration
Then specify the Database Server Type that you want to use. The following DBMS are available: Firebird, PostgreSQL and Microsoft SQL Server.
Step 9. Configure a DBMS server.
9.1. PostgreSQL DBMS
In this dialog box (fig. 12), you can configure settings for connecting to the PostgreSQL server.
- Install PostgreSQL it is necessary to configure the connection parameters to install the PostgreSQL server and click the Next button (fig. 12).
Specify PostgreSQL server port — specify the port for connecting the ELMA server to the PostgreSQL server. By default, port 5433 is selected. This field is required.
Specify the database name – enter the name of the ELMA system database to work with the PostgreSQL server to be installed. The specified database will be automatically created when you first start the ELMA server. This field is required.
User Name – user account for accessing the PostgreSQL server. By default, this field contains the name of the PostgreSQL superuser – postgres. The value of this field cannot be changed manually.
Password – if necessary, enter a password for the PostgreSQL superuser account.
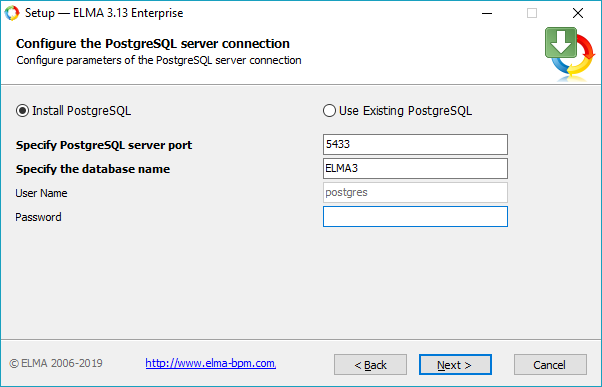
Fig. 12. “Configure the PostgreSQL server connection” dialog window
- Use existing PostgreSQL — configure the connection settings for the previously installed PostgreSQL server and click the Next button (Fig. 13).
Specify PostgreSQL server name – in order to connect, specify the name of the PostgreSQL server on which the ELMA system databases will be stored. This field is required.
Specify PostgreSQL server port – in order to connect, specify the port for connecting the ELMA server to the PostgreSQL server. This field is required.
Specify the database name – enter the database name of the specified PostgreSQL server to work with the ELMA system. The specified database will be automatically created when you first start the ELMA server. This field is required.
User Name – user account to access the database. By default, this field contains the name of the PostgreSQL superuser – postgres. This field is required.
Password – the password for the database user account.
User name sys – PostgreSQL superuser account.
User password sys – password for the PostgreSQL superuser account.
If you use existing PostgreSQL server, you can install ELMA system in one of the following ways:
Option 1. In this case, the PostgreSQL superuser manually creates a database and manually grants minimal access permissions to the database.
- Manually create an empty database.
- Connect the extension "uuid-ossp" to the database created earlier using the query create extension if not exists "uuid-ossp".
- With the help of the query, in DBMS the user of the database is granted minimal access permissions:
GRANT ALL PRIVILEGES ON DATABASE "clean" to "elma";
GRANT ALL PRIVILEGES ON ALL TABLES IN SCHEMA "public" TO "elma";
GRANT ALL PRIVILEGES ON ALL SEQUENCES IN SCHEMA "public" TO "elma";
GRANT ALL PRIVILEGES ON ALL FUNCTIONS IN SCHEMA "public" TO "elma";
ALTER DEFAULT PRIVILEGES IN SCHEMA "public" GRANT ALL PRIVILEGES ON TABLES TO "elma";
ALTER DEFAULT PRIVILEGES IN SCHEMA "public" GRANT ALL PRIVILEGES ON SEQUENCES TO "elma";
ALTER DEFAULT PRIVILEGES IN SCHEMA "public" GRANT ALL PRIVILEGES ON FUNCTIONS TO "elma";
clean – the database name, elma – username.
- In the User name and Password fields we enter the user account and password with minimal permissions to the database.
- Leave the User name sys and User password sys
Option 2. In this case, the system creates a database that is not yet in the DBMS, and grants minimal access permissions to this database.
- In the User name sys и User password sys fields, enter the PostgreSQL superuser account and password.
- In the User Name and Password fields, enter the user account and password, for which the system will later grant minimal access permissions to the database.
- For security reasons, the User name sys and sys User password sys fields can be deleted from the configuration file ../<Folder with the files of the ELMA system>/UserConfig/Configuration.config after starting the server.
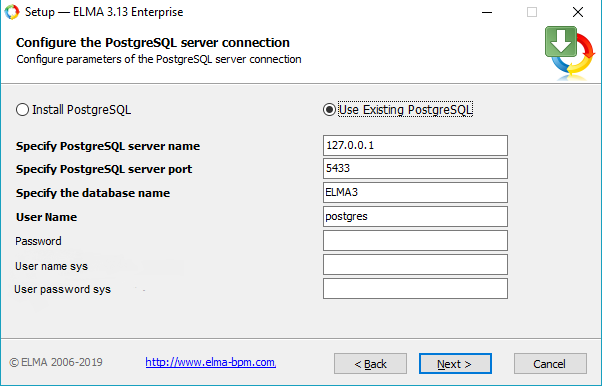
Fig. 13. “Configure the PostgreSQL server connection” dialog window
|
Attention! ELMA system works correctly only if PostgreSQL server of version 9.5 or higher is installed. |
9.2 Firebird DBMS
In this dialog box (fig. 14), you can configure settings for connecting to the Firebird server.
- Install Firebird – configure the connection settings for installing the Firebird server and click Next.
In the Select Firebird server port field, select the port for connecting the ELMA server to the Firebird server (fig. 14). We recommend that you use the default port – 3056. This field is required.
.png)
Fig. 14. Firebird server connection settings
- Use Existing Firebird – configure the connection settings for the previously installed Firebird server and click the Next button (fig. 15).
Firebird Server Address – specify the address of the Firebird server where the ELMA system databases will be stored. It is recommended to use the value 127.0.0.1. This field is required.
Select Firebird server port – specify the port for the ELMA server to connect to the Firebird server. It is recommended to use the default port – 3056. This field is required.
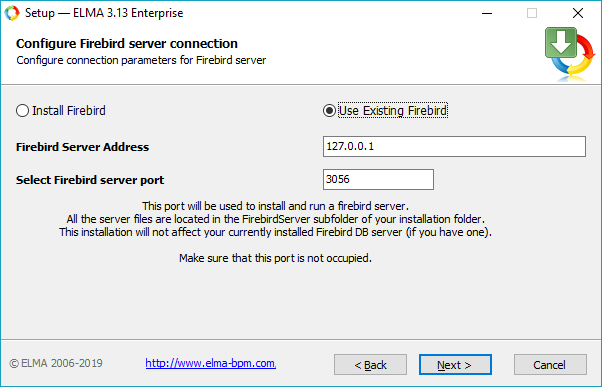
Fig. 15. Firebird server connection settings dialog box
9.3. MS SQL Server DBMS
In this dialog box (fig. 16), fill in the required fields and click Next to continue the installation.
.png)
Fig. 16. MSSQL server connection settings
Select MSSQL server host name – enter or select from the dropdown list the MSSQL host name, on which the ELMA databases will be stored. By default, this field's value is (local) – that is the local MSSQL server, located on the computer, on which ELMA is being installed. This field is required.
Select database name – enter or select from the dropdown list the database of the MSSQL server for working with ELMA. If you select a non-existing database, it will be created automatically. This field is required.
Use Windows Authentication – checking this box enables automatic authentication in the system, in case of successful authentication in the corporate domain. The access to the MS SQL Server will be granted to the user, who started the ELMA web server. If the box is not checked, you have to enter data of the user account, which will access the MS SQL Server. This user must have administrator permissions for the MS SQL Server.
When you click the Check MSSQL server connection, the program will attempt to connect to the MSSQL server, selected in the Select MSSQL server host name field. Then you will see a dialog box, with the information on the connection check result (fig. 14).
.png)
Fig. 17. Dialog box with the result of MSSQL connection check
9.4. Oracle DBMS
In this dialog box (fig. 18), in Oracle server connection string, specify the address of the Oracle server, as well as the user account information on behalf of which the server will be accessed. This field is required.
An example of Oracle server connection string:
Data Source=(DESCRIPTION=(ADDRESS=(PROTOCOL=tcp)(HOST=185.59.128.67)(PORT=1521))(CONNECT_DATA=(SID=ORATEST)));User Id=dmp040215;Password=q1234567;Enlist=false
PROTOCOL=tcp – connection protocol;
HOST=185.59.128.67 – virtual machine name or IP address;
PORT=1521 – standard port for connecting to Oracle;
SID=ORATEST – database system id;
User Id=dmp040215 – user account for database access;
Password=q1234567 – password for database user account;
Enlist=false – forbid opening multiple transactions.
User name sys – Oracle superuser account.
User password sys – password for the Oracle superuser account.
You can use one of the following options to install ELMA on the Oracle server:
Option 1. In this case, the Oracle superuser manually creates a database and manually grants minimal access permissions to the database.
- Manually create an empty database.
- Use the query to the DBMS to create a user who will be granted minimal access permissions to the database:
create user login identified by password;
GRANT
CONNECT,
CREATE TABLE,
CREATE PROCEDURE,
UNLIMITED TABLESPACE,
CREATE SEQUENCE,
CREATE SESSION,
CREATE TRIGGER,
CREATE TYPE,
CREATE VIEW
TO login;
GRANT SELECT ON "SYS" ."GV_$RESERVED_WORDS" TO login;
GRANT SELECT ON "SYS" ."V_$RESERVED_WORDS" TO login;
- In the Oracle server connection field, enter the user account and password with minimum access permissions to the database.
- Leave the User name sys and User password sys
Option 2. In this case, the system creates a database that is not yet in the DBMS, and grants minimum access permissions to this database.
- Enter the Oracle superuser account and password to the User name sys and User password sys
- In the Oracle server connection string field, enter the account and the user password for which the system will later grant the minimum access permissions to the database.
- To ensure security, you can delete the User name sys and User password sys from the configuration file ../<Folder with the files of the ELMA system>/UserConfig/Configuration when the server is started.
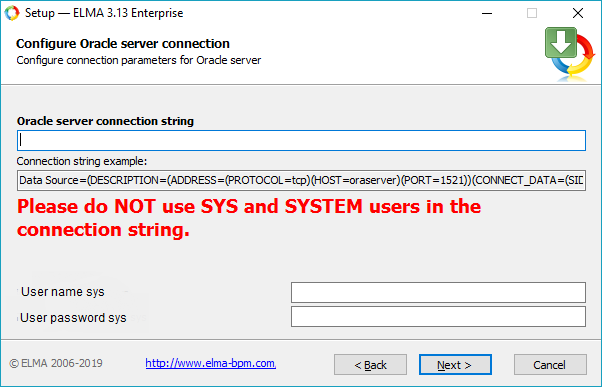
Fig. 18. Oracle server connection settings dialog box
Step 10. Configure the Web Server.
In the opened dialog box (fig. 19) enter the required parameters and click Next.
.png)
Fig. 19. ELMA web server settings
Web site port – port number for establishing the connection with ELMA web server. Port 8000 is used by default. If the port is used by another application, the system will show a respective notification. In this case, change the port.
Next, you need to specify the type of web server of the system – IIS Server or Internal ELMA server (Cassini web server). The type of web server is selected by setting the switch to the desired position.
If IIS is not available on the current operating system, the IIS server switch will be unavailable.
If the switch is set to the IIS Server position, additional fields will be displayed in this dialog box (Fig. 20).
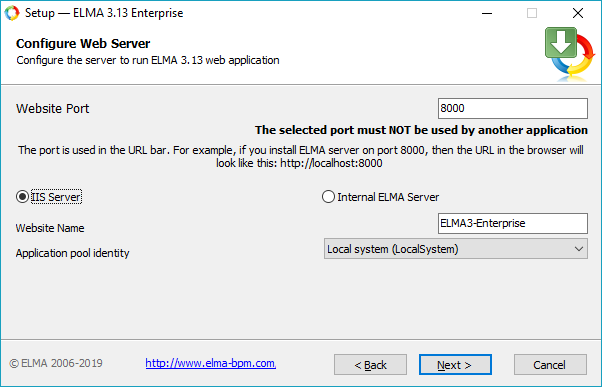
Fig. 20. Web server settings dialog box. “IIS Server” switch
Website Name — the name of the ELMA web server in IIS.
Application pool identity – the name of the service account on whose behalf the application pool workflow will be launched, specified in the Web application pool field:
- System (LocalSystem) - an account with local administrator access permissions that belongs to the Administrators group on the web server. This account is selected by default. We recommend using this account.
- Service (LocalService) - an account with the minimum set of access permissions required to run IIS server web applications. We do not recommend using this account.
- Network service (NetworkService) - an account with the minimum set of access permissions required to run IIS server web applications. We do not recommend using this account.
- Application Pool (ApplicationPoolIdentity) - The application pool identity account that is created dynamically when the application pool is started. We do not recommend using this account.
- User - a specific user account. When this item is selected, the additional required Username and Password fields will be displayed in the dialog box. We recommend using this account and choosing a Windows user with administrator permissions on the computer on which the ELMA system is being installed.
To continue the installation, click the Next button.
Step 10. Add shortcut
If you need to add shortcuts to the desktop, check the Add links on user desktop box in the opened dialog box (fig. 21).
.png)
Fig. 21. Additional tasks selection dialog box
To continue installation, click Next.
Step 11. Complete installation
At this step (fig. 22) you can see the full list of parameters, selected at the previous steps. You can change these parameters, if necessary. To do so, you need to return to the required step by clicking Back.
To start the installation, click Install.
.png)
Fig. 22. Dialog box with selected parameters
ELMA files are copied to the computer (fig. 23). This process may take a few minutes, please, wait until it is complete.
.png)
Fig. 23. Installation progress dialog box
The dialog box displays the information on the system installation results. To start ELMA Designer after the installation is complete, check the Run designer box (fig. 24).
.png)
Fig. 24. Installation completion dialog box
Click Finish to complete the installation.
Checking the installation of the ELMA server
To check if the ELMA server has been installed correctly, open the web browser on the server and open the page: http://localhost:8000 (if you selected a different port for the ELMA web server, use it). After a while (the first launch takes a long time) the system will display a page for entering the activation key. In this case, the system is installed correctly.
Notes:
If the ELMA server was not started during the first launch, and you are using the IIS server, please check:
- What version of the .NET Framework is specified for the application pool: use v4.0.
- Which user is specified in the application pool identity. To do this, right-click on the name of the application pool in the list, open the context menu, select "Additional parameters", go to the "Process Model" section. The "Identity" field should contain the value "LocalSystem" or a real system account.