Creating server module in ELMA
Before creating a module, please read Creating module in ELMA.
Basics of a module and the main configuration interaction
A module is a separate part of the application, which uses the capabilities of the system core and platform to integrate with other modules. Modules contain data and business logic that can be used by any other modules of the application. Modules interact with ELMA platform on three levels:
- Data model – on this level you create your own objects, extend/inherit the existing objects;
- Extension points – are used to extend ELMA basic functions (e.g. add new buttons, menu items, process data in any way). Extension points provide interfaces that you need to implement to add new features to the system;
- Events – tools for processing system events allow you to create even more complex extensions for the system.
Creating a new module
To create a new module you can use ELMA plugin for MS Visual Studio 2010/2013/2015/2017. The module’s structure is the same for both versions of VS. The module samples, attached to this article, were created in the VS 2013.
To create a new module, start Visual Studio and go to File – New – Project – Templates – ELMA:

When selecting the template, specify the project’s name and location, Visual Studio will create the EleWise.ELMA.CRMExtension solution with two projects:
EleWise.ELMA.CRMExtension – is a server module and EleWise.ELMA.CRMExtension.Web – is a web module.
In the AssemblyInfo.md file you can specify the displayed name, description, … for the module:

Specifying the module with data
Before specifying the data, you need to add a reference to the EleWise.ELMA.Security assembly.
Now your project is ready and you can start creating a module. In this example, a CRM module with the following features is created:
- View the list of companies;
- Create/edit companies;
- New MyCompany object with the following properties:
- Name;
- Date created;
- Date modified;
- Author;
- Modified by;
- International Taxpayer Number (ITN);
- Industrial Enterprises Classifier (IEC).
To create the MyCompany object, in Visual Studio right click on Models folder – Add – New Item – ELMA Entity Interface:

After the entity is created, go to the Properties section and add the default properties:
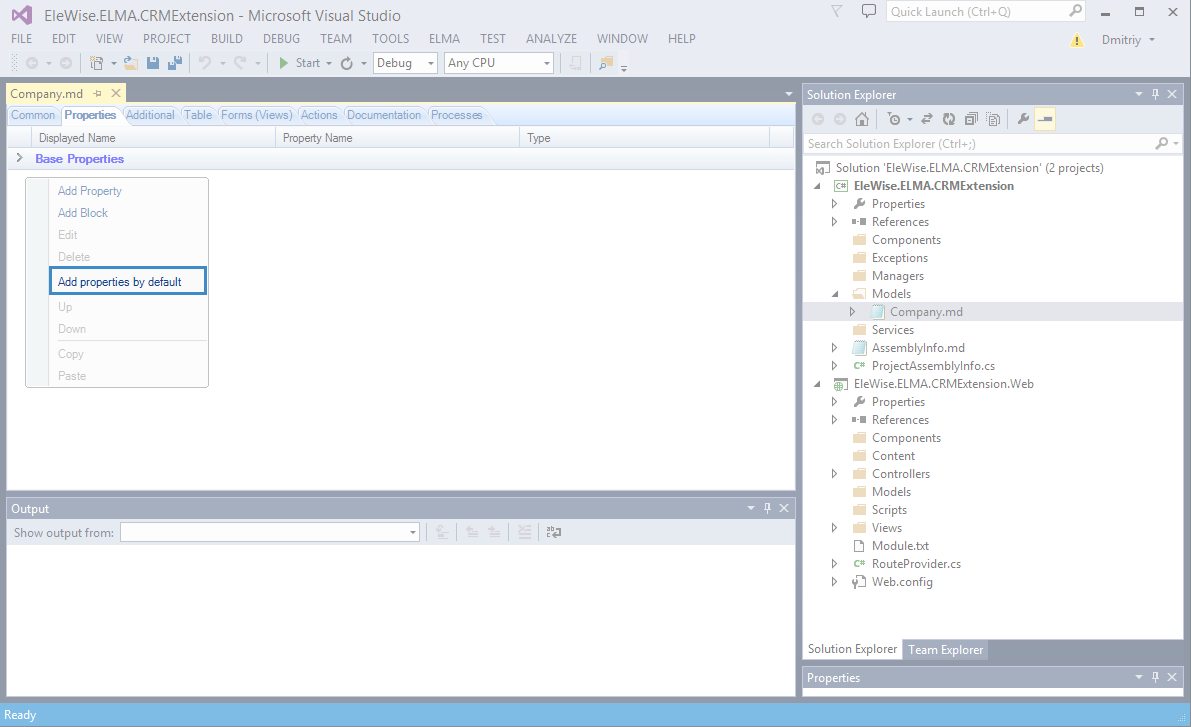
Mark Name, Author and Date created properties as required. Add ITN and ICE properties (String type). After that, go to the Additional tab and choose the Generate Filter option in the Filter Settings section.
Defining business logic
The business logic of the application should be defined in the specific classes, called ‘managers’. Let’s create a class for working with the MyCompany object. To do that, add a new class to the Managers folder:
public class MyCompanyManager : EntityManager<IMyCompany, long>As you can see, EntityManager takes two parameters: IMyCompany and long.
IMyCompany is an interface. When we create a new entity in ELMA Designer, the new interface is generated according to the properties that we added to the entity. The second parameter long – is a type of the entity identifier.
The EntityManager base class already has the required methods for creating, saving, loading and deleting entities.
It is important to understand how to create new entities´ instances. You are working with interfaces, so you cannot simply create the objects. There are two ways to do that:
- Call the Create() method from a manager. Actually, it is the invocation of the Create() method from the second variant;
- Call the Create() method of the ELMA.Model.Services.InterfaceActivator class.
In this ‘manager’ class you should define all methods for working with the entity. You can get the global instance of manager from anywhere of the system using the Instance static property. By the way, you can override it to return the manager of the required type.
You can do that this way:
public new static MyCompanyManager Instance
        {
            get
            {
                return Locator.GetServiceNotNull<MyCompanyManager>();
            }
        }
You may want to have different access permissions for the module. You can add two different access levels:
- Access to the module (if you have access to it, you will be able to see it in the system). On this level, you assign permissions to different roles in the Administration section of the system;
- Permissions to edit companies’ information (only the user, who created the company will be able to edit it). On this level, you assign permissions to access different entities (in this case, permissions depend on the value of the Author field).
To create these access levels, you need to use EleWise.ELMA.Security.Services.IPermissionProvider. To use it, you must implement two functions and three properties:
- GetPermissions() – is a function, that returns a set of instances of the ELMA.Security.Permission class;
- GetPermissionStereotypes() – is a function, that returns a set of pre-configured permissions for this module. These permissions will be enabled when the module is installed in ELMA;
- LocalizedItemsNames – is a property, that returns localized names of permissions;
- LocalizedItemsDescriptions – is a property, that returns localized descriptions of permissions;
- LocalizedItemsCategories – is a property that returns localized names of categories.
You can learn more about module permissions in this article.
To implement the above-mentioned properties and methods, create a new class CRMExtensionPermissionProvider in the Components folder and add the code below:
[Component]
    public class CRMExtensionPermissionProvider : IPermissionProvider
    {
        public const string Module = "EleWise.ELMA.CRMExtensions";

        public const string CRMAccessPermissionId = "1958FB0F-755E-4C03-B94A-694B6E80333B";
        public static readonly Permission CRMAccessPermission =
            new Permission(CRMAccessPermissionId,
                SR.T("Access to module"),
                "",
                SR.T("CRMExtension"),
                moduleUid: Module);

        public const string ViewCompanyPermissionId = "243C5DBA-ED64-4417-919A-2F20893F5017";
        public static readonly Permission ViewCompanyPermission =
            new Permission(ViewCompanyPermissionId,
                SR.T("View company info"),
                "",
                SR.T("CRMExtension"),
                moduleUid: Module,  //Define a key to group by modules
                permissionType: PermissionType.Instance,  // permission type (in this case = permission for entity)
                @base: CommonPermissions.View,  // base permission
                entityType: InterfaceActivator.TypeOf<IMyCompany>());  // type of entity for this permission

        public IEnumerable<Permission> GetPermissions()
        {
            return new[] {CRMAccessPermission, ViewCompanyPermission};
        }

        public IEnumerable<PermissionStereotype> GetPermissionStereotypes()
        {
            return new[]
            {
                new PermissionStereotype(new[]
                {
                    CRMAccessPermission,
                    ViewCompanyPermission
                }, SecurityConstants.AllUsersGroupDescriptor),
            };
        }

        public List<string> LocalizedItemsNames
        {
            get
            {
                return new List<string>
                {
                    SR.T("Access to module"),
                    SR.T("View company info")
                };
            }
        }

        public List<string> LocalizedItemsDescriptions
        {
            get
            {
                return new List<string>
                {
                    SR.T("This permission allows you to edit the shared filter tree. To have access to all filters, you must have \"Access to all filters\" permission")
                };
            }
        }

        public List<string> LocalizedItemsCategories
        {
            get
            {
                return new List<string>
                {
                    SR.T("CRMExtension")
                };
            }
        }
    }
At this point, the server module is created. You can proceed with creating a web module.
When you create a server module, you need to move the compiled .dll assembly to <ELMA>\Web\bin and restart the server.
To enable the installed module, go to the ELMA web application – Administration – System – Components – Available tab. Find your module in the list and enable it. After that, ELMA server will be restarted.