Creating portlet in ELMA module
Before reading this article please see Creating web modules in ELMA.
So, we have the EleWise.ELMA.CRMExtension module. It has a few views and controller actions, that we will use for creating a portlet.
Firstly, we need to create a new folder for the portlet (EleWise.ELMA.CRMExtension.Web – Portlets)

Now we need to create the portlet. Right click on the Portlets folder – Add – New item… – ELMA – ELMA Web Portlet:

As a result, we will see the following:
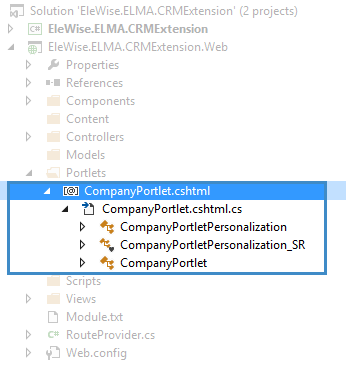
Several new objects were created:
- View cshtml
- Classcshtml.cs that contains 3 classes for configuring the portlet
Created view contains a few lines of code and is here for demonstration purposes:
@model EleWise.ELMA.CRMExtension.Web.Portlets.CompanyPortletPersonalization
<p>@EleWise.ELMA.SR.T("Welcome to ELMA3 Portlet!")</p>
<p style="font-weight: bold">@EleWise.ELMA.SR.T("Your text"):</p>
<p>@Model.Text</p>
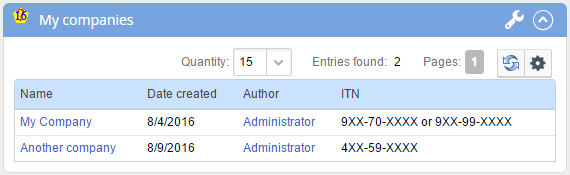
In our portlet, we will show the table with companies that we display the in Index.cshtml view. To do that, we need to add a new action to the CompanyController:
[CustomGridAction]
        public ActionResult GridForPortlet (GridCommand command, [Bind(Prefix = "DataFilter")]IMyCompanyFilter filter)
        {
            if (filter == null)
            {
                filter = InterfaceActivator.Create<IMyCompanyFilter>();
            }

            var data = CreateGridData(command, filter);

            return GridView<IMyCompanyFilter>(data);
        }
We also need to create Views\Company\GridForPortlet.cshtml view to display several properties of the MyCompany object: Name, Author, Date created and ITN.
@using EleWise.ELMA.CRMExtension.Models;
@inherits EleWise.ELMA.Web.Mvc.DynamicViewControl<EleWise.ELMA.Web.Mvc.Models.Grids.GridData<IMyCompany, IMyCompanyFilter>>

@(DynamicGrid("Companies", Model)
        .Columns(c =>
        {
            c.For(m => m.Name).Link(m => Url.Action("Details", "Company", new
            {
                id = m.Id
            }));
            c.For(m => m.CreationAuthor);
            c.For(m => m.CreationDate);
            c.For(m => m.ITN);
        })
            .Action("GridForPortlet"))
Now go to the portlet settings. Open CompanyPortlet.cshtml.cs and search for the Content function of the CompanyPortlet class.
Replace
return html.Partial("/Modules/EleWise.ELMA.CRMExtension.Web/Portlets/CompanyPortlet.cshtml", data);with
return RenderContentAction(html, "GridForPortlet", "Company", RouteProvider.AreaName, data);This will call the GridForPortlet action of the CompanyController.
Portlet settings
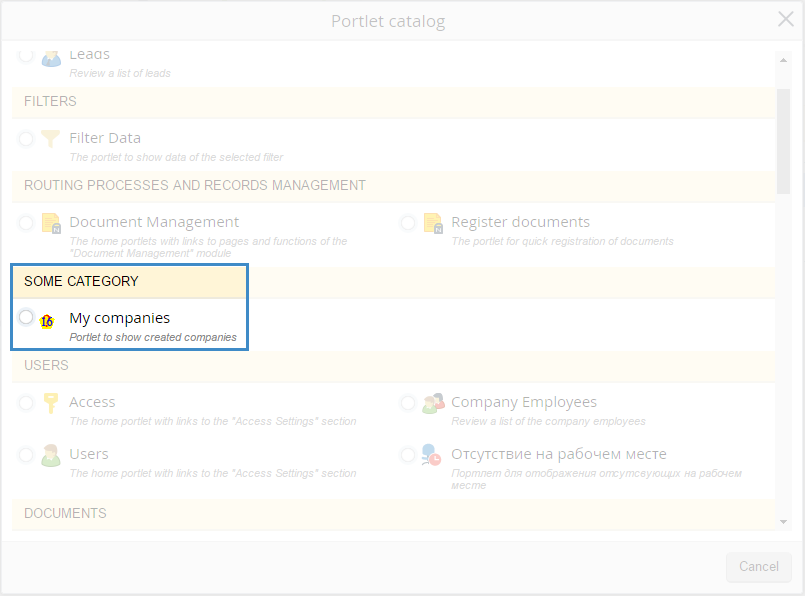
Now we will talk about the portlet settings. Firstly, we need to change the displayed name and description of the portlet. The displayed name depends on the value of the Name property from the CompanyPortlet class. The displayed description depends on the Description property of the same class.
Let’s specify the name and description of the portlet.
         /// <summary>
        /// Portlet description
        /// </summary>
        public override string Description
        {
            get
            {
                return "Portlet to show created companies";
            }
        }

        /// <summary>
        /// Portlet name
        /// </summary>
        public override string Name
        {
            get
            {
                return "My companies";
            }
        }
.png)
Let’s change the portlet icon (displayed in the top-left corner of the portlet). To do that, go to the builder of CompanyPortlet class and change the icon’s path
_profile.ImageUrl = "#x16/Unk16.gif";to
_profile.ImageUrl = "/Modules/EleWise.ELMA.CRMExtension.Web/Content/Images/x16/Contractor.png";![]()
You can also add your own options to the portlet settings. To do that, add the following property to the CompanyPortletPersonalization class:
[EleWise.ELMA.Web.Mvc.Portlets.Personalization(EleWise.ELMA.Web.Mvc.Portlets.PersonalizationScope.User)]
        [System.ComponentModel.Category("Category 2")]
        [EleWise.ELMA.Model.Attributes.DisplayName(typeof(CompanyPortletPersonalization_SR), "P_CustomUserAnotherCategory")]
        public IUser CustomUserAnotherCategory
        {
            get;
            set;
        }
Also, add the following code to the CompanyPortletPersonalization_SR class:
        public static string P_CustomUserAnotherCategory
        {
            get
            {
                return EleWise.ELMA.SR.T("User 2");
            }
        }
These properties determine the displayed name in the portlet’s settings. However, to make sure, that the names will apply to appropriate properties, you need to add the DisplayName attribute and pass the class’s type and the property’s name to the builder (see the code above).
The Category attribute creates a new category of options in the portlet settings. Thus, you can either extend existing categories or create your own ones.
The Personalization attribute determines who can configure this option. This attribute can only have two values:
- User. Each user can adjust the option.
- Shared. This option can only be set for all users.

Let’s override more portlet’s properties:
/// <summary>
       /// Author (company name)
       /// </summary>
       public override string Author
       {
           get { return @"""My company"" Ltd. "; }
       }

       /// <summary>
       /// Category
       /// </summary>
       public override string Category
       {
           get { return SR.T("Some category"); }
       }

       /// <summary>
       /// Module (identifier of the module where the portlet is located)
       /// </summary>
       public override string Module
       {
           get { return "EleWise.ELMA.CRMExtension"; }
       }

       /// <summary>
       /// Website (website of the company that developed the portlet)
       /// </summary>
       public override string WebSite
       {
           get { return "http://mycompany.com"; }
       }
These properties are displayed in Administration – Portal Settings – Portlets:
.png)
If you do not override these properties, the default values will be returned:
- Author: EleWise
- Website: http://www.elma-bpm.com
- Module: full name of the module
- Category: displayed name of the module from txt
To allow adding multiple portlets to the same page, you will need to override the AllowMultipleInstance property:
/// <summary>
       /// Allow to display several instances on the same page
       /// </summary>
       public override bool AllowMultipleInstance
       {
           get
           {
               return true;
           }
       }

ELMA portlets can be displayed in external systems (e.g. MS SharePoint). To do that, you need to override the following properties: AllowGadget и GoodExternalSupported:
/// <summary>
       /// Allow to display in external system
       /// </summary>
       public override bool AllowGadget
       {
           get
           {
               return true;
           }
       }

       /// <summary>
       /// Recommended for external systems
       /// </summary>
       public override bool GoodExternalSupported
       {
           get
           {
               return true;
           }
       }
You can hide any of the portlet options. To do that, you need to override the CanChangeProperty function. The code below hides the My option option (P_Text property of the CompanyPortletPersonalization_SR class):
/// <summary>
       /// Whether you can change a property of the portlet's settings
       /// Used for displaying closing buttons and settings' dialog boxes
       /// </summary>
       /// <param name="portletPersonalization">Personalization</param>
       /// <param name="name"></param>
       /// <param name="path"></param>
       /// <returns></returns>
       public override bool CanChangeProperty (PortletPersonalization portletPersonalization, string name, string path)
       {
           if (name == "Text")
           {
               return false;
           }
           return base.CanChangeProperty(portletPersonalization, name, path);
       }
.png)
You can add a portlet with predefined settings. To do that, you need to override the CreateDefaultSettings function:
/// <summary>
       /// Set default value for an option
       /// </summary>
       /// <returns></returns>
       public override PortletPersonalization CreateDefaultSettings (string path)
       {
           var personalization = base.CreateDefaultSettings(path) as CompanyPortletPersonalization;
           personalization.Text = "Value 1";
           return personalization;
       }
Here, we define the default value for the Text property of the CompanyPortletPersonalization class.

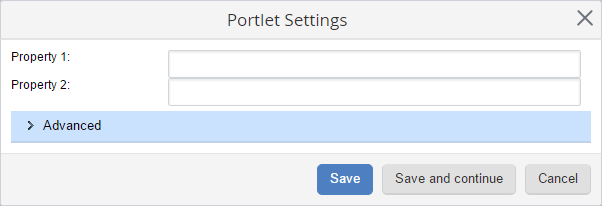
You can also add your own markup to the portlet settings. Firstly, you need to override the Settings function:
/// <summary>
       /// Return the markup of portlet settings' view
       /// </summary>
       /// <param name="html">Html helper</param>
       /// <param name="data"></param>
       /// <param name="path"></param>
       /// <returns></returns>
       public override MvcHtmlString Settings (HtmlHelper html, CompanyPortletPersonalization data, string path)
       {
           return RenderSettingsPartialView(html, "Company/CompanyPortletSettings", data);
       }
Then you need to add a view Views\Company\CompanyPortletSettings.cshtml with custom markup.
Sometimes you might want to add portlet’s properties to this view. To do that, you need to add them to the CompanyPortletPersonalization class. These properties must be marked with the HiddenInput attribute with DisplayValue = false parameter:
[Personalization(PersonalizationScope.User)]
        [HiddenInput(DisplayValue = false)]
        public string Property1
        {
            get;
            set;
        }
Besides, you can add a hyperlink to the portlet’s name. To do that, you need to override the GetNameUrl function. In the code below, this link displays the Index.cshtml view:
/// <summary>
       /// Portlet name's hyperlink
       /// </summary>
       public override string GetNameUrl (UrlHelper urlHelper, CompanyPortletPersonalization data)
       {
           return urlHelper.Action("Index", "Company", new
           {
               area = RouteProvider.AreaName
           });
       }

You can also set this link in the Name hyperlink option of the portlet settings.
Besides, there are two functions in the Portlet base class, that we need to mention – BeforeRender and BeforeEditRender. These functions are executed after the portlet settings are changed and before rendering the portlet’s content. BeforeRender is executed when you change the portlet’s settings from the main page, BeforeEditRender – when you change the portlet’s settings while editing the main page.
You can see an example of using these functions for the Filter portlet (Web\Modules\EleWise.ELMA.BPM.Web.Common\Portlets\FilterPortlet.cs).
If you need to specify your own logic for checking access permissions for the portlet, you will need to override the HasPermission() function of the Portlet class.