Installing and Configuring MS Web Farm Framework
This example involves four virtual machines: controller - VM1, two web servers - VM2; VM3, SQL Server database - VM4. Domain – domain name, UserName – account.
Before you begin.
To make sure that the farm functions, you need to do the following:
1. All the web servers of the farm must be in the same domain;
2. The account on all four VMs must be a domain account with administrator permissions to all the machines. In addition, this account must have access to the SQL server;
3. We recommend disabling firewalls on all the farm machines. At least for the testing and configuration period;
4. Prepare and configure the controller server. It does not have to be a very powerful machine; it serves as a router, that redirects incoming requests. ELMA users will connect to this machine, and it will redirect their requests to the web servers (more powerful machines).
Configuring MSSQLServer 2008 on VM4.
If you have already configured signing in with the sa account, then you can skip steps 1-10.
1. Open to MS SQL 2008 Start -> SQL Server Management Studio.
2. Go to Security -> Logins - sa login, General page.
3. Enter and confirm the password (password used in this example: !Q2w3e4r5t):
.png)
4. Click OK.
5. Open the Server Roles page and check the sysadmin box:
.png)
6. Click OK.
7. Right click on the (local)(SQLServer) pool and select Properties:
.png)
8. Open the Security page and select Windows and SQL Server authentication:
.png)
9. Click OK.
10. Restart MS SQL Server to apply the parameters. There are two ways to do so:
10.1 Open Services, Start->Administrative Tools ->Computer Management ->Services and Applications ->Services, find the MS SQL 2008 click Restart;
10.2 Open the SQL Server configuration manager: Start ->All Programs->MicrosoftSQLServer 2008 R2->Configuration tools ->SQLServer Configuration Manager:
.png)
find the MS SQL 2008 service and Restart it.
11. Try to connect to an SQL server under the sa account:
.png)
12. Create a database, since the farm cannot create one (e.g. ELMA4).
Configuring FastReport.
1. Open the Reporting Services configuration manager Start ->All Programs->Microsoft SQL Server 2008 R2 ->Configuration Tools ->Reporting Services configuration manager.
2. In the opened dialog box, click Connect:
.png)
3. In Web Service URL change the port from 80 to another, e.g. 85:
.png)
4. In Report Manager URL click Advanced and delete the URL address:
.png)
5. Stop the SQL Server Reporting Services. In the SQL Server configuration manager Start ->All Programs->Microsoft SQL Server 2008 R2 ->Configuration Tools ->SQL Server Configuration Manager find SQL Server Reporting Services and click Stop.
Configure FastReport fo all the VMs, where MS SQL Server is installed.
Installing and configuring farm servers.
Install ELMA3 Enterprise on the farm machines: VM2; VM3.
1. Install ELMA3-Enterprise using a new configuration:
.png)
2. Click Next.
Leave the following default settings unchanged.
3. Install on the IIS server; website name: ELMA3-Enterprise; web application pool: ELMA3-Enterprise; website port has to be 80, if it is occupied, unbind it:
.png)
4. After installing ELMA on VM2, VM3 do not start the servers; on each VM, stop the ELMA3-Enterprise site and pool, since it is necessary to configure the server pools and configuration files.
5. Open IIS Manager. Find Default Web Site in the tree. Open the application pool. Select DefaultAppPool and open its Advanced parameters:
5.1. Set the Idle Time-out (minutes) to 0. The default value is 20 minutes. It means, that the application pool will go to the sleeping mode if it is idle (does not receive a request for 20 minutes). By setting the 0 value, you disable this feature.
5.2. Set the Regular Time Interval (minutes) to 0.
.png)
It is necessary to avoid delays and errors that occur in the case of a timeout or an unexpected restart since all the HTTP requests and responses go through an application request routing system.
6. Now you need to select which machine will be Primary. In this case, it is VM2;
7. Go to VM2; on disk C: create a folder and name it ElmaShared, for example;
8. Provide shared access to this folder; right-click on the ElmaShared folder, open its Properties:
.png)
9. Open the ELMA configuration file configuration.config. C:\ELMA3-Enterprise\UserConfig\configuration.config
10. Insert the following lines in it:
<section name="cacheService" type="EleWise.ELMA.Configuration.GenericProviderFeatureSection`1[[EleWise.ELMA.Cache.CacheServiceManager, EleWise.ELMA.SDK]], EleWise.ELMA.SDK" />
<section name="AppFabricProviderSettings" type="EleWise.ELMA.Cache.AppFabric.AppFabricProviderSettings, EleWise.ELMA.Cache.AppFabric"/></configSections>
11. Specify the path to the database:
<connectionStrings>
 <add name="MainDB" connectionString="Data Source=ВМ4;Initial Catalog= ELMA4;User ID=sa;Password=!Q2w3e4r5t;"/>
</connectionStrings>(VM4 is the name of the VM with SQL Server; ELMA4 - database name; ID=sa; Password=!Q2w3e4r5t the SQL log in parameters are as configured in the first section).
12. In the line:
<fileStore defaultProvider="FSProvider">
        <providers>
            <clear/>
            <add name="FSProvider" type="EleWise.ELMA.Runtime.Providers.Impl.FileSystemFileStoreProvider, EleWise.ELMA.SDK" filesPath="\\BM2\ElmaShared\Config\Files" tempFilesPath="\\BM2\ElmaShared\Config\TempFiles"/>
        </providers>
    </fileStore>
specify the path to the network file folder.
13. Then add the sections themselves (copy and paste this code to the file):
<cacheService defaultProvider="AppFabric">
        <providers>
            <clear/>
            <add name="AppFabric" type="EleWise.ELMA.Cache.AppFabric.AppFabricCacheService, EleWise.ELMA.Cache.AppFabric"/>
        </providers>
    </cacheService>
<AppFabricProviderSettings channelOpenTimeout="20000" requestTimeout="10000" dataCacheServiceAccountType="DomainAccount" MainCacheName="ELMA" NHCacheName="ELMA_NH" LockTimeout="30000" LocksRegionName="ELMA_NH_Locks">
        <hosts>
            <host name="127.0.0.1" cachePort="22233"/>
        </hosts>
</AppFabricProviderSettings>(ELMA; ELMA_NH; ELMA_NH_Locks; 22233; - these settings are taken from the cache settings with the AppFabricCacheService. To learn more, read the section Configuring Cache for Primary VM).
14. Save and move this file to C:\ElmaShared\Config
15. In the folder C:\ELMA3-Enterprise\Web find the connection file and specify the path to the configuration file in it:
<?xml version="1.0"?>
<connectionStrings>
    <add name="ConfigurationFile" connectionString="\\ВМ2\ElmaShared\Config\configuration.config"/>
</connectionStrings>
16. Next, provide shared access to the Web folder (as described in step 8) C:\ELMA3-Enterprise\Web
17. Copy the content of the Web folder to the VM3 server, to the folder C:\ELMA3-Enterprise\Web (replacing its content).
Configuring Cache for Primary VM.
On the Primary VM2 install App Fabric 1.1 http://www.microsoft.com/en-us/download/details.aspx?id=27115. App Fabric is used for managing the system cache on each of the servers.
1. After installing AppFabric on the web servers, open Primary VM2, go to Start ->All Programs; AppFabric for Windows Server will appear.
2. Select AppFabric Settings, to start AppFabric Server configuration wizard:
.png)
The wizard includes five steps:
3. At the first step, you can accept or refuse to participate in the software improvement program:
.png)
4. At the second step, leave all the settings by default:
.png)
5. At the third step, configure the caching service. Select Set Caching Service configuration. Specify the following parameters:
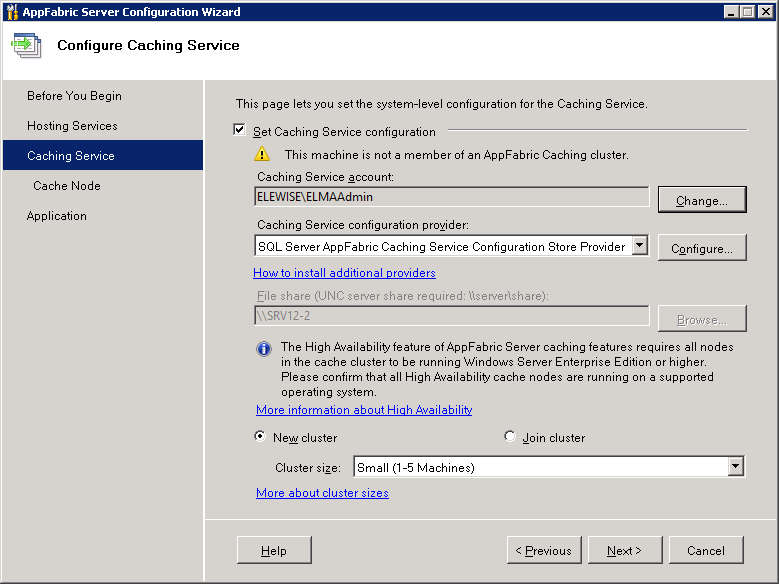
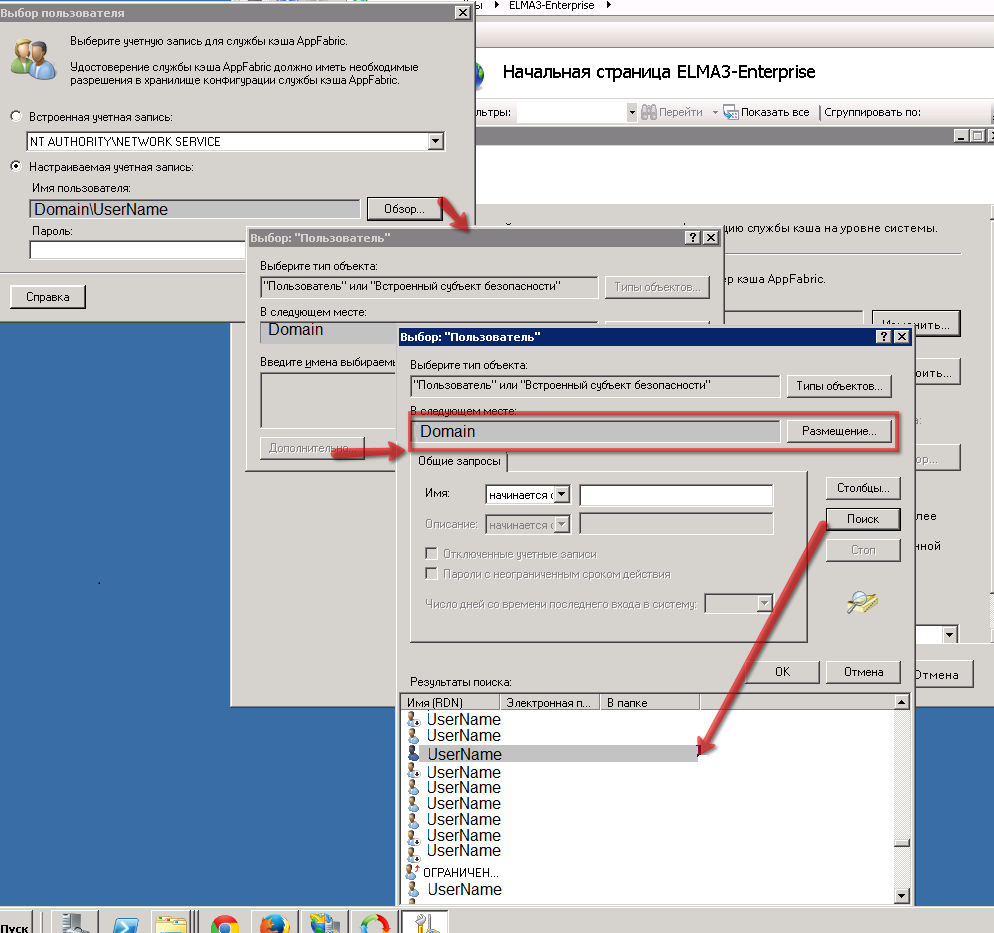
6. Specify a caching service account by click Change: This must be a domain account with administration permissions to all the machines. The account also must have access to the SQL server:
7. In the field Caching Service configuration provider select SQL Server AppFabric Cashing Service Configuration Store Provider.
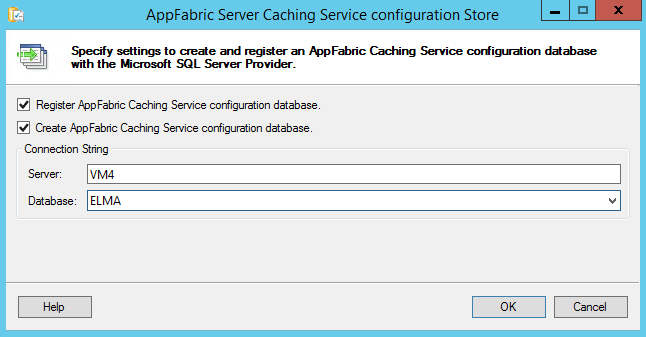
8. Click Configure next to the provider name. The dialog box AppFabric Service Caching Service configuration Store will open. In this dialog box:
- Specify the name of your SQL server (VM name \SQL login) in the Server field (in this case, VM name is VM4, login - (local).
- Specify the name of the database for storing the cache in the Database field (in this case - ELMA, it was specified at step 13 of Installing and Configuring Farm Servers). This is not the database, created for Enterprise, it is a new one, for storing cache!
- Check the box Create AppFabric Caching Service configuration database. It will allow creating a cache database on the Primary server:
9. Select New cluster. In the Cluster size field, select Small (1-5 Machines).
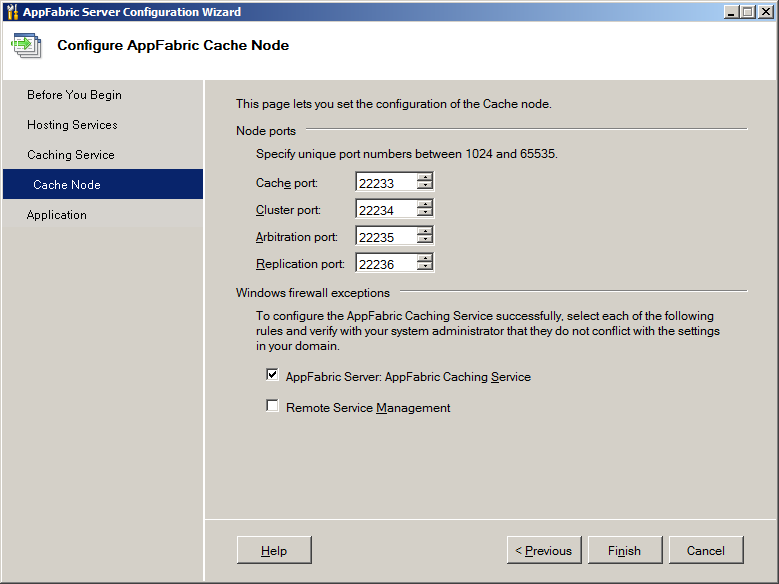
10. At the fourth step of the wizard, specify the cache node ports and firewall parameters. Leave all the settings by default.
11. At the last step, make sure, that the Start IIS Manager box is checked:
.png)
12. Click Finish.
Configuring AppFabric on the other web servers of the farm.
On the VM3 server, install App Fabric 1.1 http://www.microsoft.com/en-us/download/details.aspx?id=27115. App Fabric is used for managing the system cache on the web server. AppFabric settings on the other web servers of the farm are the same as on the Primary server. Start the AppFabric Server wizard: on VM3 go to Start ->All Programs ->AppFabric for Windows Server ->Adding and deleting components.
1. At the first step, refuse to send data to Microsoft.
2. At the second step, leave all the settings by default.
3. At the third step check the box Set caching service configuration.
3.1 Specify the caching service account. It must be a domain account with administrator permissions on all the machines. The account must also have access to the SQL server.
3.2 In the field Caching service configuration provider, select SQL Server AppFabric Cashing Service Configuration Store Provider.
3.3 Click Configure next to the provider name.
3.4 In the opened dialog box, specify the name of your SQL server (VM name / SQL login) in the Server field (in this case, the VM name - VM4, login - (local)).
3.5 Specify the name of the database for storing cache in the Database field. It must be the same name as you specified for the Primary server (in this case - ELMA).
3.6 Uncheck the box Create AppFabric caching service configuration database. The database was created earlier on the Primary farm server:

4. Click OK.
5. Select Join cluster. The cluster was created earlier on the Primary server.
6. At the fourth step of the wizard, leave all the settings by default.
7. At the last step, make sure that the Start IIS Manager box is checked.
8. Click Finish.
Executing PowerShell Commands.
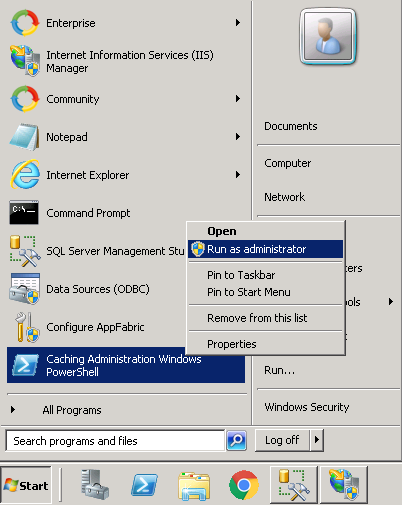
On the Primary server, start the PowerShell console as the administrator: Start ->All Programs ->AppFabric for Windows Server ->Cache Administration Windows PowerShell.
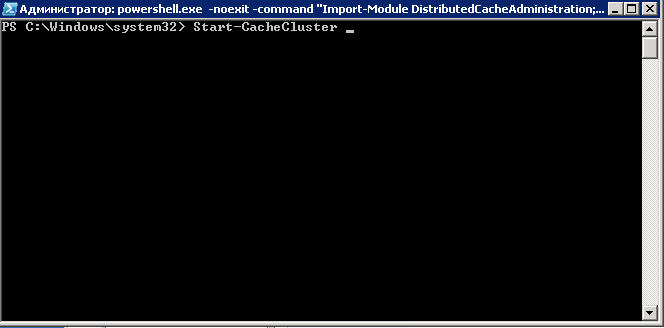
1. In the console, consequently execute the following commands:
1.1 Start-CacheCluster
1.2 Grant-CacheAllowedClientAccount Domain\UserName
1.3 Grant-CacheAllowedClientAccount UserName
1.4 New-Cache ELMA
1.5 New-Cache ELMA_NH
1.6 New-Cache ELMA_NH_Locks :
As the Domain and UserName, specify your domain and a domain username. The commands start caching services and grant the selected user access to the cache.
2. On VM3, start the PowerShell console as the administrator: Start -> All Programs -> AppFabricforWindowsServer -> Cache Administration WindowsPowerShell.
Next, using commands for viewing information, make sure that cache is connected:
2.1 Get-CacheClusterHealth
2.2.Get-Cache -Host
2.3 Get-Cache
Creating a Farm on the Controller Server.
1. Allot a separate machine for the role of controller. Install the following on the machine:
1.1 Application Request Routing (ARR) 2.5 http://www.microsoft.com/web/gallery/install.aspx?appid=ARRv2_5
To show actual IP addresses of users you need to configure additional ARR settings.
1.2 WPI launcher http://www.microsoft.com/WEB/downloads/platform.aspx
1.3 WebPlatformInstaller_3_10_amd64_en-US http://www.microsoft.com/en-us/download/details.aspx?id=6164
1.4 Web Farm Framework 2.2 http://www.microsoft.com/en-us/download/details.aspx?id=27723
2. Open the IIS Manager.
3. Find Default Web Site in the tree.
4. In the application pool, select DefaultAppPool and open its Advanced settings:
a. Set the Idle Time-out (minutes) to 0.
b. Set the Regular Time Interval (minutes) to 0.
.png)
It is necessary to avoid delays or errors that occur in the case of a timeout or an unexpected restart since all the HTTP requests and responses go through the application request routing system.
5. After installing all the programs mentioned at step 1, Server Farm item will appear the IIS Manager tree:
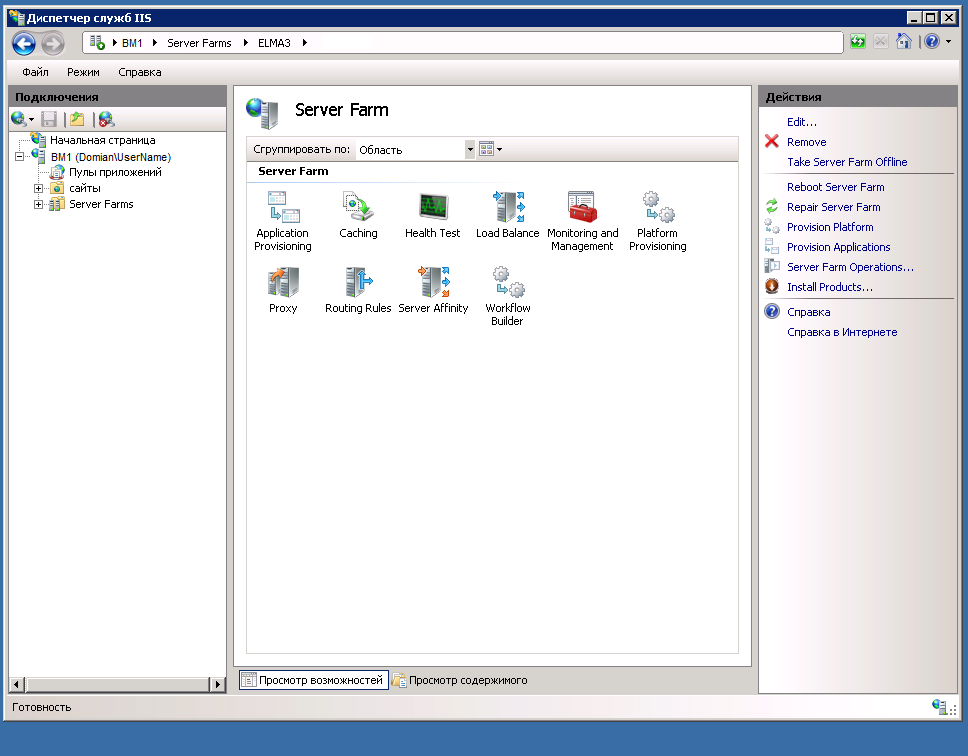
6. Right click on this item to open its context menu. In the context menu, select Create Server Farm.
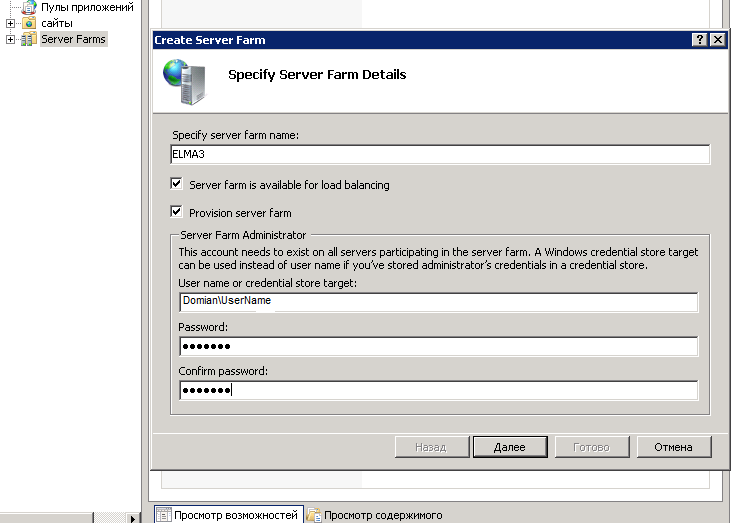
6.1 In the Specify server farm name field, specify the name of the created farm - ELMA3.
6.2 Check the boxes Server farm is available for load balancing and Provision server farm.
6.3. In the User name or credential store target field, specify the domain name and the username to connect under. In the fields Password and Confirm password specify the account's password.
7. Click Next.
7.1 In the field Server name or address specify the Primary server name - VM2.
7.2 Check the Primary Server box.
7.3 Click Finish to create a farm:
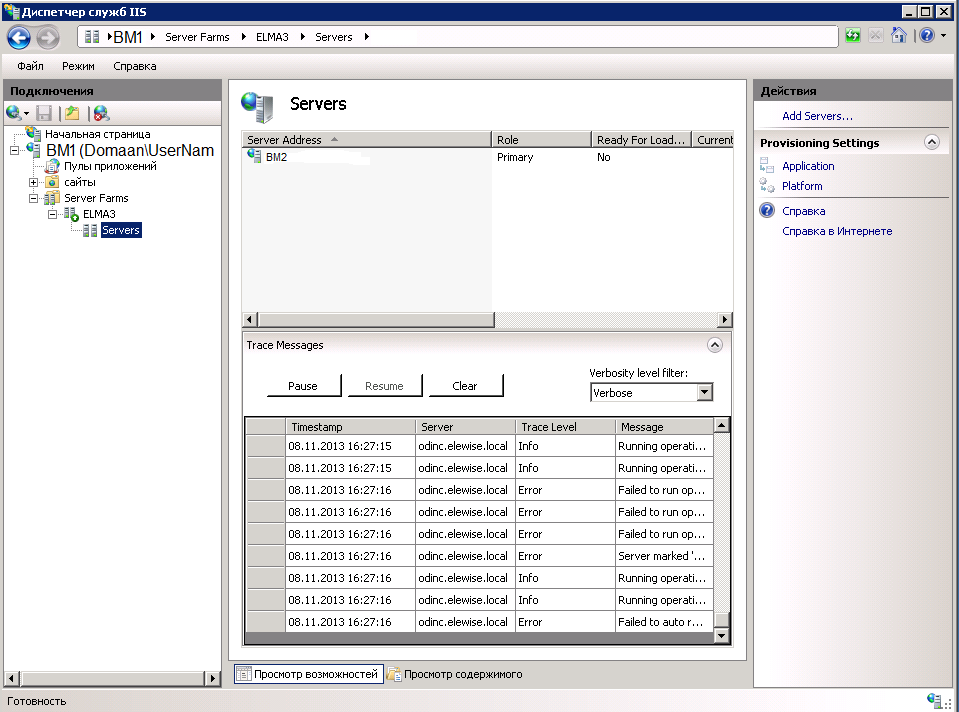
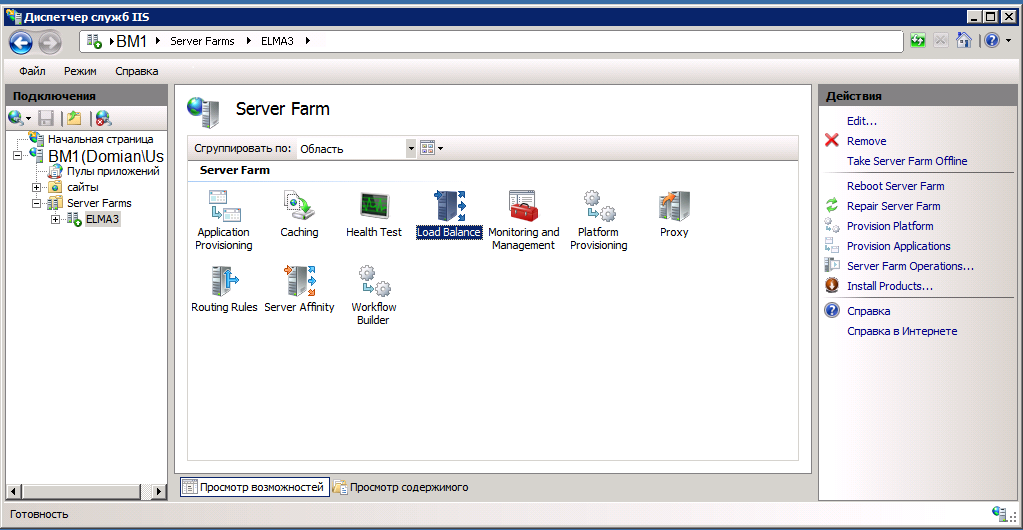
In the IIS Manager tree, under the Server Farm item, a new item will appear - ELMA3. Now you need to configure parameters of the created farm.
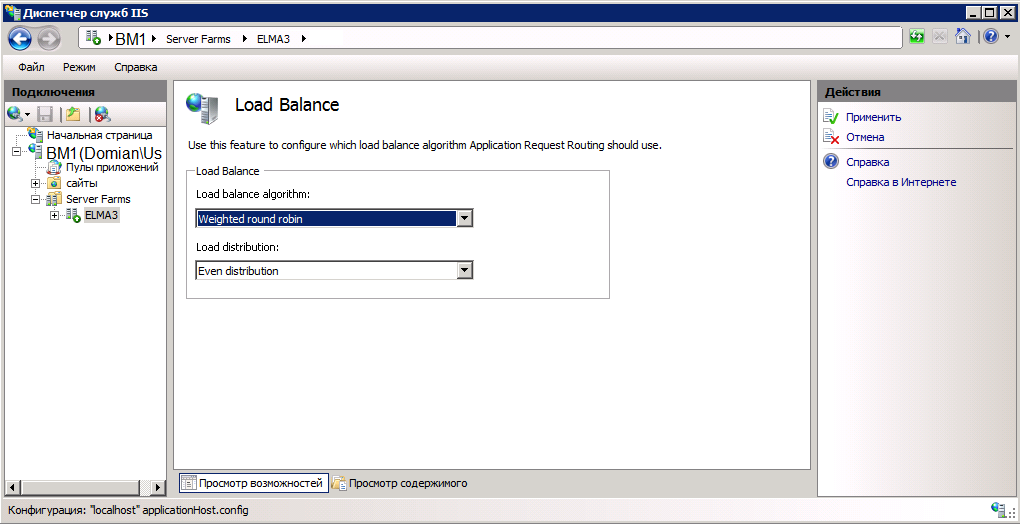
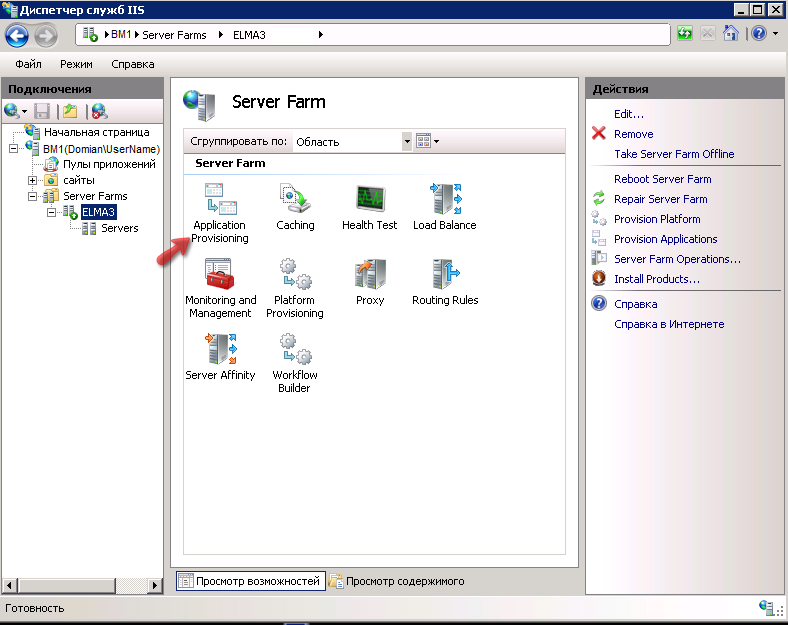
8. Configure load balancing with application request routing. This procedure defines application request routing with an algorithm, that evenly distributes incoming requests between web servers. Click on the name of the created farm (ELMA3), on the Server Farm panel, double-click on Load Balance:
9. On the Load Balance page, select Weighted round robin in the Load Balance algorithm field and click Apply:
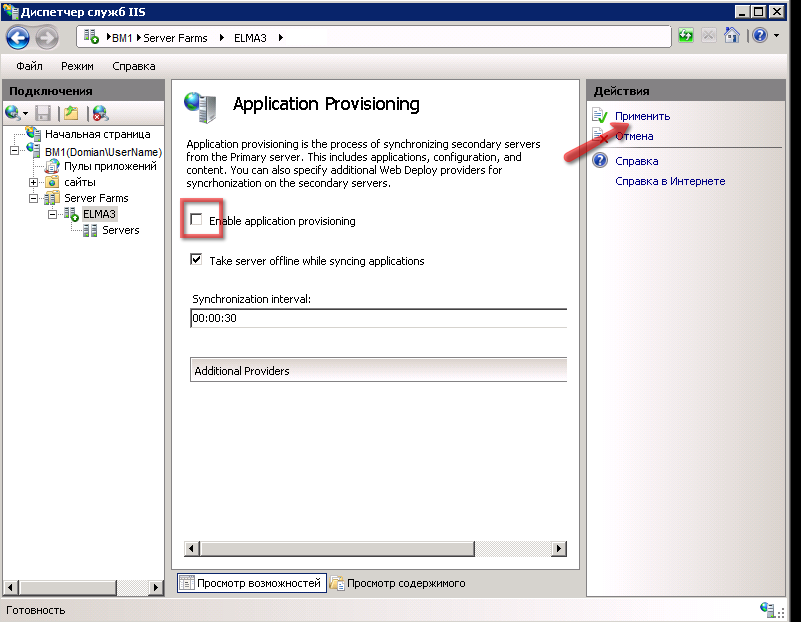
10. Click on the name of the created farm (ELMA3), on the Server Farm panel, double-click on Application Provisioning:
11. Uncheck the Enable application provisioning box. Click Apply:
12. Click on the name of the created farm (ELMA3), on the Server Farm panel, double-click Platform Provisioning:
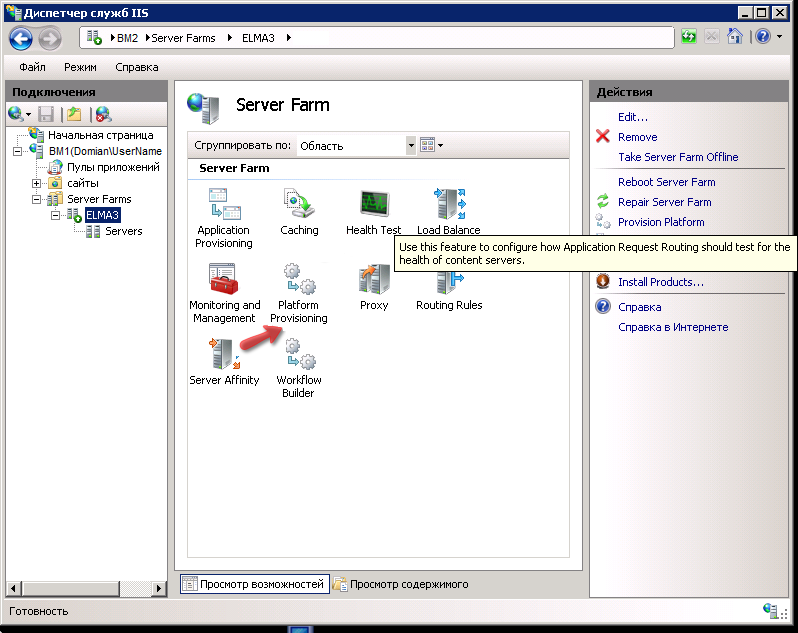
13. Uncheck the Enable platform provisioning box and click Apply.
14. Click on the name of the created farm (ELMA3), on the Server Farm panel, double-click on Health Test:

15. In the URL field, specify a line like this: http://VM1/StartInfoHandler.ashx?type=Availability, where VM1 is the controller name. In the Interval field, specify 5 seconds. In the Time-out field, set 30 seconds. In the Acceptable status codes field, set 200.
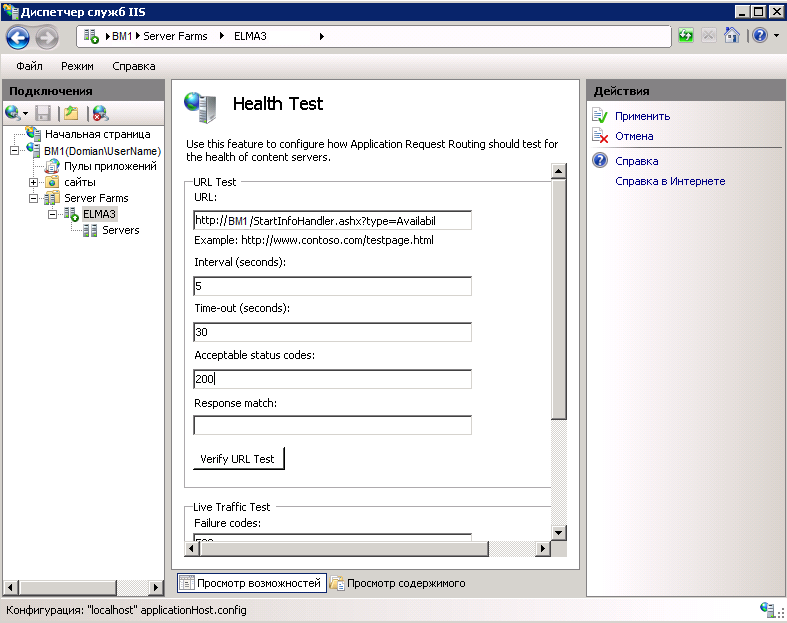
Save the changes by clicking Apply.
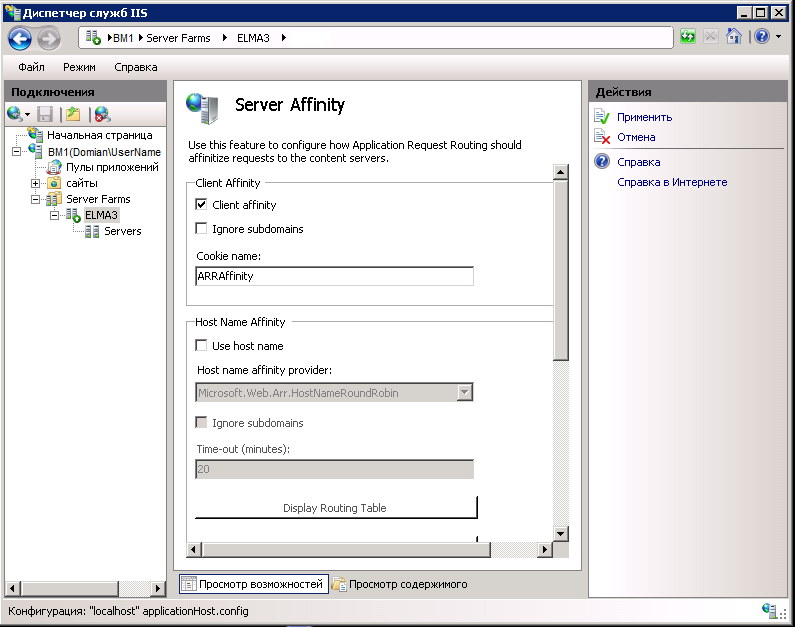
16. Click on the name of the created farm (ELMA3), on the Server Farm panel, double click on Server Affinity. Check the Client Affinity box. Click Apply:
After configuring the settings, add the second farm.
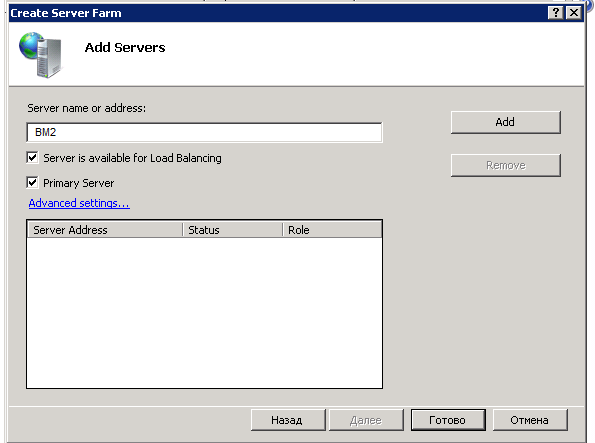
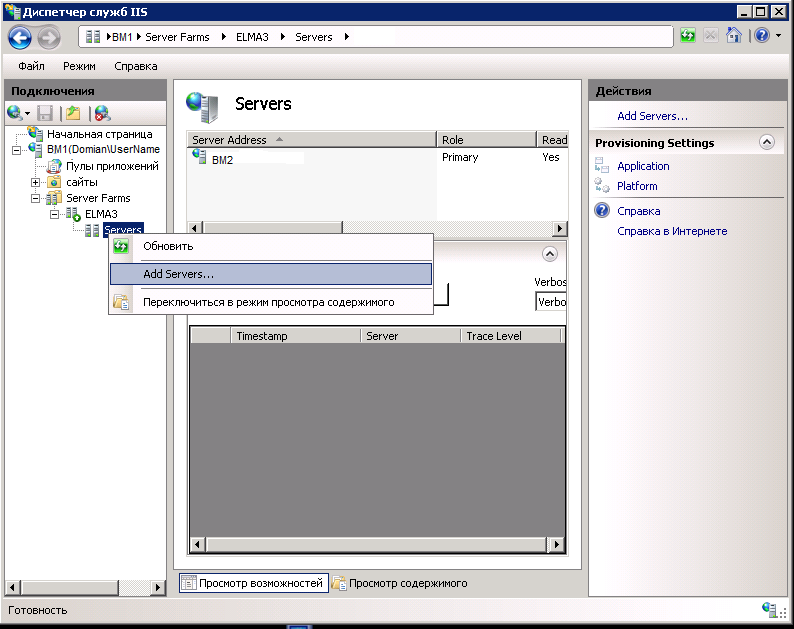
17. In the IIS Manager tree, expand Server Farms ->Farm_Name ->Servers. Right click on the server list. In the context menu, select Add Servers:
18. Enter the name of the added server - VM3:
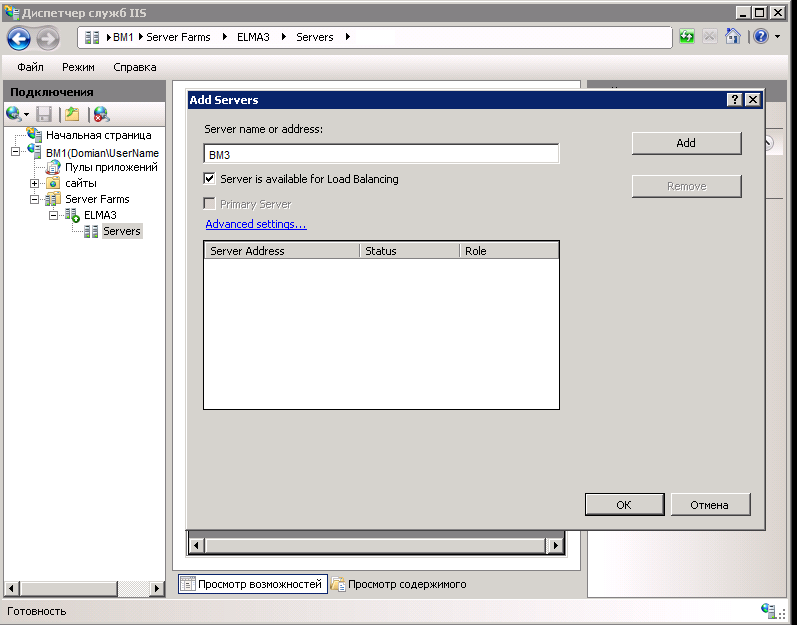
19. Click OK.
Repeat this procedure for all the web servers of the farm.
Starting farms for the first time.
1. Start ELMA-Enterprise site and pool on VM2 and VM3.
2. Check the http://VM1 - controller server; if error 502 occurred, read the article "Possible errors when starting a farm".
3. Once the server is started, stop ELMA-Enterprise site and pool on VM2 and VM3.
4. Go to VM2 and open the folder C:\ElmaShared.
5. Create a Reports folder.
6. Open the folder C:\ElmaShared\Config\WebApplication, WebApplication – it is created automatically when starting farms for the first time. It will contain these files:
.png)
7. Rename web.config.xslt.template to web.config.xslt.
8. Now you need to generate a key.
Follow the link http://aspnetresources.com/tools/machineKey
Click Generate key. Save the generated key.
It may look like this
Open the file C:\Windows\Microsoft.NET\Framework64\v4.0.30319\Config\machine.config
Add the generated key to the file web.config.xslt.
9. Add the following:
9.1. <xsl:template match="/configuration/system.web[not(machineKey)]/trust"> - it defines the computer key, so that it is the same on both servers.
<xsl:template match="/configuration/system.web[not(machineKey)]/trust">
    <xsl:copy>
      <xsl:apply-templates select="node()|@*"/>
    </xsl:copy>
    <machineKey validationKey="C9ABD1186BBB9C9129586CD47F504395D26E7612344C29F895AB23E4BD23D9E24B71DFF3B7BC73A3F81F9C0DC5C8A0A854EE1F00EFD010381C60659165557875" decryptionKey="A5E13EF6BD6F1825B904B60DB9B42A9C2E113DE3124C80055F6FA6B7B2DBE69B" validation="SHA1" decryption="AES" />
</xsl:template><xsl:template match="sessionState">
<!-- Web session storage provider -->
<sessionState mode="SQLServer" sqlConnectionString="data source=BM4;User ID=sa;Password=!Q2w3e4r5t;" cookieless="false" timeout="30"/>
</xsl:template><?xml version="1.0" ?>
<!-- Copy this file to the same folder under the name web.config.xslt, if additional application settings are required -->
<xsl:stylesheet xmlns:xsl="http://www.w3.org/1999/XSL/Transform" version="1.0">
<xsl:output indent="yes" />
<xsl:template match="node()|@*">
<xsl:copy>
<xsl:apply-templates select="node()|@*"/>
</xsl:copy>
</xsl:template>
<xsl:template match="sessionState">
<!-- Web session storage provider -->
<sessionState mode="SQLServer" sqlConnectionString="data source=BM4;User ID=sa;Password=!Q2w3e4r5t;" cookieless="false" timeout="30"/>
</xsl:template>
<xsl:template match="/configuration/system.web[not(machineKey)]/trust">
<xsl:copy>
<xsl:apply-templates select="node()|@*"/>
</xsl:copy>
<machineKey validationKey="C9ABD1186BBB9C9129586CD47F504395D26E7612344C29F895AB23E4BD23D9E24B71DFF3B7BC73A3F81F9C0DC5C8A0A854EE1F00EFD010381C60659165557875" decryptionKey="A5E13EF6BD6F1825B904B60DB9B42A9C2E113DE3124C80055F6FA6B7B2DBE69B" validation="SHA1" decryption="AES" />
</xsl:template>
</xsl:stylesheet>10. Rename settings.config.template to settings.
11. Add the following:
<?xml version="1.0" ?>
<!-- Copy this file to the same folder under the name settings.config, if additional application settings are required -->
<appSettings>
 <!-- Path to the shared folder that stores information about generated reports -->  <add key="FastReportStoragePath" value="\\BM2\ElmaShared\Reports"/>
    <!-- Time, during which the generate report is available (minutes) -->
  <add key="FastReportStorageTimeout" value="10080"/>
  </appSettings>
12. This step is executed on VM4.
12.1 Connect to MS SQL 2008: Start ->SQL Server Management Studio (ВМ4; User ID=sa; Password=!Q2w3e4r5t;").
12.2 Open the file C:\Windows\Microsoft.NET\Framework64\v4.0.30319\InstallSqlState.sql (if Windows is 32-bit, then the folder Framework64, is named Framework).
12.3 Execute the file InstallSqlState.sql.
13. Start ELMA-Enterprise site and pool on VM2 and VM3.
Once both sites http://VM2 and http://VM3 are started, check http://VM1