This activity allows sending one or several document(s) for approval. A task to send a document or a package of documents for approval is created. Its executor is defined according to the swimlane, in which the activity is placed. In the Web Application, you have to select the approvers.
You have to connect this task with the Approval task, using a label or a context variable of the Approval sheet type.
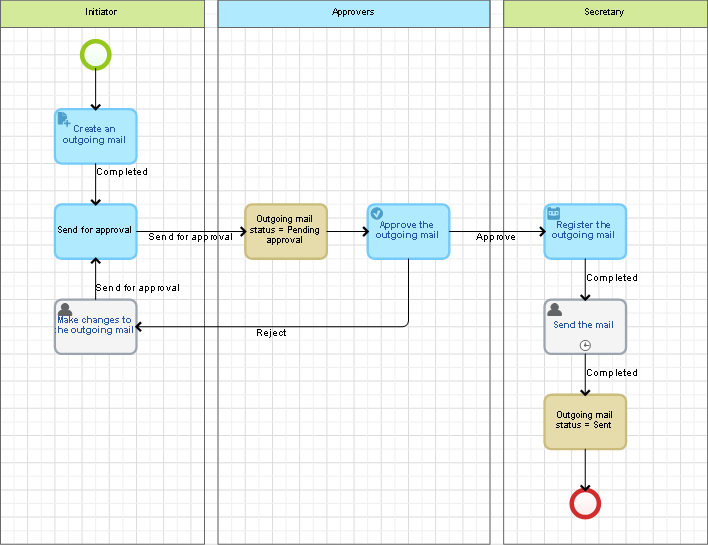
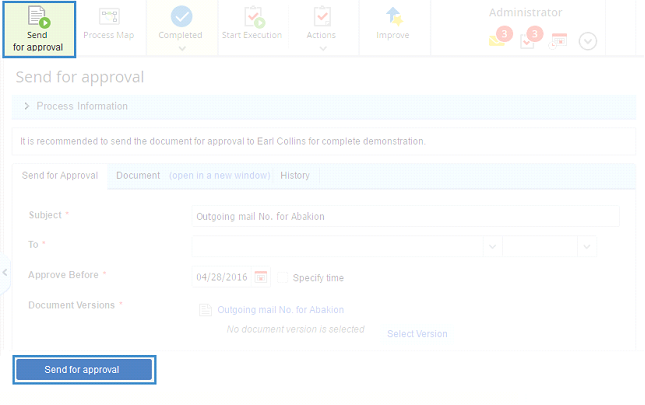
You should place this activity only before the business role swimlane, since only this swimlane does not have a defined list of users. Using this activity before a static or dynamic swimlane is pointless, since the list of approvers is defined by the swimlane. An example of correct use of this activity is shown in fig. 1.
|
|
|
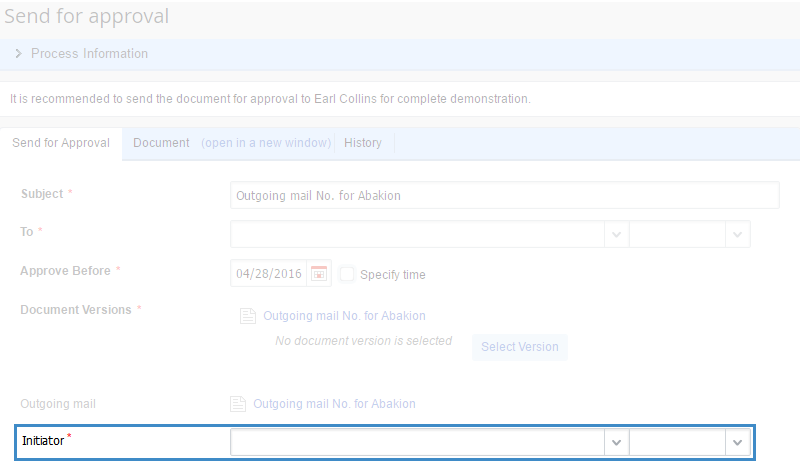
Fig. 1. Send for Approval activity
|
At this step of the process, the user, specified in the current swimlane, receives a task to select the document approvers.
As the result of the activity execution:
-
a list of users, who have to approve the document, is created;
-
a new approval sheet is created, which includes the selected users, unless other settings are configured.
Settings of the Send for Approval activity
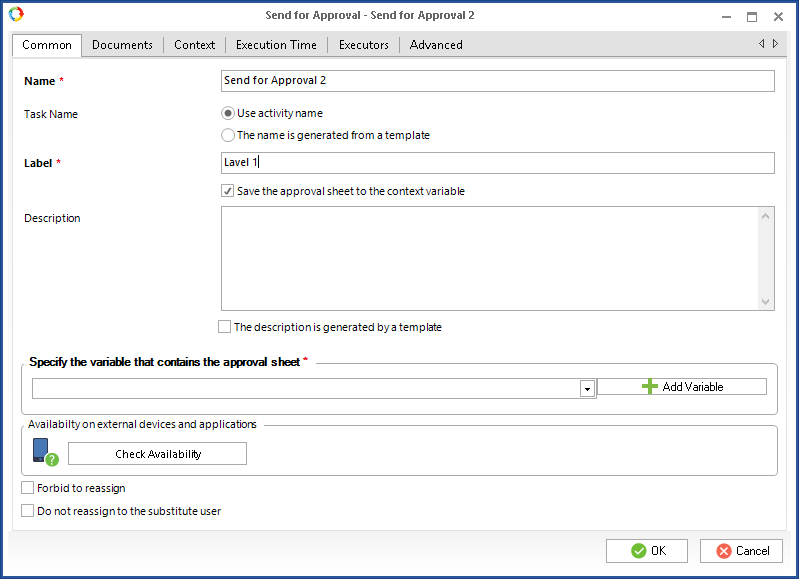
To configure this activity, double click on it on the process graphic model. The page of this activity will open, which consists of the following tabs.
Fig. 2 shows an example of this tab.
|
|
|
Fig. 2. Send for Approval activity. Common tab
|
Task Name – this parameter allows you to select task naming method. The task name is shown in the task list and on the task form in the Web Application.
-
Use operation name – the name of the activity specified in the Name field will be used as the name of the user task;
-
Label – since a process can include several Approval activities, labels are used to connect the Approval activity with the corresponding Send for Approval activity. In this field, you have to enter the name of the label for connecting with the Approval activity. This field is required.
Save the approval sheet to the context variable – allows saving the approval sheet to the context variable of the Approval sheet type with the help of which the Send for approval activity can be connected with the Approval activity. When you check this box, an additional field appears Specify the variable that contains the approval sheet.
Please note that when you check the box Save the approval sheet to the context variable, you can publish only those processes that do not contain the Approval activity. In order to make this process work correctly, there must be an external or internal sub-process that contains the Approval activity with the required settings.
Description – you can add a description of this activity in this field.
Specify the variable that contains the approval sheet – allows selecting a variable of the Approval sheet type in the drop-down list. The approval sheet created while this task was being executed will be saved to this variable. Click Add Variable to create a new variable of the Approval Sheet type in the process context. This field is required and will be displayed only if the box Save the approval sheet to the context variable is checked.
Availability on external devices and applications - this section indicates, whether this activity can be executed via ELMA ECM+ mobile app.
The Forbid to reassign box forbids reassigning the task to another user in Web Application. This setting can be overwritten by the system administrator in Administration – Access Settings – Processes, where access permissions are assigned for each process. If a user has permissions to Reassign Tasks, the Forbid to reassign box is ignored.
The box Do not reassign to substitute user becomes available if the Forbid to reassign box is checked. This settings allows ignoring the substitution settings. The Do not reassign to substitute user option applies only to the current task. For example, if the executor of this task is a user, who is substituted by another user, then the substitution settings will be ignored and the task will be assigned to the substituted user.
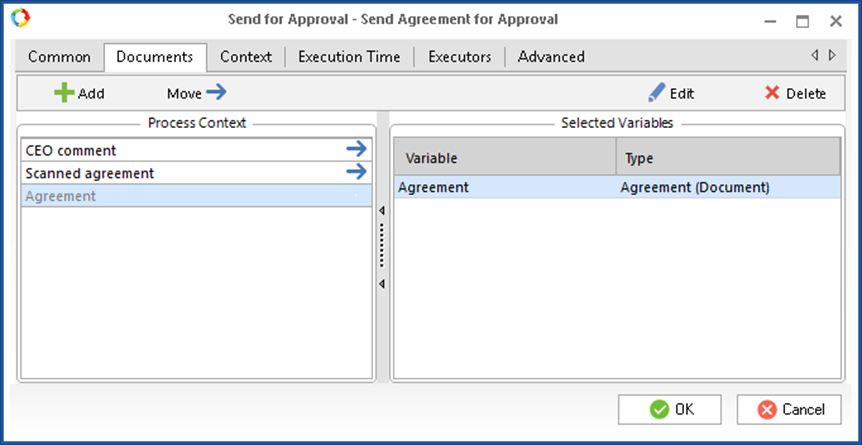
Fig. 3 shows this tab.
|
|
|
Fig. 3. Send for Approval activity. Document tab
|
To move a variable:
-
click  , to the right of the variable name;
-
select the variable in the Process Context part and click Move
You can edit the selected context variable. To do so, click the Edit button. When you click the button, the page of the context variable opens. You can edit only the variables in the Selected Variables unit.
To delete a variable from the Selected Variables unit, click the Delete button.
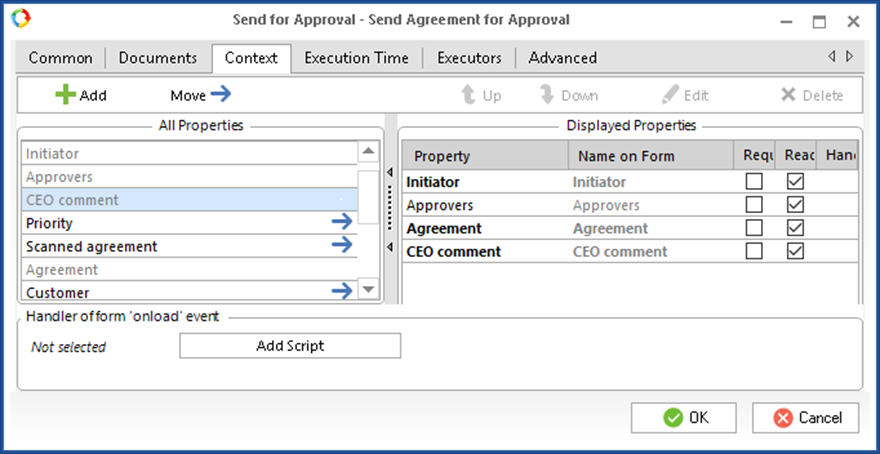
Fig. 4 shows this tab.
|
|
|
Fig. 4. Send for Approval activity. Context tab
|
On this tab, the All Properties side displays all the process context variables. You can add any of the context variables to the form of the send for approval task. To do so, move the required variables to the Displayed Properties side. The variables in this unit will be displayed on the form of the document approval task (fig. 5).
|
|
|
Fig. 5. Context variable, displayed in Web Application
|
There are two ways to move a variable:
-
click the button to the right of the variable name;
-
select the variable in the All Properties unit and click the Move button;
On this tab, you can also create a context variable.
You can edit the selected context variable. To do so, click the Edit button. When you click the button, the page of the context variable opens. You can edit only the variables in the Displayed Variables section.
To move a variable from the Displayed Variables section, click the Delete button.
 ,
,  - these buttons allow you to move the variables in the list. The variables will be displayed in the Web Application in the same order, as in the list.
You can select display options for each variable in the Displayed Properties section:
-
Required field — if this checkbox is selected, you will have to specify the value of this variable in order to send the document for approval. Otherwise it will be impossible to submit a task.
-
Read only — if this box is checked, you will not be able to change the value of the variable in the task form.
Handler of form "On Load" event - here you can specify a script, which will be executed, when loading the task form in the Web Application. To select a script, click Add Script and select one, or click Create.
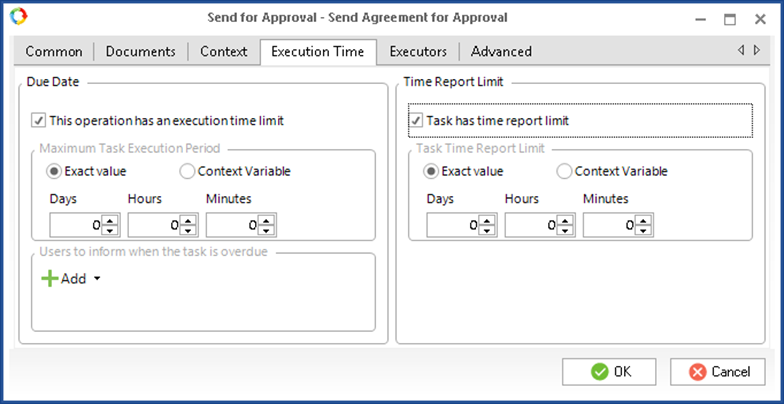
Fig. 6 shows an example of this tab.
|
|
|
Fig. 6. Send for Approval activity. Execution Time tab
|
On this tab you can configure the maximum execution time for the Send for Approval task. To do so, select the checkbox This operation has an execution time limit. The time settings will become active. To learn more about task deadlines, go to the respective Help page.
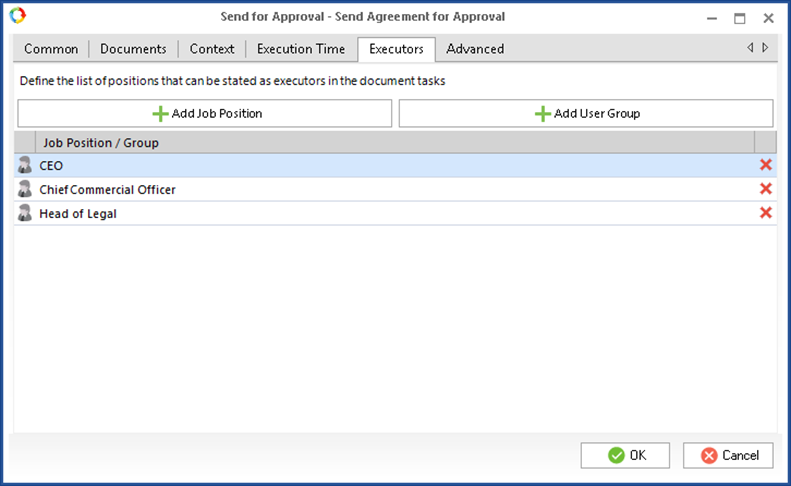
Fig. 7 illustrates an example of this tab.
|
|
|
Fig. 7. Send for Approval activity. Executors tab
|
On this tab, you can limit a number of executors of the document approval task. In the web application, users will be able to select the approvers only from this list. To add users, click Add Job Position or Add User Group and select the required item.
Advanced tab
Fig. 8 shows an example of this tab.
|
|
|
Fig. 8. Send for Approval activity. Advanced tab
|
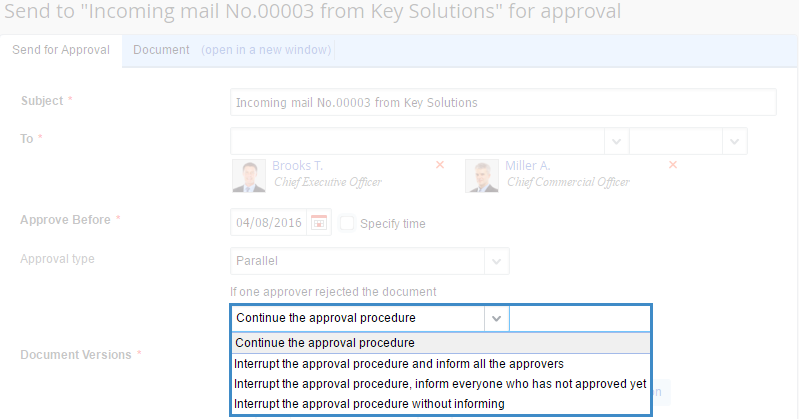
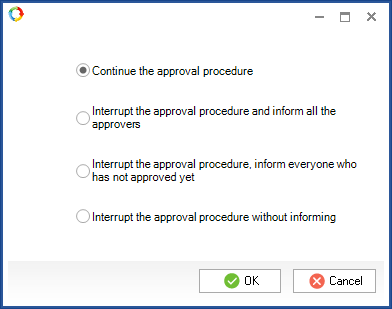
On this tab, you can configure the If one of the approvers rejected the document option. If you select this checkbox, then an additional field will appear on the task form in the Web Application, where users will be able to select a further action, in case one of the approvers rejected the document (fig. 9).
|
|
|
Fig. 9. Send for Approval task in Web Application. If one of the approvers rejected the document option
|
If you do not check this box, you have to select the default action in case one of the approvers rejected the document. To do so, click Change Value and select the required value in the opened dialog box (fig. 10).
|
|
|
Fig. 10. Selecting an action
|
Configuring an outgoing transition from the Send for Approval activity
|
|
|
Fig. 11. Transition from the Send for Approval activity
|
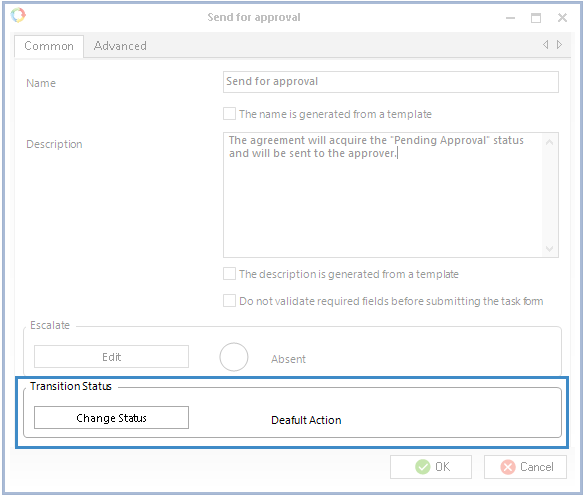
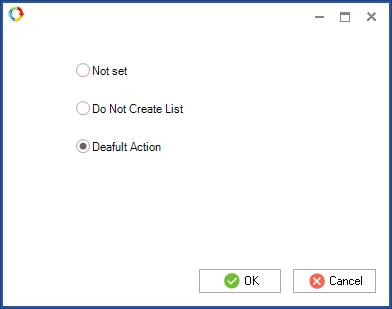
After you click Change Status, a dialog box opens, where you have to select the transition status (fig. 12).
|
|
|
Fig. 12. Selecting the transition status
|
Not Set – no status is selected for the transition. A new approval sheet is created by default.
Do Not Create List - when moving to the next process task, new approval sheet will not be created. The list of approvers will be saved in the current approval sheet. If the document does not have any approval sheets, the process execution will not be possible. Make sure, the document has at least one approval sheet, if you intend to use this option.
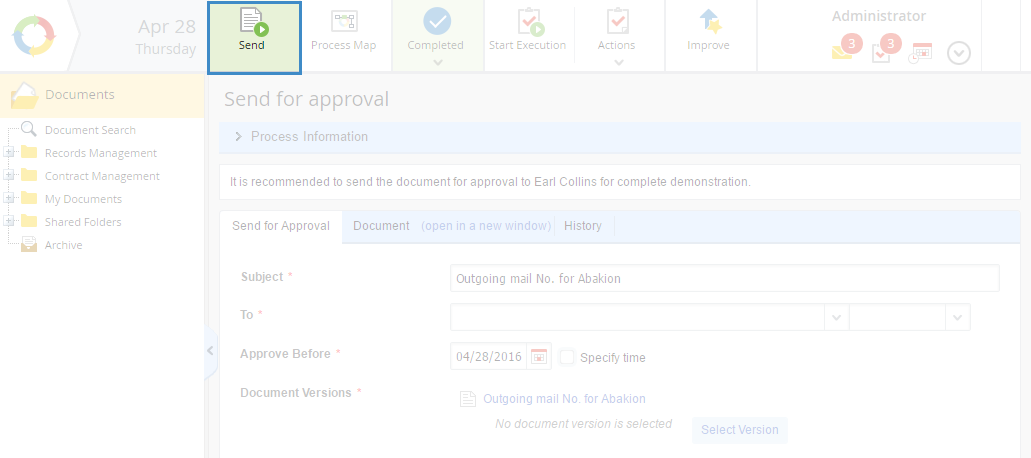
Default Action – if one of the transition has the Default Action status, the Send button is displayed in the Web Application on the send for approval form (fig. 13). When you click on this button, the process will go through the transition with the Default Action status. You can create only one transition with this status. A new approval sheet is created.
|
|
|
Fig. 13. Send for approval form. Send button
|
Fig. 14. Send for approval task. Transition buttons
Copyright © 2006–2019 ELMA