Digital Signature Settings
Digital signature is a document property that contains information encrypted by means of public-key cryptography. It authenticates the signer and verifies that the document has not been altered since the moment it was signed. A digital signature, authenticating the signatory, can be used instead of a handwritten signature in cases recognized by law.
You can sign document versions in ELMA, only if you have the ECM+ application activated, and settings configured.
The following settings are required for using digital signatures in ELMA:
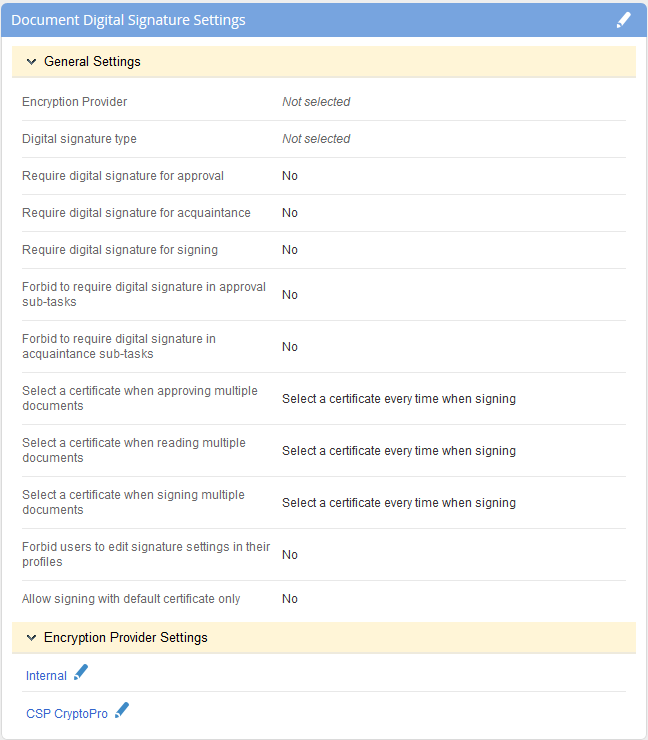
Fig. 1. Administration – System – System Settings. Digital Signature Settings
To edit these settings, click  . In the opened dialog box (fig. 2) make the necessary changes and click Save.
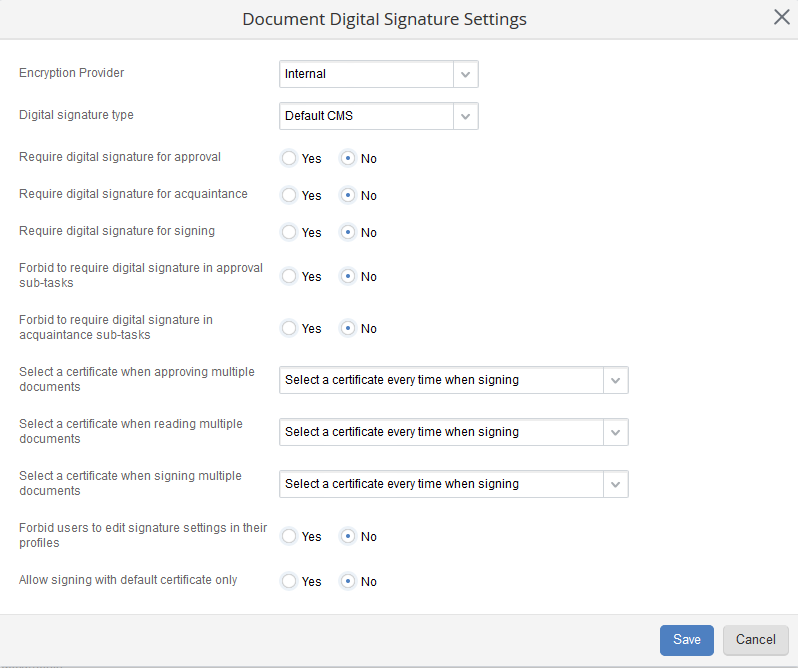
Fig. 2. Dialog box for editing settings
Digital signature type – select a digital signature type from the drop-down list. The list of types depends on the selected encryption provider:
-
Internal encryption provider:
-
-
CSP CryptoPro encryption provider:
-
-
-
Require a digital signature when approving:
-
Yes – the Sign attributes with digital signature box will be checked in the dialog box for approving a document..
-
No – the Sign attributes with digital signature box will be unchecked in the dialog box for approving a document. You can check it and use digital signature, if necessary.
Require a digital signature when getting acquainted:
-
-
No – the Sign attributes with digital signature box will be unchecked in the dialog box for getting acquainted with a document. You can check it and use digital signature, if necessary.
Require a digital signature when signing:
-
Yes – the Sign attributes with digital signature box will be checked in the dialog box for signing a document.
-
No – the Sign attributes with digital signature box will be unchecked in the dialog box for signing a document. You can check it and use digital signature, if necessary.
Forbid requiring Digital Signature in approval subtasks:
-
Yes – the Require Digital Signature option will not be displayed in the dialog box for creating an approval subtask.
-
No – the Require Digital Signature option will be displayed in the dialog box for creating an approval subtask.
Forbid requiring Digital Signature in acquaintance subtasks:
-
Yes – the Require Digital Signature option will not be displayed in the dialog box for creating an acquaintance subtask.
-
No – the Require Digital Signature option will be displayed in the dialog box for creating an acquaintance subtask.
Select a certificate when approving multiple documents:
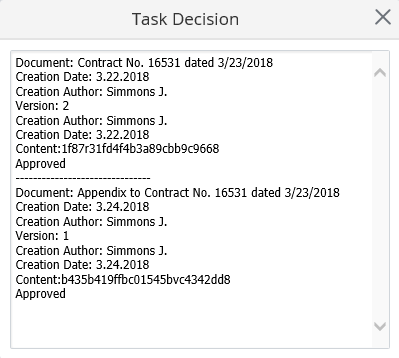
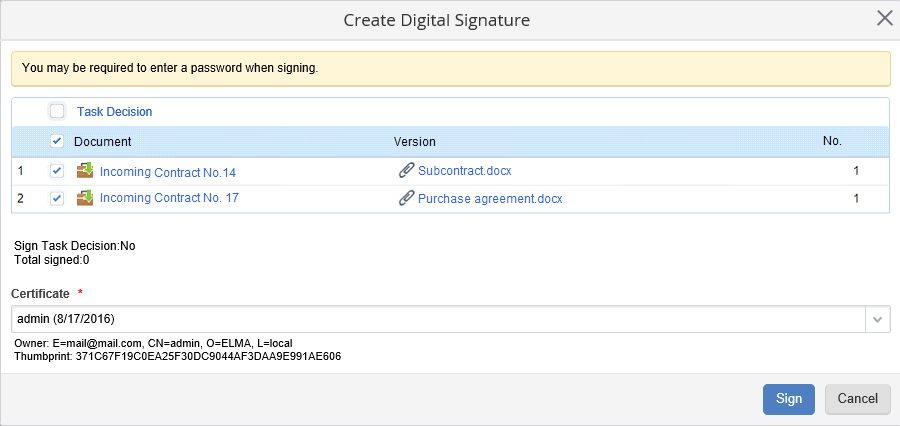
A task decision contains the document signature text (including attributes and decisions on all the documents). To view the decision, click Task Decision in the Create Digital Signature dialog box (fig. 4); the Task Decision dialog box will open (fig. 3).
Fig. 3. Task Decision dialog box
Let's take a look at signing a document package while using different encryption providers.
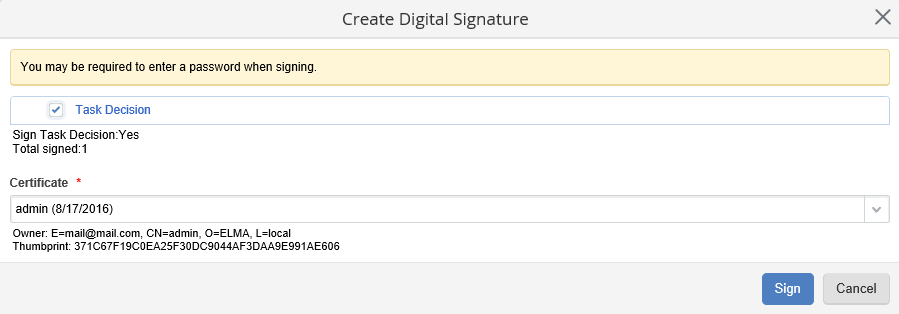
1. Signing a document package using an internal encryption provider (fig. 4).
In the dialog box (fig. 4) select a certificate in the Certificate* field, check the Task Decision box and click Sign. If you uncheck the Task Decision box, the document attributes will not be signed and a digital signature will not be generated.
Fig. 4. Create Digital Signature dialog box
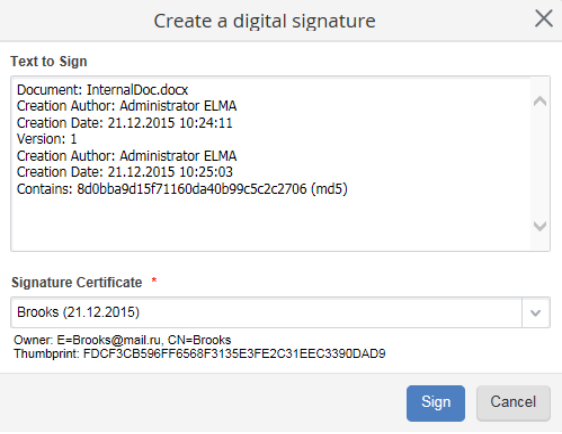
In the dialog box (fig. 5) select a certificate in the Certificate* field, check the boxes of the required files and if necessary, check the Task Decision box. Next, click Sign.
Fig. 5. Create Digital Signature dialog box
If you select this encryption provider, the user will be able to sign version files without a task decision, and sign a task decision without file versions.
Select a certificate when reviewing multiple documents – this option is similar to Select a certificate when approving multiple documents.
Select a certificate when signing multiple documents:
-
Select a certificate once when signing – if you select this option, you will need to select a certificate once in the the Signature Certificate field and click Sign when signing a document package (fig. 6).
Fig. 6. Create Digital Signature dialog box
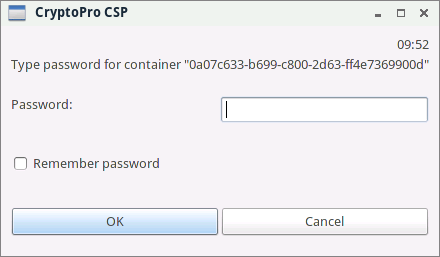
If you use an external encryption provider, a dialog box will open (fig. 7), where you need to enter a password for the container that stores the certificate. This password is set when obtaining the certificate from the Certification Authority.
Fig. 7. CryptoPro CSP dialog box
You can check the Remember Password box, so that it was automatically filled in when signing documents in the future.
-
Select a certificate every time when signing – if you select this option, you will need to sign each document in a document package separately, by selecting a certificate. This option is similar to signing a document package without digital signature. The only difference is the additional dialog box for selecting a certificate (fig. 8).
Fig. 8. Create Digital Signature dialog box
Forbid users to edit signature settings in their profiles:
Allow signing only with the default certificate:
-
-
No – default certificate settings will be unavailable.
Encryption Providers Settings unit
In this unit, you can set up encryption providers for signing documents with Digital Signature. By default, you can configure the following units: Internal and CSP CryptoPro. Note that these units have different settings.
To edit the settings, click  next to the required encryption provider.
Internal Encryption Provider Settings unit
In the opened dialog box (fig. 9), specify the required parameters and click Save.
Fig. 9. Configuring internal encryption provider
Check signature algorithm compatibility:
-
Yes – take into account the certificate generation algorithm when checking it, and compare the selected encryption provider with the encryption provider of the current certificate.
-
No – do not check the certificate generation algorithm and do not compare the selected encryption provider with the encryption provider of the current certificate.
Do not check certificate for existing signatures:
-
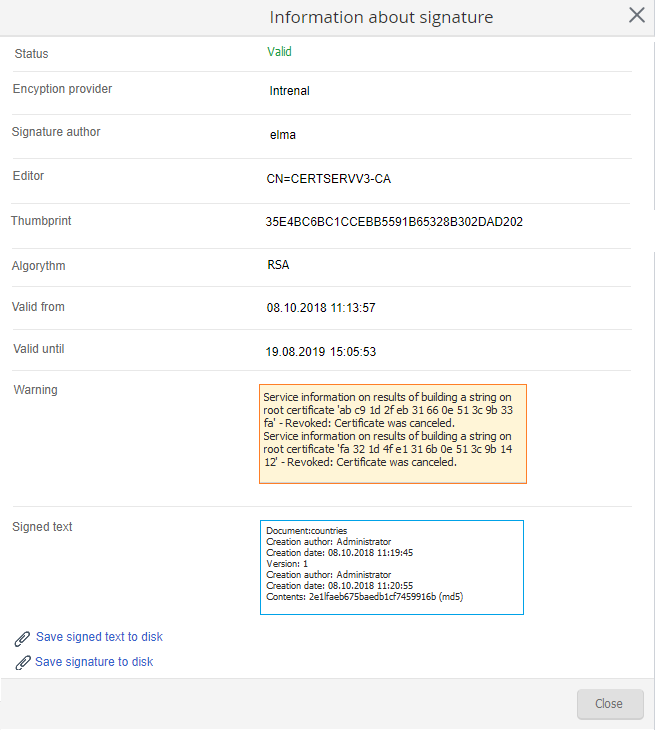
Yes – each time a document page is opened, the validity of digital signature certificate is checked. If the certificate is not valid, for example, is has been revoked, the window with information about the digital signature will feature a warning (fig. 10).
Fig. 10. Information about digital signature
-
No – when a document page is opened, the validity of digital signature certificate is not checked.
Certification authority root certificates:
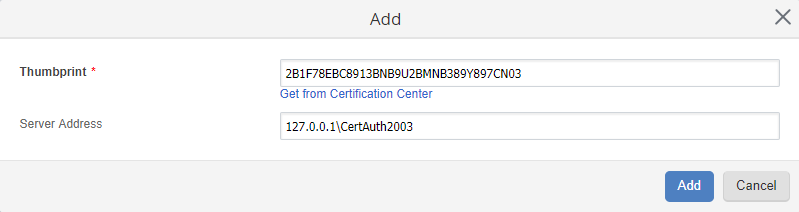
To add a root certificate thumbprint, click Add. A dialog box will open (fig. 11).
Fig. 11. Dialog box for adding a new certificate
Thumbprint* (Authority Key Identifier, SHA-1 hash of a DER-encoded open key) is used for validating user certificates. If the Server Address is specified correctly and available, you can get the Thumbprint automatically, by clicking Get from Certification Center.
The certification authority issues and validates open key certificates, provided by the system users. An open key certificate can be used to sign in to ELMA with a certificate and to sign documents with a digital signature.
|
Attention!
If you select a certification authority that checks the open key, then only the certificates verified by this center are considered correct. If you intend to use commercial certificates, then root certificates of third-party certification authorities must be added to the trusted certificates container of the specified certification authority.
If a certification authority is not selected, the user certificate is checked in chain order until the certification authority root certificate, added to the trusted certificates container on the user's computer. The user certificate is verified, if the root certificate of the certification authority that issued the user certificate is added to the trusted certificates container on the user's computer.
|
-
first part - name or IP address of the computer on which the certification authority is installed (fig. 11: "127.0.0.1");
-
second part - certification authority name (fig. 11: "CertAuth2003").
To edit existing thumbprints of the root certificate, click  , to delete –
  .
.
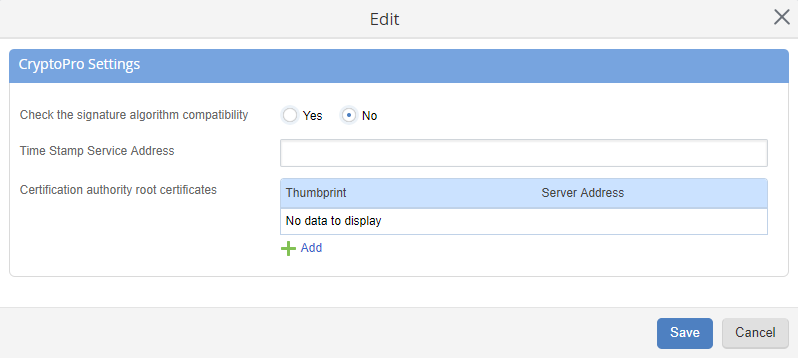
CryptoPro Settings unit
In the opened dialog box (fig. 12), configure the required parameters and click Save.
Fig. 12. CryptoPro settings
Time Stamp Service Address – the address of the time stamp service, used for adding a time stamp to the signed document, which will be used to validate the signature integrity.
See also:
Copyright © 2006–2019 ELMA